How to install CyberPanel? Using a VPS template and manually
CyberPanel provides a graphical interface and various features to streamline Linux virtual private server (VPS) management. However, setting up this web hosting control panel might be tricky for beginners since it might involve commands.
In this article, we will explain how to install CyberPanel on a Linux server in two ways – with a Hostinger’s VPS template and by using commands. Since they differ in difficulty, choose one according to your technical expertise.
The VPS template method is simpler and ideal if you want a command-free installation process. Meanwhile, if you want more flexibility when configuring the platform, using commands might be the right choice for you.
Prerequisites for installing CyberPanel
Before installing, make sure your VPS meets the following CyberPanel system requirements:
- Ubuntu 18.04, Ubuntu 20.04, AlmaLinux 8, AlmaLinux 9, Ubuntu 22.04, or CloudLinux 8.
- At least 10 GB of storage.
- 1 GB of RAM or more.
If you want to use our template for a command-free installation process, purchase Hostinger’s CyberPanel VPS plan. Based on the minimum requirements, KVM 1 that starts at ₱299.00/month should be enough.
In addition to templates enabling easy application installation, Hostinger VPS offers other features that complement CyberPanel functionality.
For example, our automatic malware scanner ensures your server is clean of malicious software. In addition, our free snapshot lets you easily capture your server’s current state for simpler restoration in case of issues.
Moreover, ask our Kodee AI assistant when you need help managing your server. Simply enter simple prompts, and the tool will write commands or provide guidance based on your needs.

How to install CyberPanel using the Hostinger VPS template
Using the Hostinger VPS template to install CyberPanel is a more beginner-friendly option. It is also safer since you won’t run the wrong commands, which can cause errors.
Purchased our CyberPanel hosting?
If you purchased Hostinger’s CyberPanel hosting plan, our system should have automatically picked the CyberPanel template during onboarding. This means you can skip the installation process and directly access the control panel.
Before installing, back up your VPS since setting up a new template will wipe all your data. However, you can skip this step if you use a new empty server.
Once finished, follow these steps to set up CyberPanel:
- Open hPanel and click VPS from the sidebar.
- Click Manage on the VPS you want to install CyberPanel.
- On the VPS overview page, go to the sidebar → OS & Panel → Operating System.
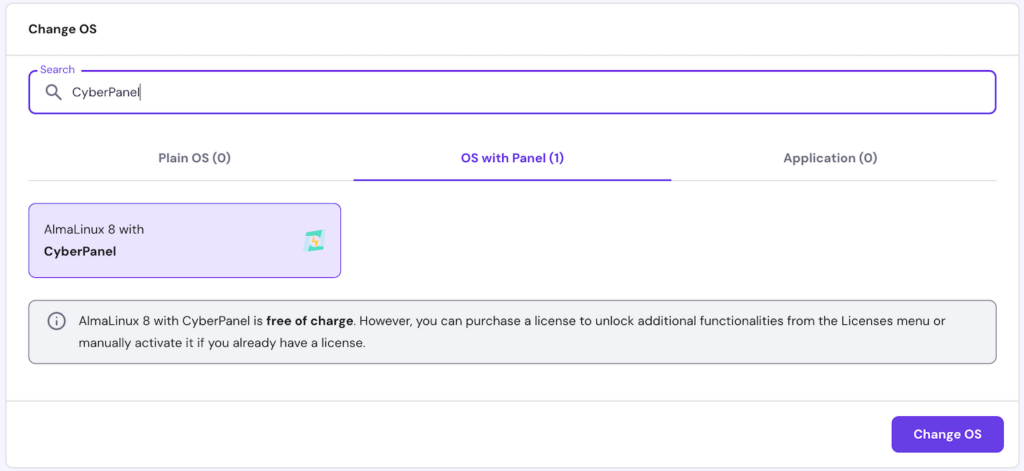
- Go to the OS with Panel tab and select AlmaLinux 8 with CyberPanel. If you can’t find it, look it up using the search bar.
- Click Change OS.
- Check the box to acknowledge the data deletion and hit Next.
- Enter a new CyberPanel admin panel password and click Confirm.
That’s it. Once the installation is complete, access the CyberPanel login page by clicking the Manage Panel button at the top. Then, sign in as admin using the password you created during the setup.

When you access the control panel for the first time, your web browser might warn you of an unsafe site. This is normal because the panel uses a naked IP address without HTTPS. You can ignore the notice and proceed to the login page.
Once logged in, we recommend completing several tasks to ensure your CyberPanel is properly configured. We’ll explain more about this in the last section.
How to install CyberPanel manually
Here’s how to manually install CyberPanel using commands. This method is better if you want more flexibility, such as using another Linux distribution.
1. Access your VPS remotely
To run the installation commands on your VPS, you must access the system remotely via SSH. You can use different applications, such as PuTTY or Terminal.
Regardless of the applications, start by obtaining your server’s IP address and root login credentials. Hostinger users can find these details on the VPS overview page’s SSH access tab.
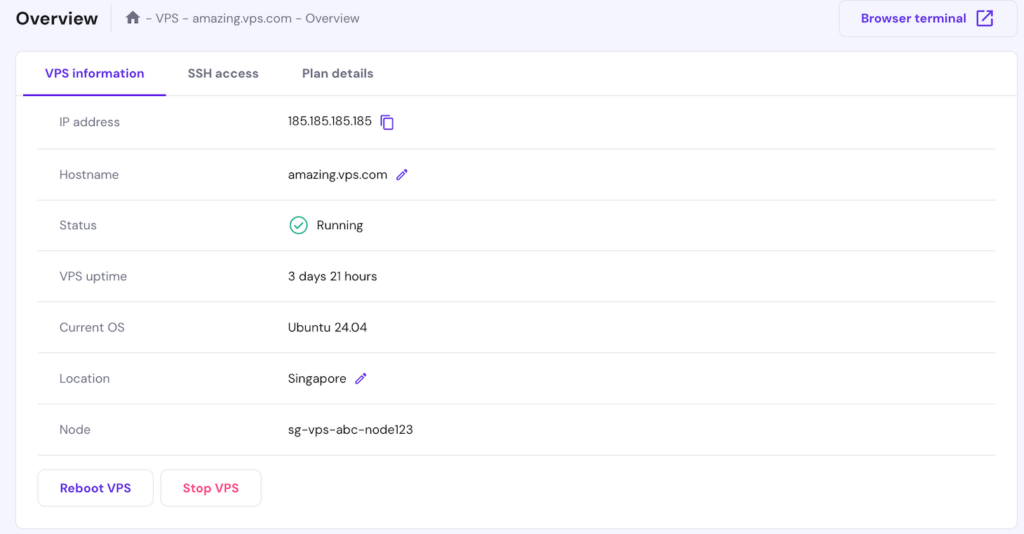
If you use the PuTTY SSH client, enter your VPS IP address and hit Connect. Meanwhile, run the following if you are using Terminal, with 185.185.185.185 being your server’s IP:
ssh root@185.185.185.185
Once connected, enter the root user login credentials. If you can access the server, the command-line interface should change to root@hostname.
Alternatively, Hostinger VPS users can quickly access their server via a web browser using our Browser terminal. Simply click the button on hPanel, and you will log in automatically.
2. Update your system
Before setting up CyberPanel, update server packages to avoid incompatibility issues due to outdated software. The commands for doing so differ depending on your Linux distribution.
If you use Debian-based operating systems like Ubuntu, run the following:
apt update && apt upgrade
For Red Hat Enterprise Linux (RHEL) and its derivates like AlmaLinux, use this command:
dnf check-update && dnf update
3. Download and install CyberPanel
The easiest way to set up CyberPanel is by running the official installation script, which will automatically download and unpack the installer package.
To use the script, simply run the following command:
sh <(curl https://cyberpanel.net/install.sh || wget -O - https://cyberpanel.net/install.sh)
4. Configure the installation
During the installation, CyberPanel will ask a few questions about the configuration. Answer them by selecting the option using the corresponding number or alphabet. Here are the settings in chronological order:
- Select the web server you want to use – the free OpenLiteSpeed or paid LiteSpeed Enterprise. For the enterprise version, enter its license key or TRIAL if you want to use the limited-time demo.
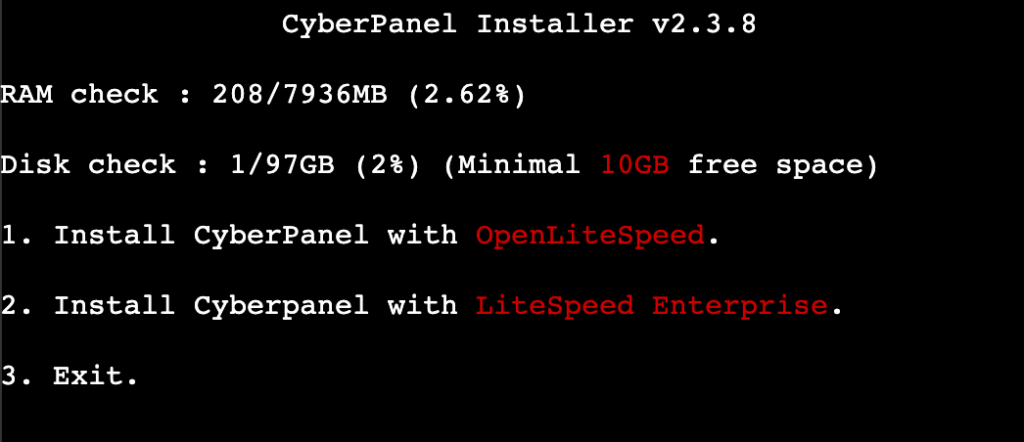
- Choose whether you want to install CyberPanel’s full service. If you only need the control panel, skip their setup by entering N. However, we don’t recommend doing so since it might cause errors.

- Select if you want to install the MySQL database management system remotely or not. Enter N to install the database locally on the same server as CyberPanel.

- Specify the CyberPanel version you want to set up. Hit Enter to install the latest release, which we recommend to avoid bugs and security issues.

- Set your CyberPanel password. You can choose three different ways to do so, but we recommend entering S to set one up manually.

- Choose whether you want to install the Memcached caching system. We recommend setting it up by entering Y.

- Decide if you want to install Redis for caching and in-memory database. Enter Y to proceed with the setup.

- Determine whether you want to install WatchDog kernel monitoring. Enter Y to set it up.

Now, wait until CyberPanel finishes installing all the software. Once completed, you should see a confirmation message with important details about your control panel, like the dashboard URL and admin login credentials. Copy the details and store them in a safe location.
Now, enter Y to restart your server. This enables your VPS to complete any pending process, ensuring CyberPanel is properly configured.
5. Access the CyberPanel dashboard
Access your CyberPanel dashboard by entering your VPS IP address followed by :8090. The URL should look like this:
185.185.185.185:8090
Ignore your web browser’s warning of an untrustworthy site and log in as admin using the password you set during the installation. That’s it. Now, your CyberPanel server is ready.
Important! Under other circumstances, DO NOT ignore your web browser’s warning about untrustworthy sites. Only disregard the message if you are certain the server is trustworthy, like your own VPS.
Configure CyberPanel after installation
After installing CyberPanel on your VPS, complete these several tasks to ensure your control panel works properly and securely.
Finish the setup wizard
After installation, CyberPanel recommends that you finish the setup wizard to create a new website and issue an SSL. Doing so verifies that your setup works properly.

To access the setup wizard, click the top banner on your CyberPanel web interface. Enter a domain for your website and choose whether you want to skip the rDNS/PTR check. Click Start Configurations.
Once the process is completed, click Restart CyberPanel to reboot your system and apply the SSL certificate. To see the new website, go to CyberPanel dashboard’s sidebar → Main → Websites → List Websites.
Create a new website
To create a website in CyberPanel, navigate to the sidebar → Main → Websites → Create Website.
Select the package – a template determining how many server resources the new website will use. You can set up a new one from the Packages menu, but we’ll use the default template.
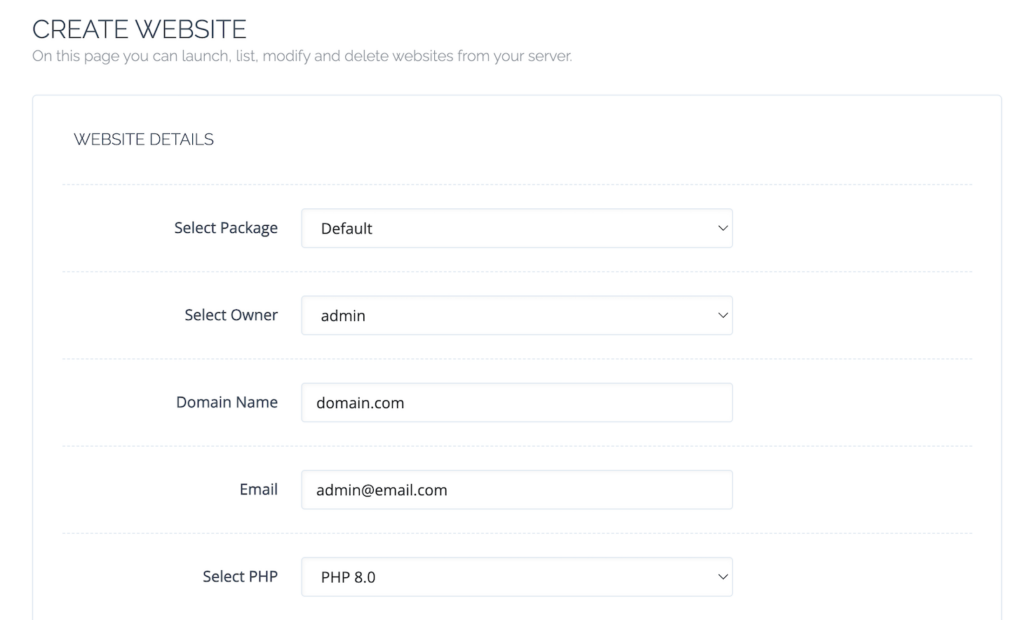
Choose the website owner, which is set to Admin if you haven’t created another user. Enter a domain name, add an administrator email address, and select your preferred PHP version, ideally the newest one.
That’s it. Now, your new website is still blank, and you should populate it with content. Alternatively, you can set up applications like WordPress or Prestashop using CyberPanel’s one-click installer.
To do so, go to List Websites and click Manage on the new website. Scroll down to the Application installer section and choose the platform you want to use.
Set up an SSL certificate
A secure sockets layer (SSL) certificate encrypts the connection between users and your CyberPanel server. You can’t enable HTTPS without it, and your website visitors will get a warning about an untrusted site.
To manually issue an SSL certificate for your website, follow these steps:
- Navigate to your CyberPanel’s sidebar → SSL → Manage SSL.
- Select the website for which you want to issue SSL.
- Click Issue SSL.
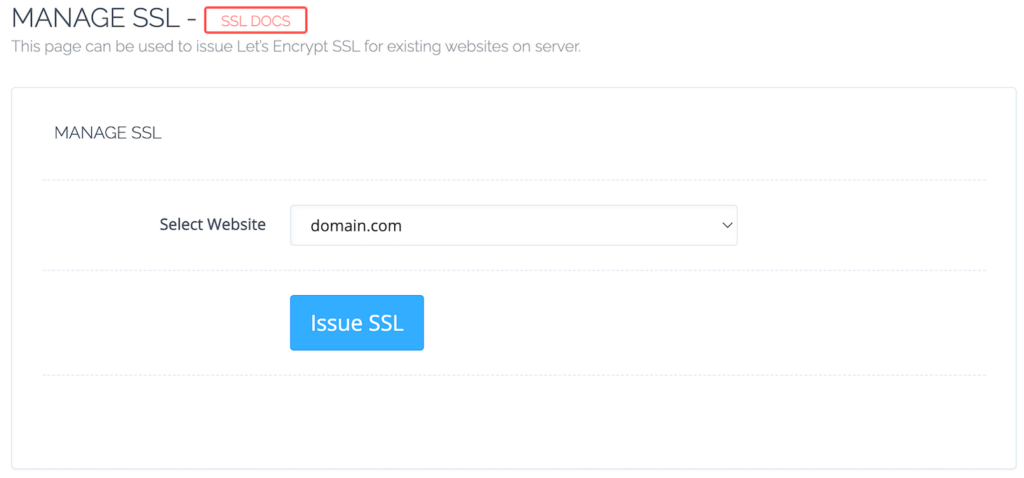
Check if CyberPanel has issued the SSL certificate properly by going to Websites → List Websites → Manage the website in question. You should see the status of your SSL and the time until it expires.
You can also issue SSL certificates for a hostname and mail server by going to their respective menus from the sidebar. To learn more about the steps, check out CyberPanel’s guide on issuing SSL.
Add and manage accounts
CyberPanel lets you add multiple users to manage your VPS and websites. This feature improves team collaboration efficiency and helps agencies manage multiple client sites more easily.
To create a new account, go to the CyberPanel’s sidebar → Main → Users → Create New User. Enter the following information:
- First and Last name – the account owner’s real name.
- Email – the account owner’s mailbox address.
- Access control list (ACL) – the role and permissions of the new account.
- Website limit – the maximum number of websites the account can make.
- Username and password – the current account’s login credentials.
- Security level – the rule determining whether the user can keep their login session using different IPs.
Remember to carefully set the ACL and security level to avoid unauthorized acess and modifications.
After you create a new user, manage it by going to Manage Users and selecting the account. In this menu, an important step is checking the 2FA box to improve security.
Update CyberPanel
Regularly updating your CyberPanel instance ensures you apply the latest security and bug patches. It is important to avoid potential exploits that can harm your server and users.
To update CyberPanel, connect to your server and run the following command:
sh <(curl https://raw.githubusercontent.com/usmannasir/cyberpanel/stable/preUpgrade.sh || wget -O - https://raw.githubusercontent.com/usmannasir/cyberpanel/stable/preUpgrade.sh)
The command will run the update script to download and install the newest patches.
Expert tip
Security exploits can happen anytime to anyone. To minimize the risk, install the latest version of CyberPanel and regularly update it.
If you install CyberPanel using the Hostinger VPS template, you will get the newest version of the control panel. We actively update our templates to make sure you get the latest security patches and bug fixes.
Conclusion
CyberPanel is a VPS control panel that provides a graphical user interface and various features for managing your server. It streamlines system administration tasks because you don’t need to use commands.
The easiest way to install CyberPanel is using Hostinger’s VPS template since you can do so in a few clicks. Simply select the control panel in hPanel’s OS management menu and enter a new admin password.
Alternatively, you can set up CyberPanel manually using commands. To do so, login to your server via SSH and run the installation script. Complete the setup wizard by selecting the add-ons and creating an admin password.
Once installed, access the CyberPanel dashboard by entering your VPS IP address followed by :8090. Then finish the setup wizard, issue an SSL to enable HTTPS, and update the admin account information.
Install CyberPanel FAQ
What is the easiest way to install CyberPanel?
The easiest way to install CyberPanel is using Hostinger’s VPS template since it uses a graphical interface and doesn’t require commands. You can also install the control panel by downloading and running the official setup script, but this method is more technical.
How do I access CyberPanel after installation?
After installation, you can access the CyberPanel dashboard by entering your server IP address followed by :8090 into a web browser. By default, you can log in as admin using the password you set during the set up process.
Can I install WordPress with CyberPanel?
Yes. To install WordPress with CyberPanel, create a blank website. Then, open the new website and click Manage. Scroll down to Application installer and select WordPress + LScache. Once the setup is complete, your site should run on WordPress.


