WooCommerce Checkout: An In-Depth Guide to Maximizing Conversions
WooCommerce allows WordPress users to turn their websites into full-fledged online stores. While the eCommerce plugin provides essential functions to start with, your business’s success relies on the shopping experience. A vital part of the whole experience is the checkout process.
Whether you’re new to WooCommerce or an experienced business owner, this guide will help you create, customize, and optimize your WooCommerce checkout page. We will also cover the best plugins and extensions to improve your checkout experience.
First, let’s explore the benefits of customizing the default WooCommerce checkout page.
What Is a WooCommerce Checkout Page?
A WooCommerce checkout page is where customers finish their online shopping by entering their payment and shipping details. Most stores customize this page to improve user experience and optimize conversions.
Why You Should Customize Your WooCommerce Checkout Page
According to the latest eCommerce statistics, 18% of customers abandon carts due to an overcomplicated checkout process. Tailoring your checkout page accordingly will help minimize this problem.
A custom WooCommerce checkout page reduces cart abandonment rates by addressing common pain points in the checkout process. By improving the overall customer experience, you encourage return visits and repeat purchases, driving up conversion rates and average order value.
Additionally, aligning the checkout page’s design with your branding ensures brand consistency. It helps create a professional impression and build trust, which are crucial factors in converting visitors into paying customers.
Furthermore, adding custom checkout fields streamlines data collection, allowing you to capture customers’ preferences, behaviors, and needs. You can use this information to tailor future offerings and marketing pitches for better targeting.
Like any website customization, one wrong setting can hurt your customer experience. To avoid that, we recommend experimenting with your customizations on a staging website.
A staging website is an identical copy of your live website, allowing you to experiment with customizations without impacting the live version’s functionality.
Hostinger users on WordPress Business and cloud hosting plans can easily set up a WordPress staging environment from the hPanel dashboard. You can also install a staging plugin to streamline the setup process.
Key Elements of the WooCommerce Checkout Page
Your WooCommerce checkout page ideally features these key elements to ensure a smooth checkout experience.
Billing Details
Billing details are crucial for processing payments. Accurate billing information prevents payment issues and delays, which can affect the customer’s satisfaction with their purchase.
Moreover, having this checkout element helps build trust and maintain a great customer experience. Customers need assurance that their payment details are secure and will not be compromised.
Shipping Details
Shipping information impacts items’ delivery timing and method. Clear and concise shipping details reduce delivery errors, ensuring that products reach the customers on time.
Businesses, especially those with a global reach, can boost customer satisfaction by offering varied shipping methods and speeds. This feature accommodates customers’ specific needs, such as rush shipping or international delivery.
Payment Options
Providing various payment options lets you cater to different customer preferences. This element is crucial when appealing to a global audience with diverse payment preferences and services, increasing sales completion rates.
Order Review
This element allows customers to review purchase details, such as items, quantities, prices, discounts, and taxes, before finalizing the transaction. A clear order review reduces errors and enhances customer confidence, ensuring they feel secure about their purchase.
How to Create a Checkout Page in WooCommerce
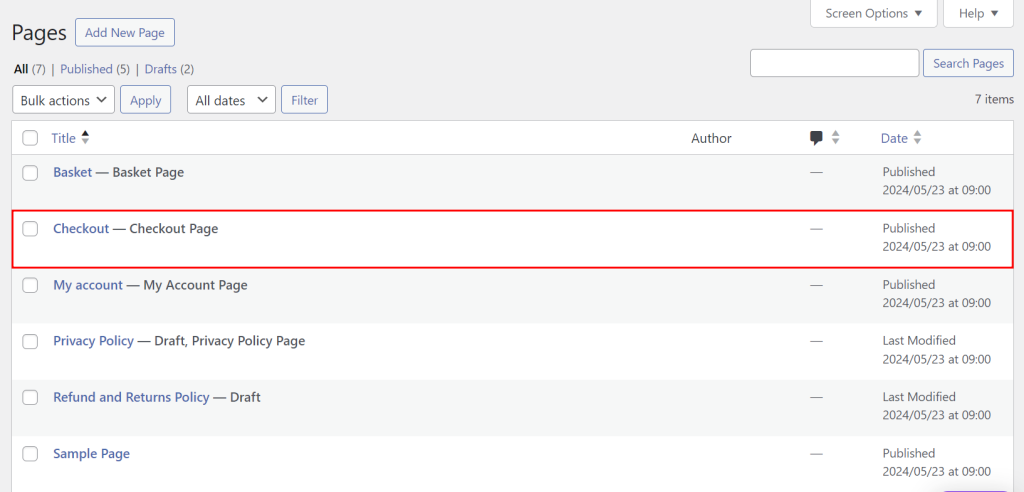
WooCommerce automatically creates a checkout page during the store setup process. You can access it through Pages → All Pages from your admin dashboard.
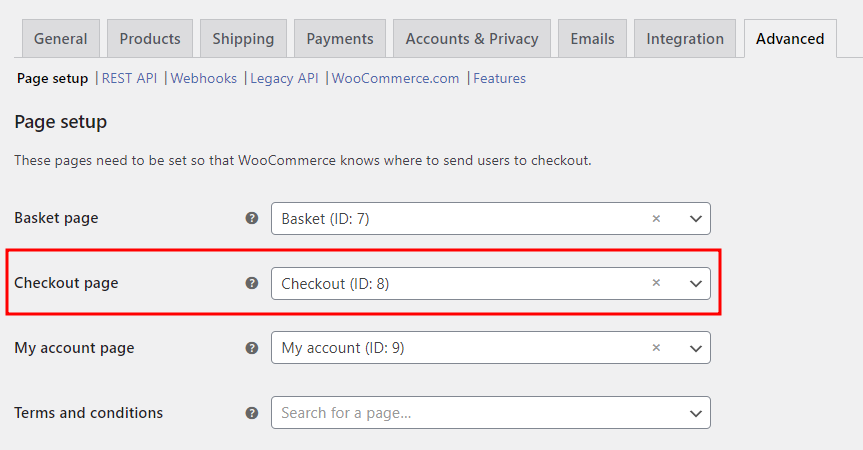
If you want to set up a new checkout page, head to WooCommerce → Settings → Advanced tab and pick a different page from the Checkout dropdown. If you need help, check out our WordPress guide for creating a new page.
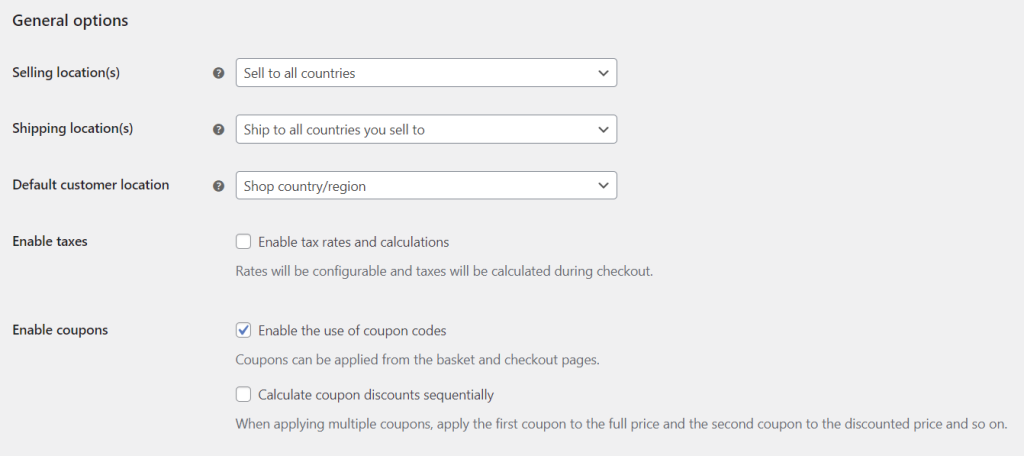
Open the General tab to customize the elements of your checkout page. The General options section controls the locations you sell and ship to and customers’ default location. Here, you can also enable tax payments and coupons during checkout.
Scroll down to Currency options to manage the currency displayed in the product catalog and for payments.
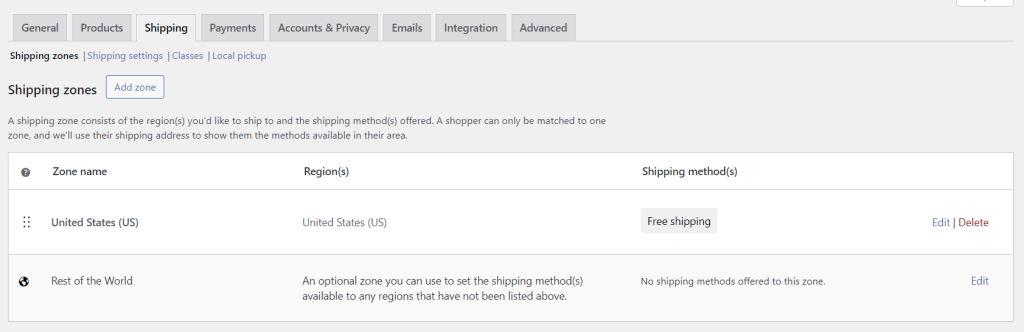
The Shipping tab is where you create shipping zones. Assign shipping methods to regions you’d sell to.
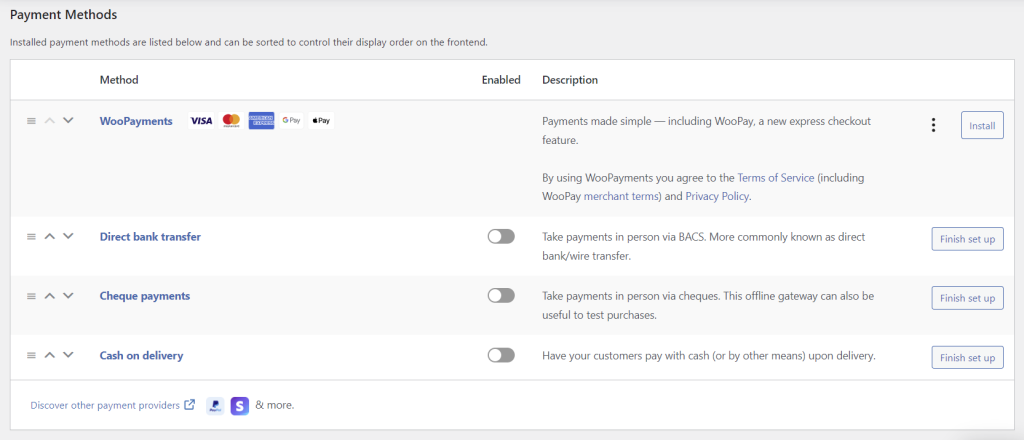
The Payments tab manages your store’s payment methods. Browse our list of top WooCommerce payment gateways if you need help choosing the right one.
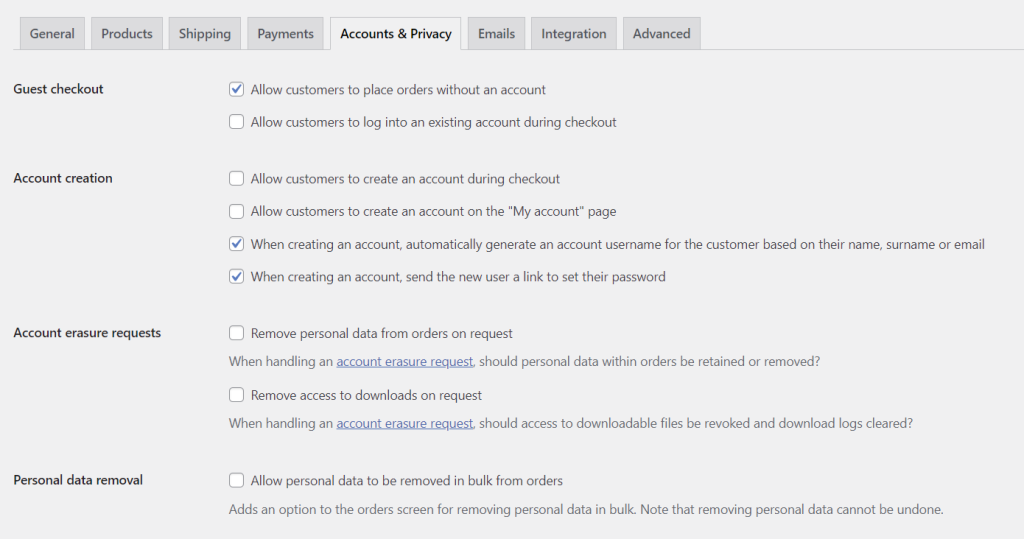
In the Account & Privacy tab, you can configure guest checkout, account creation, and privacy policy.
How to Optimize Your WooCommerce Checkout Page for Conversions
Customizing a WooCommerce checkout page is more than just modifying its format and layout. Here are some tips to improve your checkout experience for better conversions, customer experience, and performance.
Simplify the Checkout Process
A lengthy or complex checkout process often frustrates customers, causing them to abandon their carts. Respect their time by reducing the number of steps and clicks required to complete a transaction. This includes allowing customers to make purchases without creating an account.
For WooCommerce stores with a multi-page checkout, consider simplifying the process to one page for the same reason. If this isn’t feasible, use progress indicators to display the remaining steps or enable signups using email addresses or social media profiles. WooCommerce shortcodes can help achieve these customizations efficiently.
Enabling autofill and validation for billing and shipping addresses further speeds up the checkout process and reduces errors, enhancing customer experience.
Feature a User-friendly Design
Your checkout page should be easy to navigate and have a logical flow. Remove unnecessary elements and links that can distract customers from completing their transactions.
As most people browse on mobile, ensure your checkout layout adjusts to all screen sizes for a consistent experience. Test the checkout process on various mobile devices periodically to identify and fix any issues.
Displaying trust badges helps build trust and brand credibility. They verify supported payment methods and reassure customers that their data security is your top priority.
Analyze Checkout Performance
Track key checkout metrics like cart abandonment rate, conversion rate, and average order value to identify bottlenecks. Conduct regular A/B testing by experimenting with different checkout page designs, layouts, and elements to see what works best for your audience.
Make use of these user behavior insights and customer feedback to personalize the checkout experience, improving customer satisfaction and conversions.
Offer Accessible Support
Offer support options, such as live chat, a knowledge base, or an FAQ section, to help customers with checkout questions or issues.
Additionally, provide easy access to your return and refund policies to reassure customers about their purchase decisions and reduce abandoned carts.
Optimize Checkout Page for Speed
WordPress speed optimization strategies can also enhance your checkout page’s performance.
Switch to Hostinger’s WooCommerce hosting service for hassle-free optimization. Starting at ₱159.00/month, all hosting plans include free CDN and LiteSpeed Cache for faster performance, SSL for secure transactions, and auto-updates for optimal security and compatibility.
Our WordPress.org recommended hosting service also offers a free domain, a one-click WooCommerce setup, daily backups, and a 30-day money-back guarantee for maximum value.
How to Customize WooCommerce Checkout Fields
Having the necessary checkout fields for your business enhances customer experience and simplifies data collection.
For example, eCommerce stores can add a date picker to let customers choose a specific delivery date for their orders. Food and beverage sites benefit from an extra section to record dietary restrictions or preferences. If you’re planning to create a membership website, custom fields make collecting membership details easier.
WooCommerce built-in settings only allow for basic customization. For advanced customization, use a WordPress plugin or modify your theme’s functions.php file.
Using a WordPress Plugin
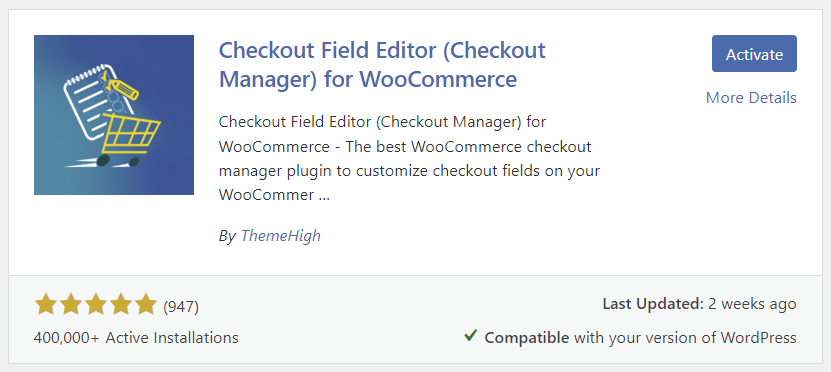
Checkout Field Editor is one of the most popular WordPress plugins for the job. The free version lets you add extra custom fields to your checkout page, reposition or remove default ones, and even set fixed values for address fields.
Other alternatives include Flexible Checkout Fields and WooCommerce Checkout Manager, both also available in a free version.
Here’s how to customize your WooCommerce checkout fields using the Checkout Field Editor plugin:
- Install and activate Checkout Field Editor. If you can’t do it from the plugin directory, check our WordPress plugin installation guide for alternative methods.
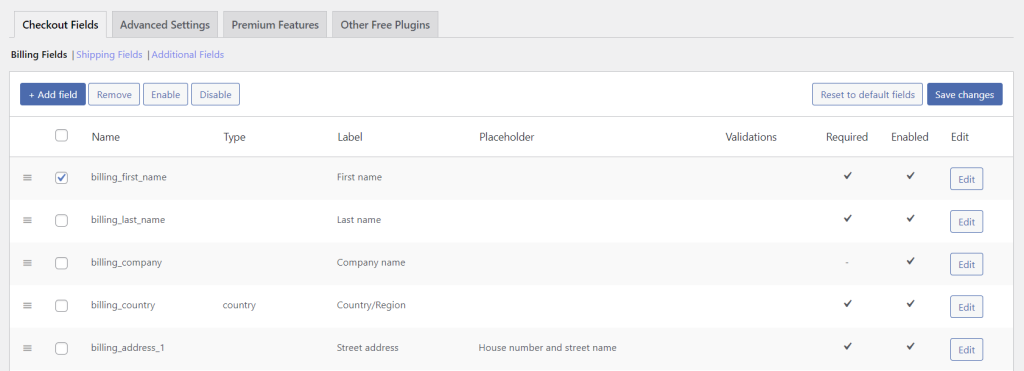
- Go to WooCommerce → Checkout Form from your admin dashboard.
- Manage billing, shipping, and additional fields inside the Checkout Fields tab. To customize a field, check its box and select Remove, Enable, or Disable. Drag and drop fields to rearrange them, or click Reset to default fields to undo all the changes.
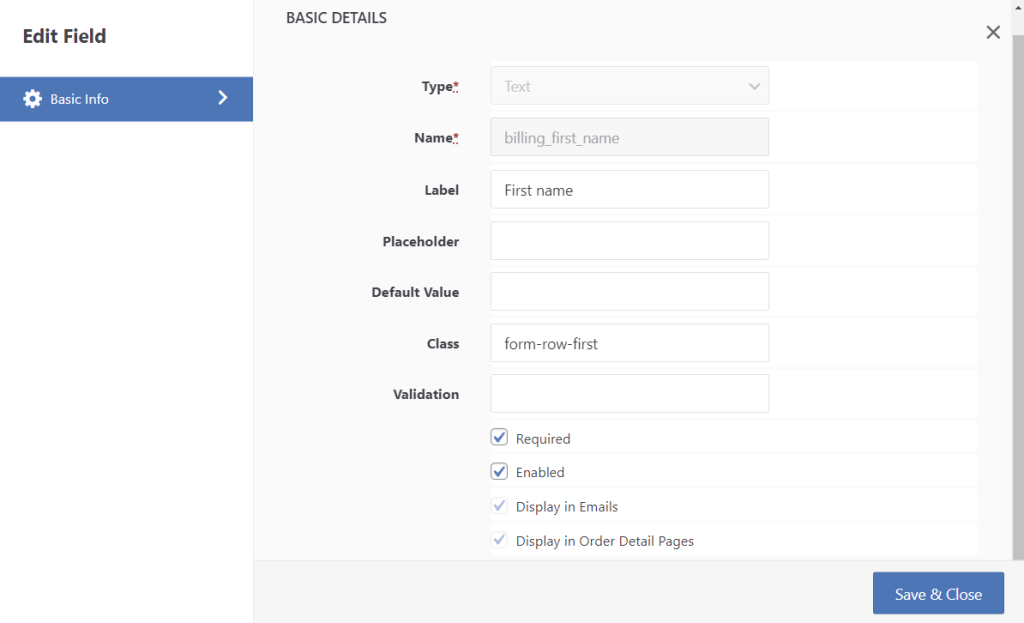
- Click Edit to modify an existing checkout field’s label, validation, and whether it’s required or enabled. Once you’re done, Save and Close the popup form. The same popup form will appear when you click the Add field button.
- Hit Save changes after customizing your checkout fields.
Modifying functions.php File
This method gives you more flexibility in customizing your checkout page than using a plugin. However, it isn’t beginner-friendly due to the advanced technical knowledge required.
After backing up your WordPress site, start editing the functions.php file using your web host’s File Manager or an FTP client like FileZilla. Refer to our functions.php guide if you need help locating the file.
Customizing WooCommerce checkout fields manually requires using actions and filters. WooCommerce loads the fields from the class-wc-countries.php and filters them through woocommerce_billing_fields and woocommerce_shipping_fields.
You can override checkout fields using this hook:
add_filter('woocommerce_checkout_fields', 'custom_override_checkout_fields');.
Here’s an example of its usage to override a custom checkout field’s label:
// Hook in
add_filter( 'woocommerce_checkout_fields' , 'custom_override_checkout_fields' );

// The hooked-in function - $fields is passed through the filter
function custom_override_checkout_fields( $fields ) {
    $fields['order']['order_comments']['placeholder'] = 'New placeholder';
    $fields['order']['order_comments']['label'] = 'New label';
    return $fields;
}
Check the official WooCommerce Developer Documentation for a detailed guide on changing your website’s PHP code.
To retain changes after updates, make sure to add your custom code to the functions.php file in your child theme. If your theme doesn’t come with a child theme, create one yourself with our guide’s help.
How to Change WooCommerce Checkout Page Template
Aesthetically, the easiest way to change a checkout page template is to change the website’s theme. Many excellent WooCommerce themes are available in the WordPress theme directory, WooCommerce Marketplace, and third-party marketplaces like ThemeForest.
If you’re happy with the current design, customize the layout using checkout page builder plugins like CartFlows and FunnelKit Builder or custom code. WooCommerce also provides action hooks in its documentation, which you can use to modify the theme’s template files.
We have a separate guide on customizing a WooCommerce checkout page using these methods.
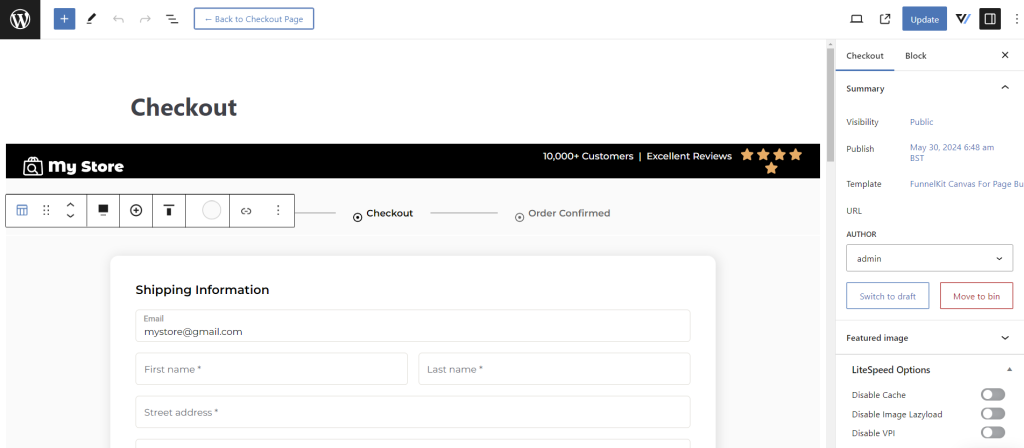
For now, let’s learn how to do it using FunnelKit Builder, a freemium plugin that offers beginner-friendly features:
- Install and activate the FunnelKit Builder plugin.

- Go to FunnelKit → Store Checkout from the admin dashboard, then click Create Store Checkout.
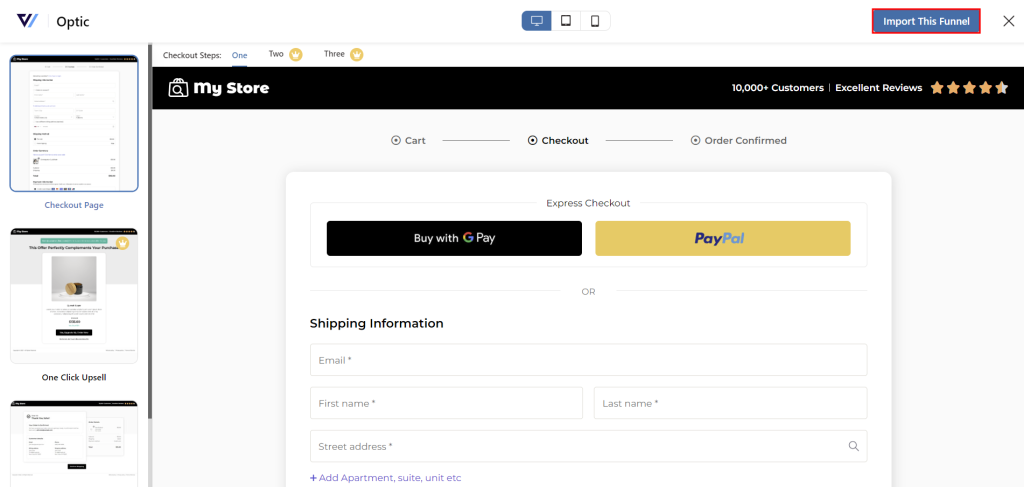
- Filter the template options based on your chosen page builder. Preview the chosen funnel template and click Import This Funnel to implement it. Some elements may be unavailable in the plugin’s free version.
- Preview your checkout page and select Edit Checkout at the top menu bar to modify it.
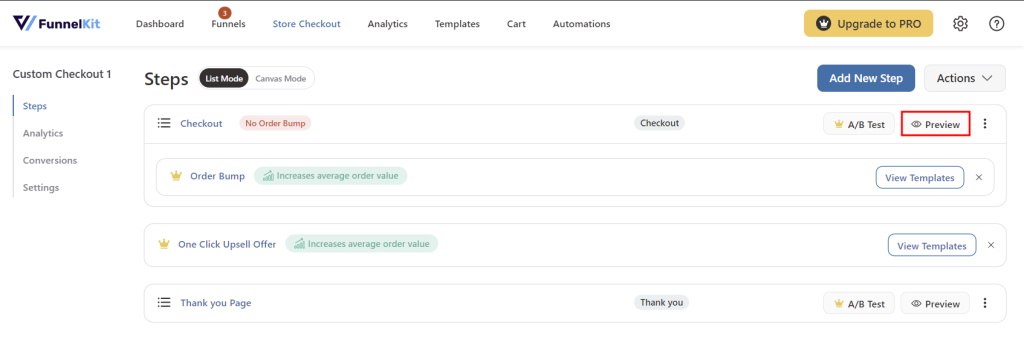
- Make all the necessary changes using the block editor. Once you’re done, hit Update.
How to Create a One-Page WooCommerce Checkout
As mentioned earlier, a one-page checkout page reduces the number of steps and clicks required to finish a transaction. It saves customers time and helps lower cart abandonment rates.
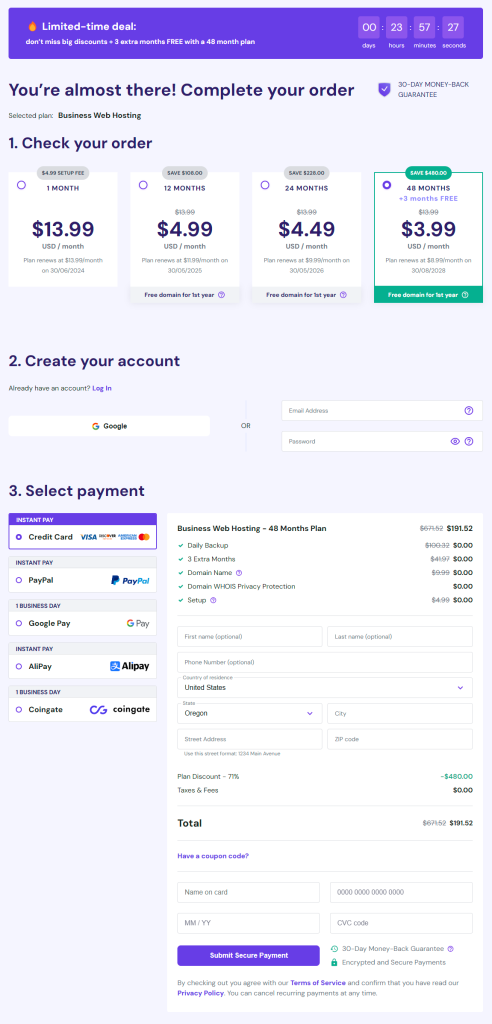
Hostinger, for example, adopts this format by allowing customers to review their orders, make an account, and submit payment details on a single page.
As outlined earlier, many one-page themes and templates can streamline your checkout process. Alternatively, buy the WooCommerce One Page Checkout extension for $79/year to design your checkout flow in various ways.
Here’s how to enable the single-page checkout screen per product using the WooCommerce plugin extension:
- Go to Products → All Products from the admin dashboard.
- Edit a product listing you want to modify.
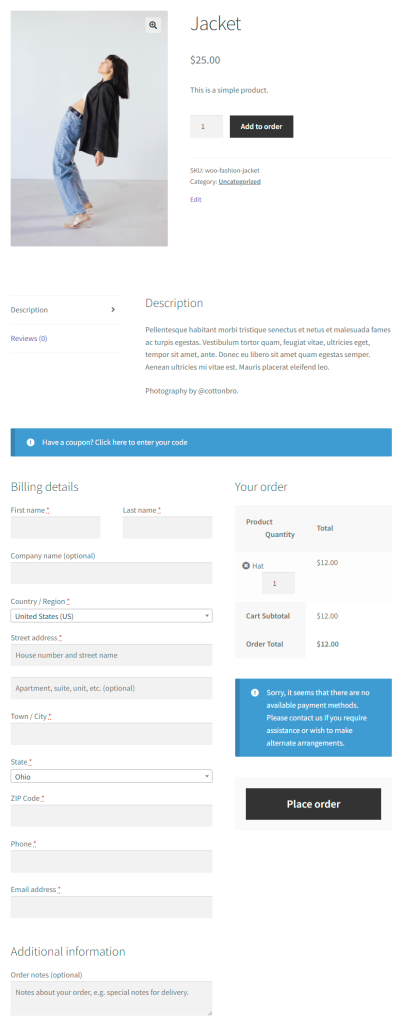
- Scroll down to Product data and check the One Page Checkout box. Hit Update.
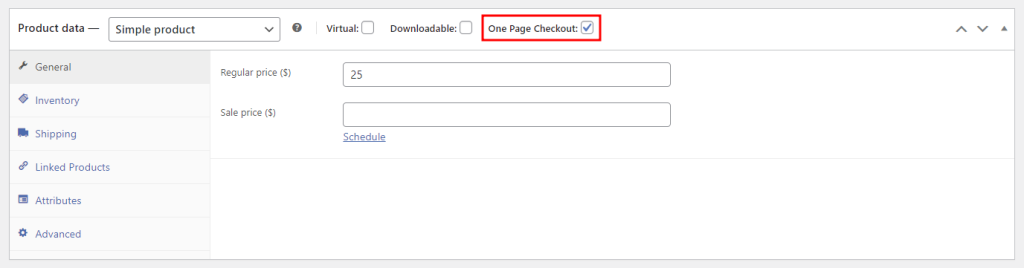
- A checkout form should now appear on the modified product page.
You can also add a checkout form to any page, post, or custom post type using the extension’s shortcode. This method is ideal for promoting products relevant to your content, offering a quick and convenient way for customers to make purchases without browning your store catalog.
Simply add [woocommerce_one_page_checkout] to the chosen page or post’s content using the Shortcode block. Embed the product ID of the item you want to display at the top of the checkout process in the code snippet.
The template attribute indicates the template slug for displaying the checkout process. Pick one of the four built-in templates:
- Product List ‒ product-list
- Product Table ‒ product-table
- Single Product ‒ product-single
- Pricing Table ‒ pricing-table
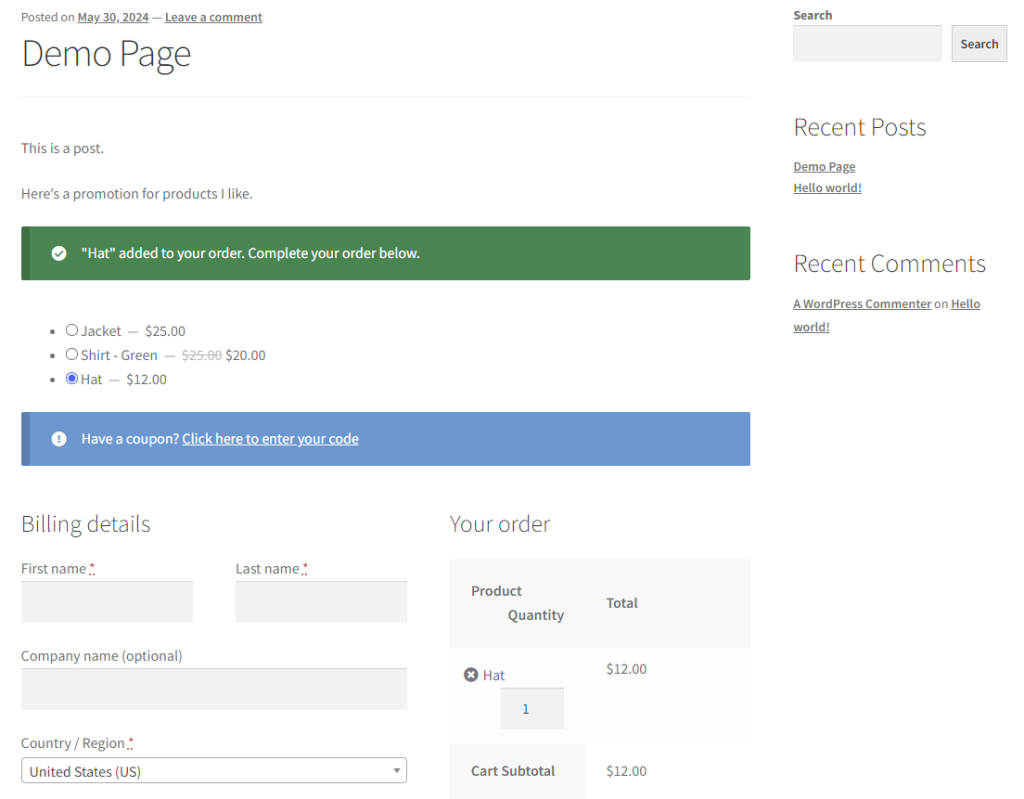
The following code snippet uses the shortcode to display three products on a post. Visitors can click one of them to add it to the cart and make the purchase without being redirected to a separate checkout page.
[woocommerce_one_page_checkout template=”product-list” product_ids=”39,40,41″]
How to Trigger Free Shipping During WooCommerce Checkout
If your WooCommerce store doesn’t offer free shipping, you might want to reconsider. A survey found that 49.7% of people prioritize free shipping when shopping online. This perk also benefits upselling and cross-selling strategies, as 93% of consumers buy additional items to qualify for free shipping.
Many online stores offer waive shipping fees on orders over a set amount, increasing the average order value. In WooCommerce, you can trigger conditional free shipping by leveraging the shipping zone feature.
Here’s how to add free shipping to your WooCommerce checkout process:
- Go to WooCommerce → Settings from the admin dashboard.
- Open the Shipping tab and select Add zone.
- Give the new zone a name and add the regions you want to include.
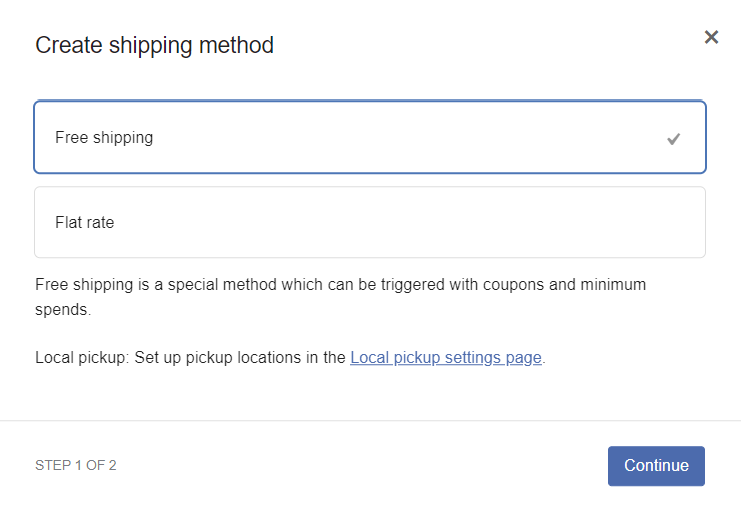
- Click Add shipping method within the Shipping methods section. Select Free shipping and hit Continue.
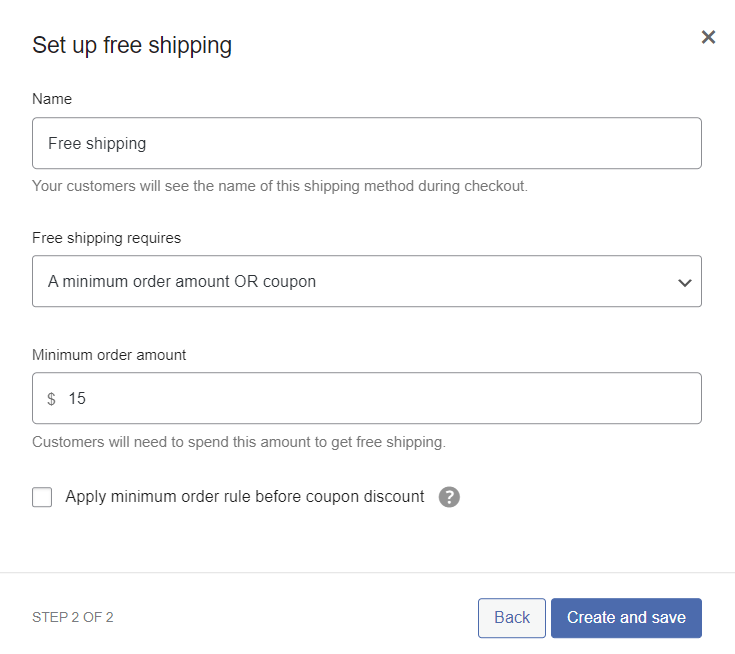
- Give the shipping method a name, then select A minimum order amount OR coupon and set the minimum order amount. Hit Create and save.
- Click Save changes once you’re done.

To boost revenue further, you can also show a free shipping progress bar across your store catalog. WooCommerce offers a Free Shipping Progress Bar extension to streamline the setup process, enable country restrictions, and offer discounts on all shipping methods.
How to Directly Link Products to WooCommerce Checkout Page
Another method to improve your checkout experience is to link products directly to the WooCommerce checkout page. This technique is instrumental in marketing campaigns, turning promotional emails and social media posts into direct sales channels.
There are two ways to create a WooCommerce direct checkout link ‒ manually and using a plugin.
Manual Linking
The manual method is ideal for stores with a few products, as you can tweak the following URL whenever needed:
https://yourdomain.com/checkout/?add-to-cart=ID
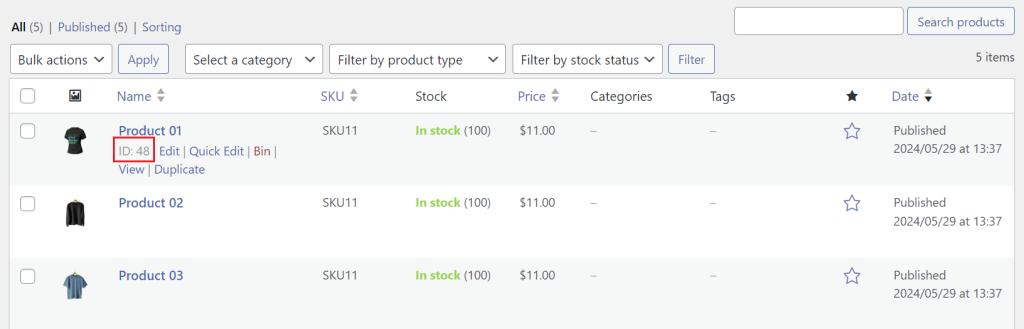
Replace yourdomain.com with your domain name and ID with the product ID you want to link directly to the checkout page. You can find an item’s product ID by hovering over it on the All Products page.
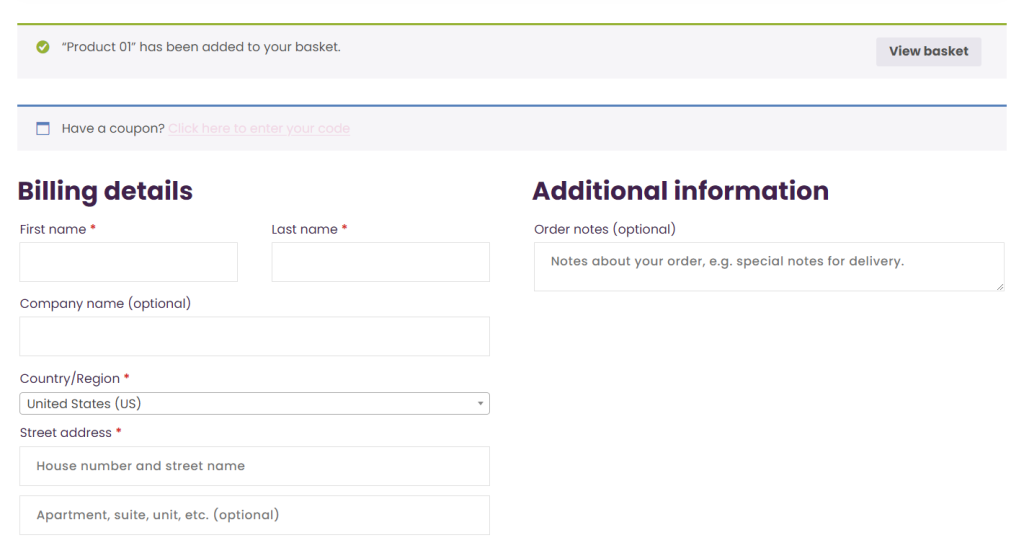
This link will add the item to the cart and redirect users to the checkout page, where they can complete the transaction.
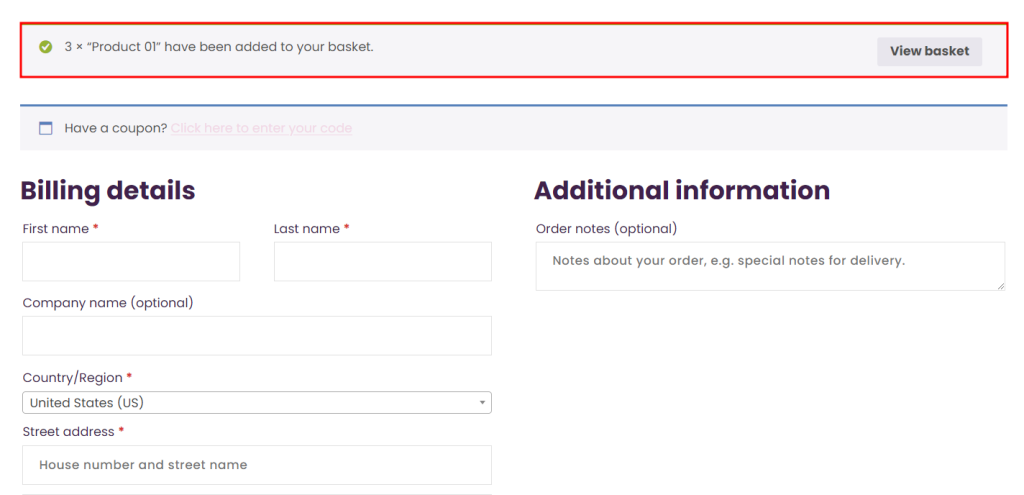
Add &quantity=[number of items] at the end of the URL to change the item’s quantity, checking out the item as a bundle. For example, the following link adds the linked items three times:
https://yourdomain.com/checkout/?add-to-cart=48&quantity=3
Using a WordPress Direct Checkout Plugin
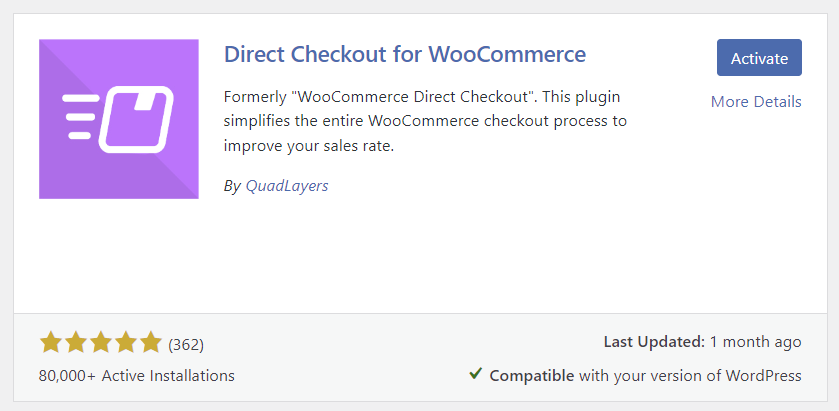
Using a plugin can simplify link creation for WooCommerce stores with a wide range of products. In this tutorial, we’ll use Direct Checkout for WooCommerce as one of the best plugins for the job.
This freemium tool offers flexibility in creating direct checkout links, such as the ability to replace the cart URL. It also comes with AJAX add-to-cart functionality and a quick purchase button to enhance your checkout experience.
Here’s how to create a direct checkout link with the WordPress plugin:
- Install and activate the Direct Checkout for WooCommerce plugin.
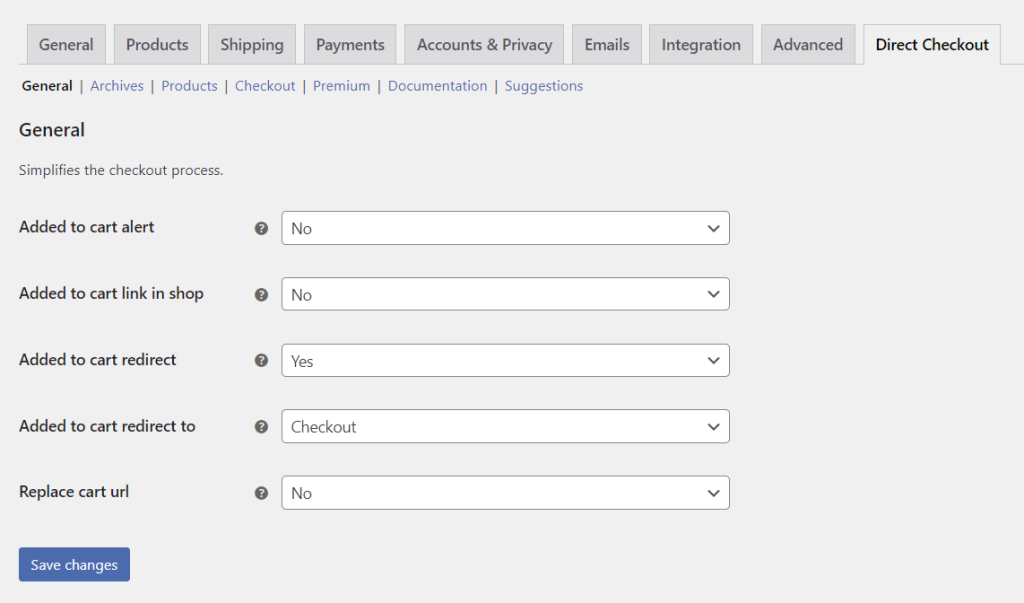
- Go to WooCommerce → Settings from the admin dashboard, then open the Direct Checkout → General tab.
- Pick Yes for the Added to cart redirect setting and redirect customers to Checkout. Once you’re done, hit Save changes.
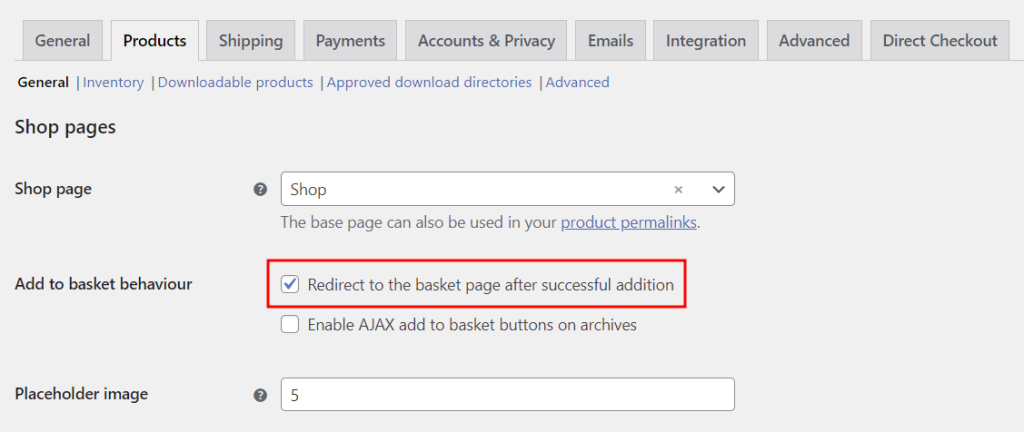
- Open the Products tab and check the Redirect to the basket page after successful addition box. Hit Save changes.
How to Test WooCommerce Checkout Page
To maintain a consistent customer experience, regularly test your online store’s checkout process, not just after updates. Doing so helps identify and resolve issues that could discourage buyers from completing their transactions, such as broken links, incorrect calculations, or payment gateway errors.
WooCommerce provides a built-in test mode to simulate purchases without processing an actual transaction. This mode is accessible after setting up WooPayments as a payment gateway ‒ refer to our WooCommerce tutorial for configuration steps.
Follow these steps to test your checkout page using WooCommerce’s test mode:
- Navigate to Payments → Settings from your WordPress dashboard.
- Check the Enable test mode option and hit Save Changes.
- Try adding products to your cart and input the payment details using WooCommerce’s test cards. Refer to the plugin’s documentation for different testing scenarios, such as declined transactions and non-card payments.
- Turn off test mode after testing to allow your store to process actual orders again.
Best Plugins and Extensions for WooCommerce Checkout
In previous sections, we have mentioned several extensions and plugins with specific checkout functionality. Let’s extend the list by exploring other excellent WooCommerce checkout plugins to boost sales:
- Checkout Field Manager ‒ developed by the same team that made Direct Checkout for WooCommerce, this powerful plugin improves the checkout experience by allowing customers to upload files to their orders.
- Extra Fees for WooCommerce ‒ lets you charge additional fees based on product price, order total, payment method, and shipping method. It’s helpful in increasing average order value and encouraging customers to use your preferred payment gateway.
- MultiStep Checkout for WooCommerce ‒ if you prefer multi-page checkout, this plugin offers various layouts and step customizations for accessible checkout experiences.
Pair your chosen checkout plugins with some of the best WooCommerce plugins below to make your store stand out:
- SearchWP ‒ make every element in your WooCommerce site searchable and monitor on-site search to identify popular queries and whether visitors find what they’re looking for.
- Advanced Dynamic Pricing for WooCommerce ‒ set flexible costs based on ever-changing factors like market demands and seasons. It also lets you create pricing rules in bulk, category-level discounts, and buy-one-get-one offers.
- Simple Giveaway ‒ hold giveaways on your WooCommerce shop to attract new customers. The plugin comes with social logins, making it easy for people to join your subscriber list.
Conclusion
Just because WooCommerce generates a checkout page by default doesn’t mean you can’t take it to another level. To make your WooCommerce store successful, regularly test and optimize your checkout page for an optimal user experience.
We’ve explored different ways of customizing and optimizing the default WooCommerce checkout page. You also learned how to create one-page and direct checkout pages, as well as trigger free shipping to drive more sales.
Don’t forget to leverage our recommended plugins and extensions to enhance your WooCommerce checkout experience further.
We hope this article will help you understand and improve the WooCommerce checkout process. If you have any questions, check out the FAQ section or leave a comment below.
WooCommerce Checkout FAQ
This section answers some of the most common questions about WooCommerce checkout.
What Is the Purpose of Woocommerce Checkout?
WooCommerce checkout helps customers complete orders by providing payment and shipping details. The process ensures a smooth, secure transaction and an improved shopping experience.
What Payment Options Are Available at Woocommerce Checkout?
WooCommerce checkout offers payment options like credit and debit cards, Apple Pay, Google Pay, and bank transfers. You can also add more payment gateways for regional services and crypto payments using plugins.
How Do I Set Up Direct Checkout in Woocommerce?
To set up direct checkout in WooCommerce, go to WooCommerce → Settings → Products → General and enable Redirect to the basket page after successful addition. Alternatively, use a WordPress plugin like Direct Checkout for WooCommerce to let customers bypass the cart page.

Jordana is a Senior Content Writer at Hostinger with a background in Information Systems. She has over five years of experience in WordPress and is casually dabbling with PHP and MySQL. Her passion for writing and technology drives her to create tutorials for anyone wanting to build their online presence. Follow her on LinkedIn.


