Iptables tutorial: securing VPS with Linux firewall

Are you looking for a comprehensive iptables tutorial for your VPS? This article will show you how to install and use iptables on an Ubuntu system.
Follow along and learn how to secure your VPS with the command-line interface and a Linux firewall tool.
What Is Iptables?
Iptables is a firewall program for Linux. It will monitor traffic from and to your server using tables. These tables contain sets of rules, called chains, that will filter incoming and outgoing data packets.
How does iptables work?
When a packet matches a rule, it is given a target, which can be another chain or one of these special values:
- ACCEPT – will allow the packet to pass through.
- DROP – will not let the packet pass through.
- RETURN – stops the packet from traversing through a chain and tell it to go back to the previous chain.
In this iptables tutorial, we are going to work with one of the default tables, called filter. It consists of three chains:
- INPUT – controls incoming packets to the server.
- FORWARD – filters incoming packets that will be forwarded somewhere else.
- OUTPUT – filter packets that are going out from your server.
Before we begin this guide, make sure you have SSH root or sudo access to your machine that runs on Ubuntu 22.04 or up. You can establish the connection through PuTTY (Windows) or terminal shell (Linux, macOS). If you own a Hostinger VPS plan, you can get the SSH login details on the Servers tab of hPanel.
Important! Iptables rules only apply to ipv4. If you want to set up a firewall for the ipv6 protocol, you will need to use ip6tables instead.
How to install and use iptables Linux firewall
We will divide this iptables tutorial into three steps. First, you will learn how to install the tool on Ubuntu. Second, we are going to show you how to define the rules. Lastly, we’ll go over how to make persistent changes in iptables.
1. Install iptables
Iptables comes pre-installed in most Linux distributions. However, if you don’t have it in your Ubuntu/Debian system by default, follow the steps below:
- Connect to your server via SSH. If you’re not sure how to do it, read our SSH tutorial.
- Execute the following commands one by one:
sudo apt-get update
sudo apt-get install iptables - Check the status of your current iptables configuration by running:
sudo iptables -L -v
Here, the -L option is used to list all the rules, and -v is for showing the info in a more detailed format. Below is an example output:
Chain INPUT (policy ACCEPT 0 packets, 0 bytes)
pkts bytes target     prot opt in out   source destination

Chain FORWARD (policy ACCEPT 0 packets, 0 bytes)
pkts bytes target     prot opt in out   source destination

Chain OUTPUT (policy ACCEPT 0 packets, 0 bytes)
pkts bytes target     prot opt in out   source destination
You will now have the Linux iptables firewall installed. At this point, you will notice that all chains are set to ACCEPT and have no rules. This is not secure since any packet can come through without filtering.
Don’t worry – we’ll teach you how to define rules in the next step.
2. Define chain rules
Defining a rule means appending it to the chain. To do this, you need to insert the -A option (Append) right after the iptables command, like so:
sudo iptables -A
It will alert iptables that you are adding new rules to a chain. Then, you can combine the command with other options, such as:
- -i (interface) — the network interface whose traffic you want to filter, such as eth0, lo, ppp0, etc.
- -p (protocol) — the network protocol where your filtering process takes place. It can be either tcp, udp, udplite, icmp, sctp, icmpv6, and so on. Alternatively, you can type all to choose every protocol.
- -s (source) — the address from which traffic comes from. You can add a hostname or IP address.
- –dport (destination port) — the destination port number of a protocol, such as 22 (SSH), 443 (https), etc.
- -j (target) — the target name (ACCEPT, DROP, RETURN). You need to insert this every time you make a new rule.
If you want to use all of them, you must write the commands in this order:
sudo iptables -A <chain> -i <interface> -p <protocol (tcp/udp) > -s <source> --dport <port no.> -j <target>
Once you understand the basic syntax, you can start configuring the firewall for more security. For this tutorial, we are going to use the INPUT chain as an example.
Enabling traffic on localhost
To allow traffic on localhost, type this command:
sudo iptables -A INPUT -i lo -j ACCEPT
We’ll use the lo or loopback interface for this demonstration. It is utilized for all communications on the localhost. The command above will make sure that the connections between a database and a web application on the same machine are working properly.
Enabling connections on HTTP, SSH, and SSL ports
Next, we want http (port 80), https (port 443), and ssh (port 22) connections to work as usual. To do this, we need to specify the protocol (-p) and the corresponding port (–dport). You can execute these commands one by one:
sudo iptables -A INPUT -p tcp --dport 22 -j ACCEPT
sudo iptables -A INPUT -p tcp --dport 80 -j ACCEPT
sudo iptables -A INPUT -p tcp --dport 443 -j ACCEPT
It’s time to check if the rules have been appended in iptables:
sudo iptables -L -v
It should return with the results below which means all TCP protocol connections from the specified ports will be accepted:

Filtering packets based on source
Iptables allows you to filter packets based on an IP address or a range of IP addresses. To do so, you need to specify it after the -s option. For example, to accept packets from 192.168.1.3, the command would be:
sudo iptables -A INPUT -s 192.168.1.3 -j ACCEPT
You can also reject packets from a specific IP address by replacing the ACCEPT target with DROP.
sudo iptables -A INPUT -s 192.168.1.3 -j DROP
If you want to drop packets from a range of IP addresses, you have to use the -m option and iprange module. Then, specify the IP address range with –src-range. Remember, a hyphen should separate the range of ip addresses without space, like this:
sudo iptables -A INPUT -m iprange --src-range 192.168.1.100-192.168.1.200 -j DROP
Filtering packets based on their sources is crucial if you are using an intrusion detection and prevention system (IDS/IPS) like Suricata. This tool monitors your VPS network and notifies you about malicious traffic.
IDS/IPS shows the malicious packets’ origins, which you can add to the iptables blocklist. Check out our article to learn more about how to set up Suricata on Ubuntu.

Dropping all other traffic
It is crucial to use the DROP target for all other traffic after defining –dport rules. This will prevent an unauthorized connection from accessing the server via other open ports. To achieve this, simply type:
sudo iptables -A INPUT -j DROP
Now, the connection outside the specified port will be dropped.
Deleting rules
If you want to remove all rules and start with a clean slate, you can use the -F option (flush):
sudo iptables -F
This command erases all current rules. However, to delete a specific rule, you must use the -D option. First, you need to see all the available rules by entering the following command:
sudo iptables -L --line-numbers
You will get a list of rules with numbers:
Chain INPUT (policy ACCEPT)

num  target     prot opt source               destination

1    ACCEPT     all -- 192.168.0.4          anywhere
2    ACCEPT     tcp -- anywhere             anywhere tcp dpt:https
3    ACCEPT     tcp -- anywhere             anywhere tcp dpt:http
4    ACCEPT     tcp -- anywhere             anywhere tcp dpt:ssh
To delete a rule, insert the corresponding chain and the number from the list. Let’s say that for this iptables tutorial, we want to eliminate rule number three of the INPUT chain. The command should be:
sudo iptables -D INPUT 3
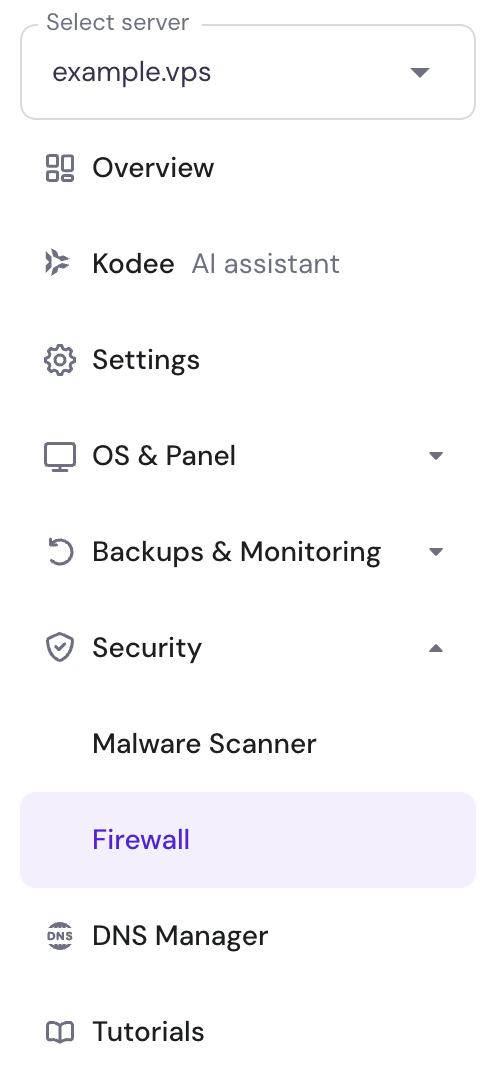
Alternatively, if you need to filter only the incoming traffic, you can use Hostinger VPS Firewall. Select your VPS and navigate to the Firewall section:
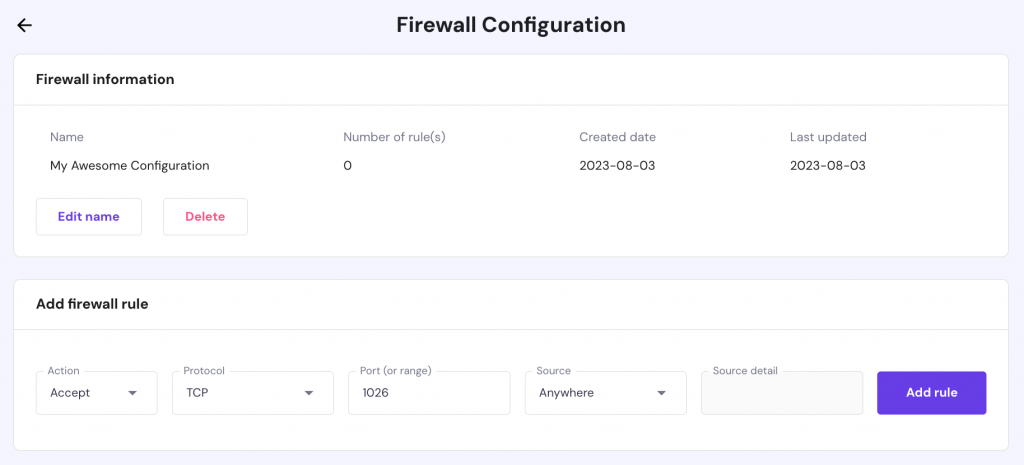
Create a new configuration, give it a name, and specify any incoming traffic rules you prefer:
3. Persist changes
The iptables rules that we have created are only saved in temporary memory. That means we have to save them to a file to be able to load them again after a reboot. To make these changes you can use these commands depending if you are saving IPv4 or IPv6 rules:
sudo iptables-save > /etc/iptables/rules.v4
sudo iptables-save > /etc/iptables/rules.v6
Now whenever you restart your VPS you will need to load the saved rules with the following commands:
sudo iptables-restore < /etc/iptables/rules.v4
sudo iptables-restore < /etc/iptables/rules.v6
If you want for the loading process to be completely automatic, you can set up iptables-persistent package and it will take care of loading the rules.
sudo apt-get install iptables-persistent
After installation you will be asked to save the current rules. Choose Yes for both IPv4 and IPv6 and finish the configuration. Now the loading process will be automatic. Keep in mind that you will still need to use sudo iptables-save command each time you make changes to iptables.
Conclusion
Iptables is a powerful firewall program that you can use to secure your Linux server or VPS – you can define various rules based on your preferences.
In this iptables tutorial, you have learned how to install and use the tool. Now, we hope you can manage your sets of rules to filter incoming and outgoing packets.
It’s time to test it yourself. Good luck!
Discover More About How to Protect Your Linux
How to Configure OpenVPN on VPS
How to Configure Fail2Ban on CentOS
How to Configure UFW Firewall in Ubuntu
How to Install ClamAV on CentOS


Comments
May 07 2018
This tutorial is definitely great. Thanks, Hostinger! <3
May 23 2018
Hello, Jacopo I'm glad to hear you found our guide useful!
February 16 2019
This description is truly succinct and clear. Thank you Hostinger and Prithvi.
January 31 2020
Awesome work! Thank you! :)
March 13 2020
Nice article. Thanks.
March 31 2020
Thanks a lot for this. I have now gotten something about iptables
May 14 2020
good one man. As a beginner it's a TREASURE .
May 27 2020
Very clear, easy to understand, and use full tutorial. Thank you.
July 15 2020
No one explains this clearly.Thanks alot Prithviraj.Great Job
July 24 2020
Thnx Prithviraj, we learn the basics very clearly.
September 01 2020
good, finally something I could understand
November 11 2020
I love it
March 03 2021
Simple and clear explanation. Thanks a lot!!
April 24 2021
Thanks. Nice a simple beginner's guide
May 17 2021
Great tutorial to understand. Thank you.
May 19 2021
Thanks Hai Pham :)
May 27 2021
nice work, clearly done.
August 06 2022
Hello! When I run the command "sudo iptables -L -v" I get the error: iptables v1.8.4 (legacy): can't initialize iptables table `filter': Table does not exist (do you need to insmod?) Perhaps iptables or your kernel needs to be upgraded. How can I solve this? Thank you
August 12 2022
Hey! We would suggest adding the following lines the Dockerfile:
RUN apt install iptables \
    && mv -v /usr/sbin/ip6tables /usr/sbin/ip6tables--DISABLED-$(date +"%Y-%m-%d--%H-%M") \
    && cp -v /usr/sbin/ip6tables-nft /usr/sbin/ip6tables
Hopefully this helps to resolve the issue ?March 01 2023
This was a great tutorial, but I would like to add that it caused a little headache as well, because on my Debian 11 system, fresh install from Hostinger VPS image, the changes did not persist after reboot. It couldn't find '/sbin/iptables-save', however I tried 'sudo iptables-save' instead, and it looked like it was working. Then, after a reboot, a long time later, I discovered it had not been loading the rules during startup after all. Maybe this is different on Debian and Ubuntu, I don't know. Anyway, I solved it this way: $ sudo apt install iptables-persistent Since the rules were reset I answered 'no' to save the current tables, then I configured the tables again, and typed: $ sudo bash -c "iptables-save > /etc/iptables/rules.v4" $ sudo bash -c "ip6tables-save > /etc/iptables/rules.v6" Now, after reboot, it loaded the new tables. Apparently, on Debian at least, iptables-save only dumps the rules, it doesn't save it anywhere.
March 03 2023
Hello! Thank you for great insights, yes the process of configuring iptables on Ubuntu vs Debian can differ. I have also double-checked the steps mentioned in our article with Ubuntu 20.04 VPS. The iptable rules were indeed not saved after reboot, thus I updated the article with
iptables-persistentmethod.