How to start a blog in 7 steps and make money from it

Blogging is incredibly rewarding. You can share your passion, network with people with the same interests, and even make money. The best part? Launching a blog is easier than you might think.
As a part of the team behind Hostinger Tutorials’ success, I will show you how to start a blog in seven steps, from picking a niche to choosing monetization methods.
Ready to dive in? Let’s start!
How to start a blog in 7 steps
Here’s a quick overview of the seven steps to start a blog:
- Pick a niche for your blog.
There are tons of blogs on the internet today, so choosing the right niche helps you stand out and attract the right audience.
- Choose a platform for your blog.
In this article, I’ll show you how to start a blog with WordPress, which is beginner-friendly, highly customizable, and scalable.
- Get hosting and a domain name.
Choose a reliable hosting provider and start brainstorming domain name ideas.
- Build your blog on WordPress.
Learn how to launch a blog easily with Hostinger Managed WordPress hosting.
- Start writing and publishing blog posts.
Get some tips to plan and write SEO-friendly blog articles.
- Increase your blog traffic.
Get more eyes on your blog with various promotion and marketing methods.
- Monetize your blog.
Discover a variety of ways to monetize your blog creatively.
Now, let’s dive deeper into each step!
1. Pick a niche for your blog
Choosing a blog niche defines the direction of your blog content, keeping your posts relevant and valuable. Focusing on a niche also boosts your blog’s authority on a specific topic, helping it rank higher in search engines.
You might’ve started thinking about a niche among the many blog ideas out there, but how do you find the right one?
Try listing down five to ten things you enjoy telling people about. Write them in order from the most to the least exciting for you. Asking these questions to yourself can help:
- What am I passionate about?
- What are my past working experiences or projects?
- What am I knowledgeable about?
- What do I enjoy learning?
- Who do I want to help?
- What problems can I solve?
Your blog’s niche can be anything and doesn’t have to be super serious. You could write about your favorite movies, travel mishaps, or quirky snacks. Even the mundane everyday life that you might think is boring can be entertaining for the right audience. Among these 55+ blog examples, many bloggers actually share about what they do daily.
Something to keep in mind
Google has higher evaluation standards for website topics that fall under the Your Money Your Life (YMYL) category. It includes subjects potentially impacting a person’s happiness, health, finances, or safety. If you plan to produce content in that niche, featuring subject-matter experts’ insights will be necessary. The time it takes for Google to recognize your blog will also be longer, as you need to work on building a credible reputation on that topic.
However, there are tons of established bloggers out there. So, to stand out, start by writing content on a micro niche. This involves picking a subtopic within a broad niche to narrow down the competition.
For example, if you want to start a food blog, you could focus on a particular cuisine, such as Japanese, Mexican, or Italian.
I’ve been thinking about ramen as it’s raining a lot where I’m from, so let’s take that as an example. With Japanese food as your niche, you can start your blog by diving deep into all things ramen.
Once you establish a loyal readership, you could branch out to other Japanese cuisine staples like sushi, Japanese desserts, or tea culture. This allows your blog to evolve while maintaining its authenticity.
You probably have some topic ideas by now. Great! Let’s use Google Trends to see if there is growing interest in them. Go to the Explore tab and enter your blog niche idea. If you see a stable graph, that means people consistently look up the topic online.
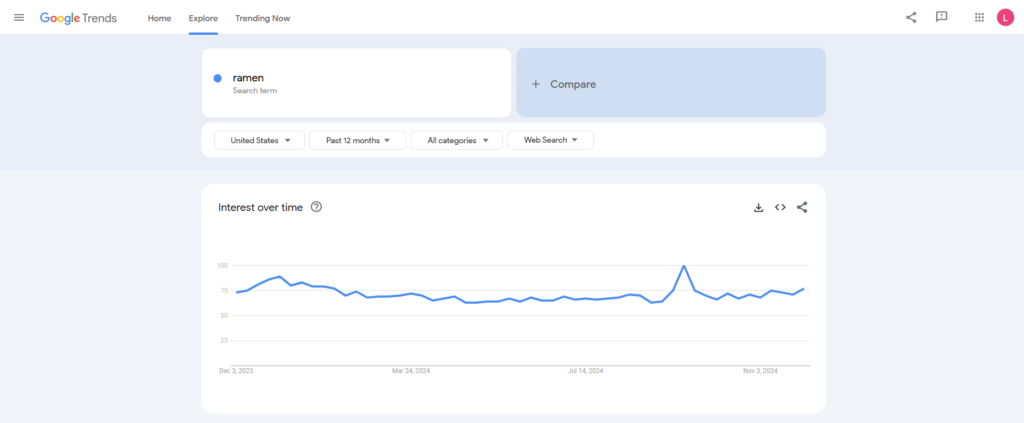
If you have multiple micro-niche ideas, compare their search popularity to see which one is more worth exploring. For example, I’m comparing ramen to mochi. Ramen has a much higher search volume, so it’s likely to have a bigger audience.
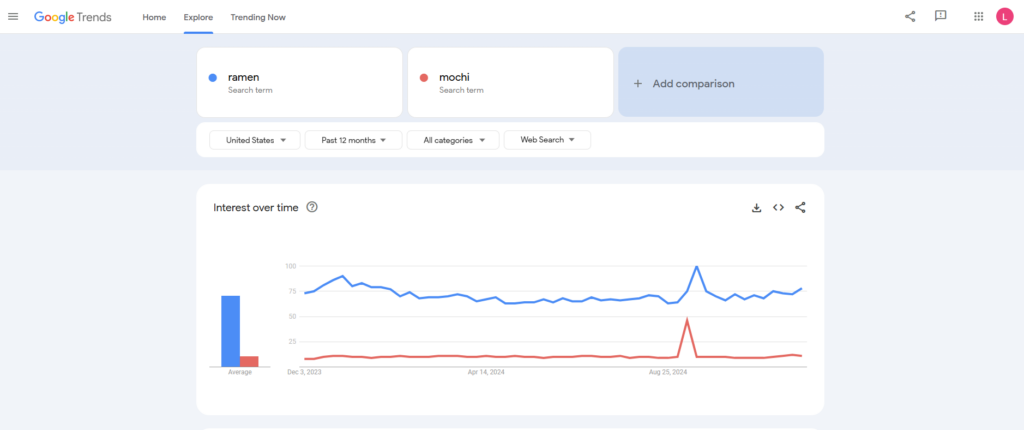
That doesn’t mean you can’t choose a less popular topic. If you’re passionate about a subject and you can confirm there’s a growing interest, go for it!
After confirming the niche’s popularity, the next step is to assess its profitability, particularly if you plan to monetize your blog. The simplest way to do this is to think of what to sell on the blog – whether it’s digital or physical products or any services you could bring to the table.
Using the ramen niche example, I can monetize it down the line by selling digital recipes, ramen-making utensils, or eBooks.
You could also try Googling [insert your desired niche] affiliate program. A growing demand for affiliates in a niche indicates potential profitability.
We’ll explore more blog monetization options later. For now, if you found a niche you love that has growing traction and can be profitable, let’s choose the blogging platform!
2. Choose a platform for your blog
I’m sure you’ve heard of free blogging platforms like Blogger, WordPress.com, and Medium. They are great for starting out and showcasing your writing skills, but these hosted platforms have limited customization and monetization options.
That’s why I much prefer creating a blog on self-hosted WordPress. This content management system (CMS) was introduced in 2003 as a blogging platform, so it has full-featured, built-in blogging tools like advanced post editing and comment management.
Starting a blog on WordPress also gives you these benefits:
- Full ownership and control. You own your blog and content completely, with the freedom to customize every aspect without platform restrictions.
- Extensive themes and plugins. Gain access to a vast collection of themes and plugins to enhance your blog’s design, functionality, SEO, security, and user experience.
- Highly customizable. You can tailor your blog to your exact vision, from themes to plugins to custom code, giving you limitless creative control.
- Freedom to monetize. WordPress makes it easier to monetize your blog in various ways, including ad networks, affiliate marketing, sponsored content, and eCommerce functionality.
- Scalability. WordPress can handle anything from a simple blog to a large, multi-author publication, making it a great choice if you aspire to go big with your blog.
- Vibrant community and support. As the world’s most widely used CMS, WordPress has a large community that is generous with resources, plugins, and troubleshooting advice, making it easy to find support and stay updated on best practices.
For the above reasons, I will use WordPress for this tutorial and encourage you to do the same.
3. Get hosting and a domain name
When creating a self-hosted WordPress blog, you’ll need to choose a web host and purchase a hosting plan so that it can go online. Then, buy a domain name from a trusted registrar to make your blog easily accessible.
Some web hosting companies, like Hostinger, also act as domain registrars. This way, you can get a web hosting plan and domain name in one package. You can also claim a free domain name from us by choosing an annual subscription.
Our managed WordPress hosting platform makes starting a blog much easier. With its suite of WordPress-optimized features, setting up your blog and managing back-end tasks is a breeze, leaving you much room to focus on writing.
Speaking of the hosting plan, I recommend going with Business, which costs ₱169.00/month by paying for the 48-month bundle. This way, you can save up to $500 for web hosting and get a bunch of freebies from us, including unlimited SSL certificates and a domain name.
The hosting resources can handle up to 100,000 monthly visitors, and our in-house content delivery network (CDN) service will accelerate your blog’s loading speed.
If you decide blogging isn’t for you, there’s a 30-day money-back guarantee anyway, so there’s no harm in trying.

Web hosting, check. Let’s move on to the domain name.
If you still have no options in mind, try blog name generators to help you brainstorm. The name doesn’t have to be an exact match to your blog name, but making it similar can give your blog a more professional vibe.
Do note that domain names are unique. So, when choosing a domain name, make sure it’s not yet taken. Use our domain name checker to see if the one you want is still available:
Domain Name Checker
Instantly check domain name availability.
If the domain name you want is unavailable, tweak the name or the extension (the suffix that comes after it). For instance, if the .com version is taken, try pairing it with .net instead.
Less common extensions like .blog, .me, or .online can make your blog address stand out. You can also create a catchy word combination that rhymes to make a memorable domain name, for example:
- japanesefood.blog
- tasteofjapan.online
- foodiejourney.online
- ramenvibes.me
When ideas pop into your mind, jot them down immediately – they can slip away faster than you realize.
4. Build your blog on WordPress
Now that you’ve prepared the foundations for starting a blog, it’s time to bring it to life. Let’s begin by setting up WordPress.
Set up your blog
After purchasing Hostinger’s Managed WordPress hosting plan, you’ll be redirected to the onboarding page.
Select the Create a website option, and sign up for a new WordPress account.
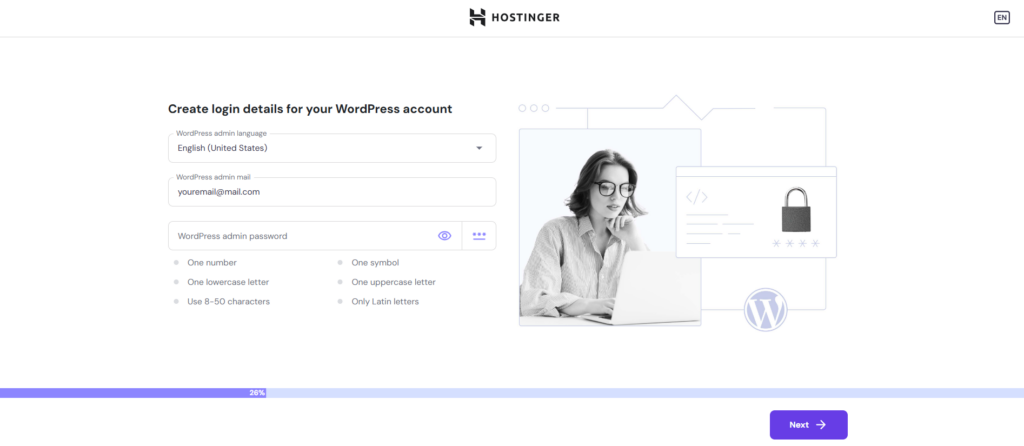
Next, choose the Blog website type and select how you want to build it. We provide three methods:
- Using the AI WordPress website builder. Instantly create a fully functional blog simply by describing how you’d want it to be.
- Using a pre-built website template. Choose from the available template options and customize your website from there.
- Building your website from scratch. Create your blog from a blank canvas or install a WordPress theme of your choosing.
The simplest, quickest method is to use AI Website Builder for WordPress, which I will show you in this tutorial.
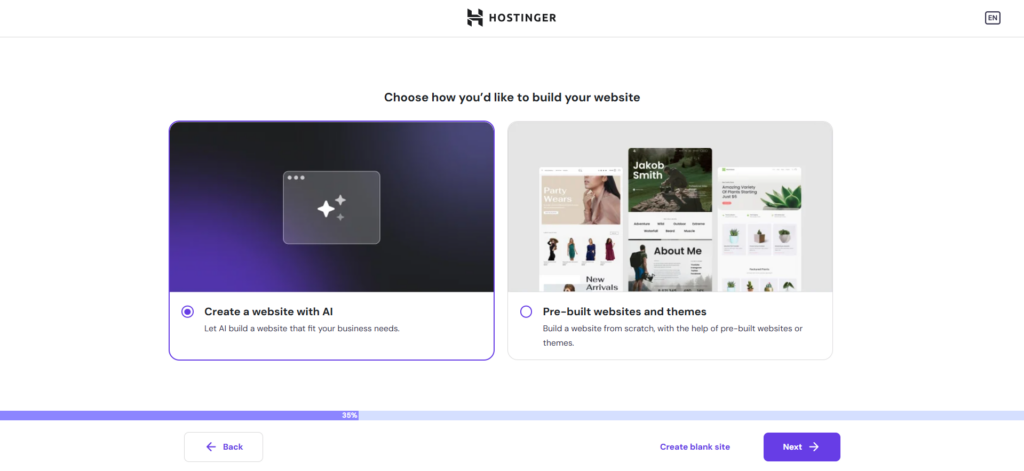
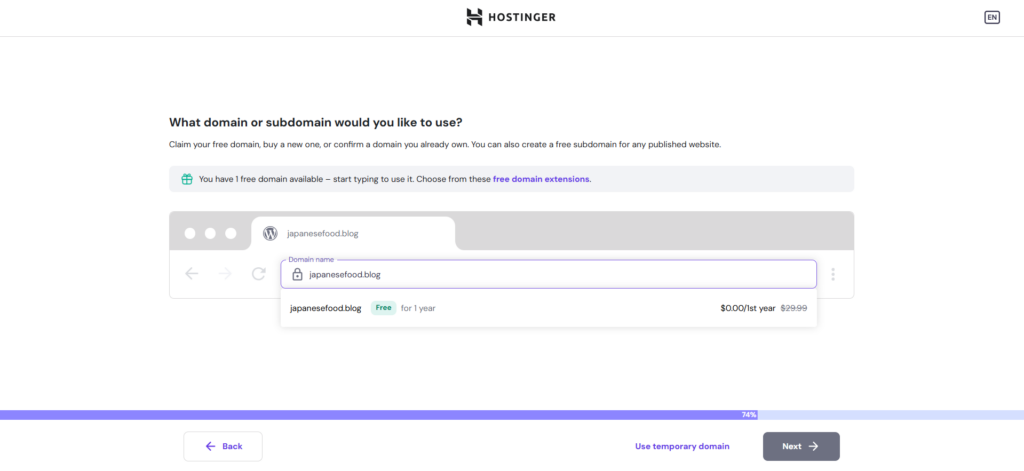
After clicking Next, type your blog domain name into the box. Still not sure which domain to choose? Don’t worry – you can Use a temporary domain for now.
Then, select the data center nearest to your target audience for the best loading speed.
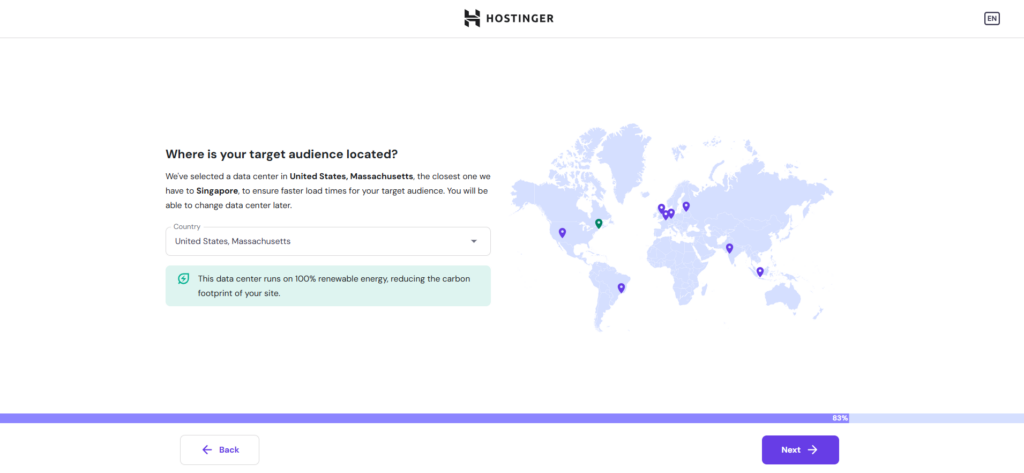
Hit Next to install and set up WordPress automatically. You’ll then see the AI Website Builder page, where you need to describe the blog you want to make.
The more details you provide, the better results you can get. In this example, I’m telling the AI tool how I will use my blog. Hit Create once you see the indicator bar turn green.
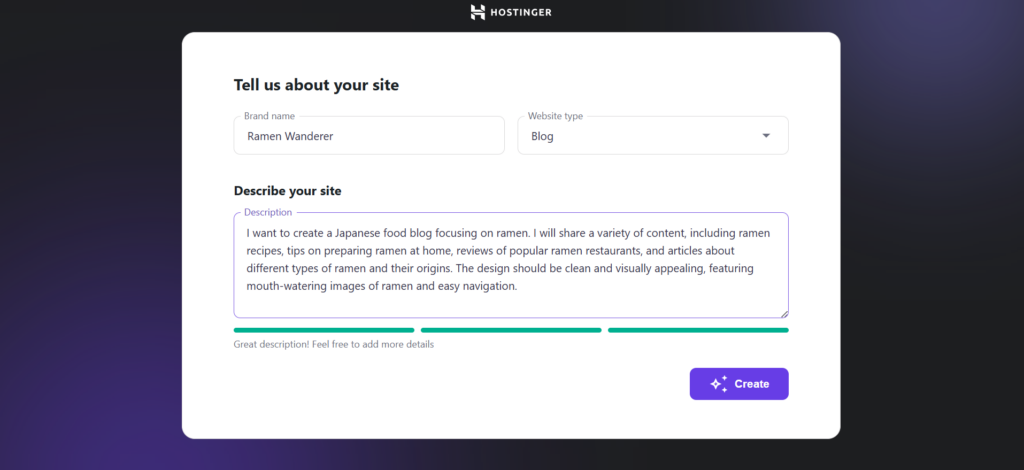
Wait for a few seconds, and you’ll have your blog ready for further customization! Click Confirm & edit to enter the WordPress Site Editor area.

Design your blog pages
When I first started using WordPress, I didn’t know that WordPress pages differ from posts. While posts are blog entries that you publish and update regularly, pages are for static, timeless content you won’t edit often, like Home, About, or Contact.
In this step, I will show you how to create and edit your blog pages. Hostinger AI Website Builder for WordPress uses a block-based theme, meaning that it’s customizable with Gutenberg (the block editor).
Once in the Site Editor, here’s what you can do to customize your blog page:
- Click on any website element (such as headings, buttons, or images) to display the toolbar settings. You’ll see multiple options to customize the content placeholders according to your needs.
- To change the colors, fonts, and page layout, click the Styles icon on the top toolbar.
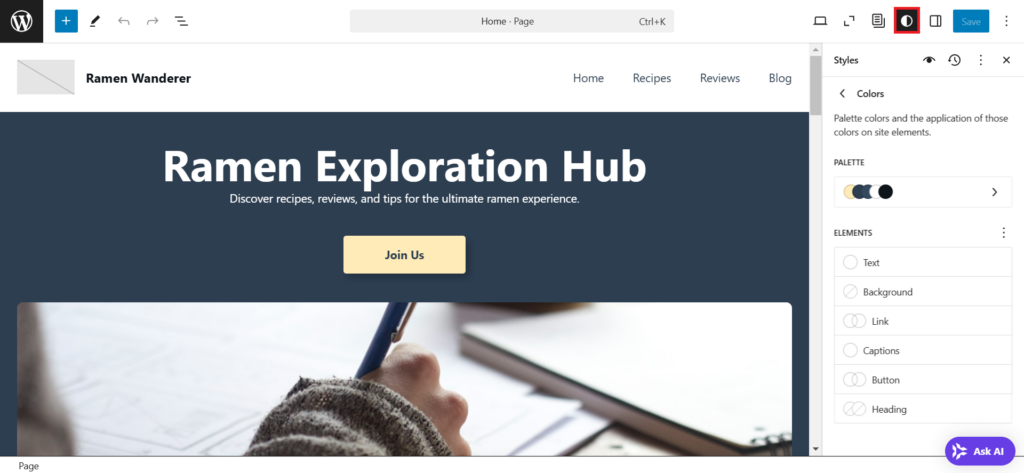
- If you feel something is missing from the current blog’s home page, add new WordPress blocks by hovering over any blank area and hitting the plus (+) button.
Hit Save to apply the changes.
Once you’ve finished editing the home page, click the Edit Pages button on the top toolbar to see other pages to customize. Hit Edit on the one you want to design first.
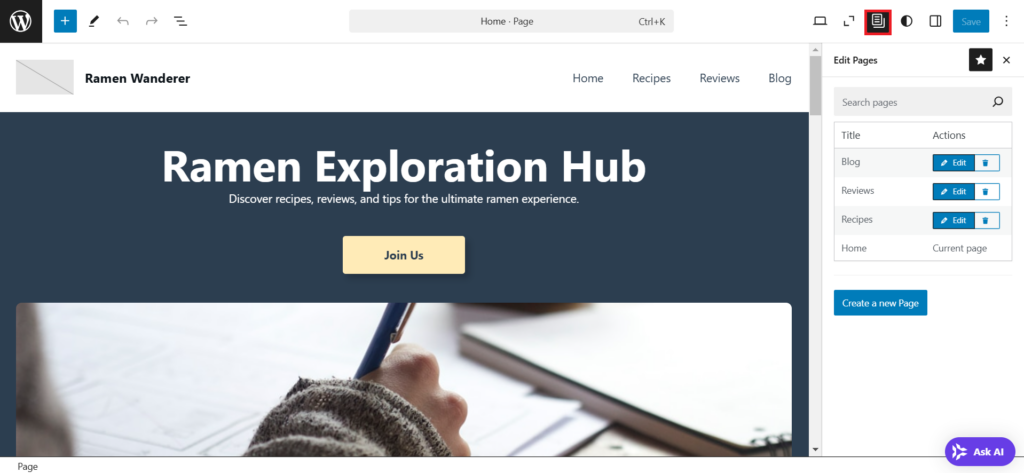
If you want to create new pages, exit the editor interface by clicking the WordPress logo in the left corner of the top toolbar. You will then enter the WordPress Site Editor dashboard.
Go to Pages → Add New Page, give it a name, and click Create draft.
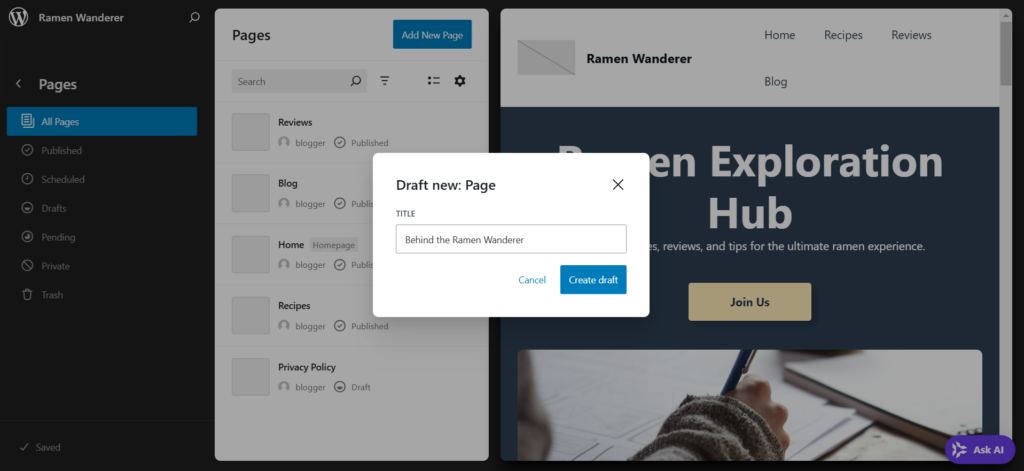
From there, you can start designing the new website page by arranging WordPress blocks. Once you’re satisfied with it, hit Publish.
Pro tip
Document the color palette, font styles, blog logo, and other visual assets in one place. A visual design guideline helps you maintain a cohesive look for your blog. Read this web design best practices guide for more tips.
Install WordPress plugins
You can enhance your blog features effortlessly by installing WordPress plugins. It’s just like adding apps to your phone.
Simply access Plugins → Add New Plugin from your WordPress dashboard. You can then browse thousands of plugins from the WordPress official repository.
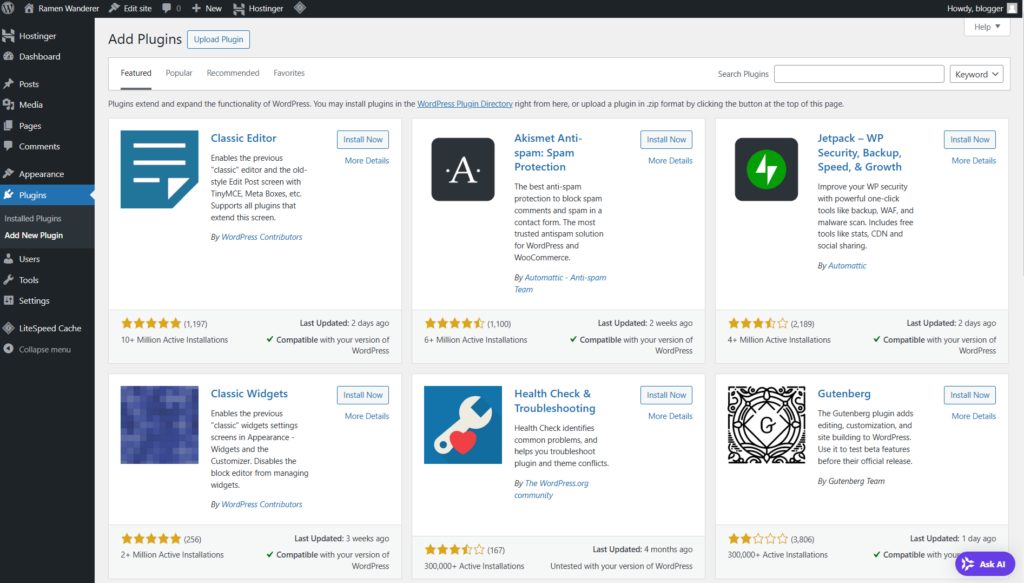
Although you can have as many plugins as you want, it’s best to install what you truly need. Installing too many plugins can slow down your blog and make it prone to security issues.
I recommend having these most important WordPress plugins for a blog:
- SEO plugin. I’d say this is a must-have, as optimizing your blog for SEO helps generate organic traffic, increasing your readership. Plugins like Yoast SEO, AIOSEO, or Rank Math provide features to guide you in creating SEO-friendly pages and posts.
- Analytics plugin. Integrate Google Analytics into WordPress to monitor important blog metrics (such as your readers’ demographic information and which articles bring the most traffic) right from your admin dashboard.
- Related posts plugin. Keep readers on your blog longer by adding related posts to the article they’re reading. Yet Another Related Posts Plugin (YARPP) is one of the most popular plugins for this functionality.
- Security plugin. Protect your blog from hackers, malware, and spam with a security plugin like Wordfence, Sucuri Security, or iThemes Security.
Hostinger’s Managed WordPress plans already include the LiteSpeed Cache plugin to optimize your blog’s loading speed and other Hostinger plugins that help ease your website management tasks.
Want to go beyond the basic features and truly bring your dream blog to life? Check out my list of the 31 best WordPress plugins.
5. Start writing and publishing blog posts
Now that your blogging website is ready, it’s time to let your words take the spotlight!
In this section, I’ll share how my team and I research, write, and publish new blog posts on Hostinger Tutorials, which now has thousands of daily readers.
Identify your blog readers
Understanding your audience helps align your writing with their needs, interests, and challenges so your message hits the mark every time.
Before writing a blog post, I recommend creating your ideal reader’s persona to visualize who you’re talking to. This semi-fictional profile represents your blog readers – their age, job, hobbies, challenges, and the type of content they’re likely searching for.
Begin by imagining to whom you would like to share your ideas. Who will be excited to read all the information you share? To get a clearer idea, do the following:
- Find social media accounts within your niche. Read their comments and questions to understand their interests and pain points.
- Use forums like Quora or Reddit to observe discussions or even participate in them. You’ll find plenty of topic ideas this way.
- Analyze other blogs within your niche. See how they write their posts and how their audience engages with them. You can also look for recurring themes about what people appreciate or struggle with.
As your blog grows, you’ll gain deeper insights into your readers, who may also evolve. Feel free to update your reader personas as you learn more about them.
Plus, you can create multiple personas and segment them based on specific criteria to tailor your content better. My team and I at Hostinger categorized our readers into business owners, hobbyists, freelancers, and online hustlers. Then, we tailor our blog topics to each persona’s needs.
For example, we described the hobbyist as a young adult who loves learning and experimenting with websites. They build personal projects and don’t necessarily want to profit from the website. Their goals:
- Learn and experiment with WordPress core software, plugins, and themes.
- Create personal or passion projects like blogs or portfolios.
- Improve skills and knowledge without financial pressure.
Their pain points:
- Want to build a website but don’t have any technical knowledge.
- Overwhelmed by technical jargon and complex tools.
- Not knowing where to start or which tools to use.
- Struggling to find easy, beginner-friendly guides.
This How to start a blog article caters to the hobbyist. Does any of the points above sound like you?
Map the blog’s topics and subtopics
Planning what to write on your blog begins with mapping out your main topics and subtopics. These are also the topics you can add as your WordPress blog categories and subcategories.
Start by choosing the core topics most relevant to your niche – these will be your blog’s broad focus areas. Then, brainstorm the subtopics under each one. Subtopics allow you to explore specific aspects of your core topics, making your content diverse and detailed.
Write down your blog post ideas by considering your experiences within the niche. Position yourself as the reader, and try to answer this key question: What kind of information do you wish to gain from this blog?
You can also use the SEO topic clustering strategy, which involves organizing related articles around a central theme. It’s like drawing a mind map of your overall blog content, helping build your blog’s topical authority in search engines.
Follow these steps to create a topic cluster for your blog:
- Choose the core topics. Focus on the broad subjects within your niche that match your target audience’s interests.
- Create a pillar page. Write a comprehensive article on the broad topic. This will be the main information hub, covering a glimpse of multiple interrelated topics.
- Identify subtopics. Break down the broad topic into specific subtopics. Each should answer a question or cover an aspect of the main topic in detail.
- Write cluster content. For each subtopic, write individual articles that dive deeper into those areas.
- Interlink the content. Link the pillar page to each cluster article and vice versa. This creates a network of related content, signaling to search engines that you have authoritative resources on this topic.
Pro tip
Tools like MindMeister, Google Jamboard, or Miro can be beneficial for visualizing your topic clustering plan.
Let’s take Hostinger Tutorials as an example. There are five core topics: WordPress, VPS, Hostinger Website Builder, Emails, and Domains. WordPress subtopics include WooCommerce, blogging, and website customization, which we developed into many articles.
This How to start a blog article is a pillar of content on blogging, covering everything you need to know to build a blog. As you’ve probably noticed, I linked to many articles to give you a deeper understanding of multiple related topics, such as SEO, WordPress plugins, and more.
Planning the topics beforehand makes your blog content more organized and navigable. Additionally, it increases the chance for readers to stay on your blog longer as they find plenty of interesting related reads.
Conduct keyword research
People often use similar keywords to look for information on search engines. Keyword research is the process of understanding the language people use to find information on your blog.
Our friends at Hostinger Academy created this video on how to conduct keyword research:

Here are the four main types of users’ search intent:
- Informational intent. For users who want to find information about a specific topic. Keywords reflecting this intent usually appear as a question or contain “tutorial,” “tips,” “what is,” and “guide.”
- Navigational intent. For users who already have a specific brand or website name in mind when typing in the keyword.
- Transactional intent. For users who are ready to buy a specific product or are looking for purchase options.
- Commercial intent. For users who want product or service recommendations. This search intent is often answered with listicle or comparison articles.
Understanding different types of search intent helps you address why your readers should engage with your blog, complementing the who that you’ve identified through the personas.
Next, you’ll need some keyword research tools. Ahrefs, Moz, and Ubersuggest are a few examples of tools that provide keyword metrics (including their difficulty, trends, and search volume). This information helps you decide which keywords to target in each blog post.
Looking for a free tool? Ahrefs has a free keyword generator that is handy for those getting started.
You can use it to evaluate your keyword potential based on your planned blog topics and the corresponding search intent. It’s also useful to check how people expand the seed keywords (the general word of a topic), which can give you more fresh ideas.
For instance, by typing in the term “ramen” and targeting the United States, I get these keywords as the results:
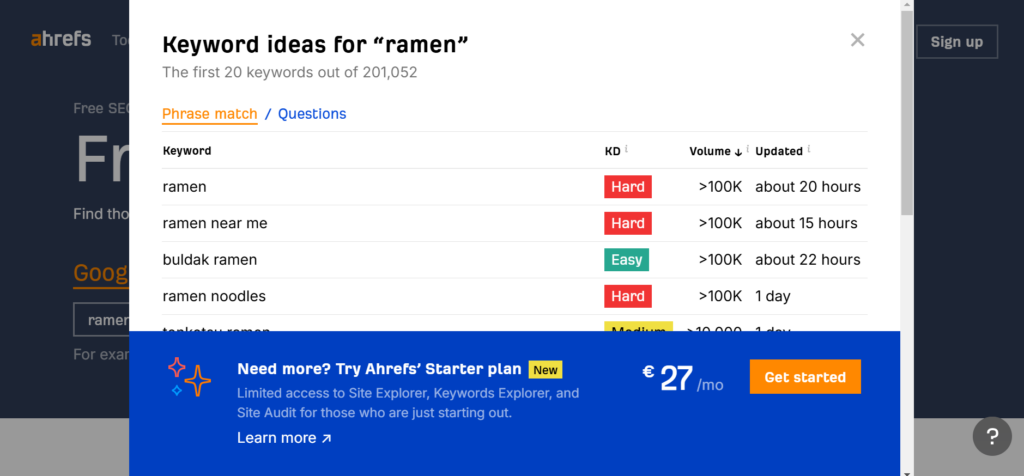
You’ll see the keyword ideas under the Phrase match and Questions tabs. The KD column stands for Keyword Difficulty, which reflects how hard it is to rank on search engines. Aim for the Easy ones when starting out.
In addition to searching the seed keywords, you can also try expanding them into long-tail keywords, which usually have lower competition. I tried to see the keyword potential for “how to cook ramen.”
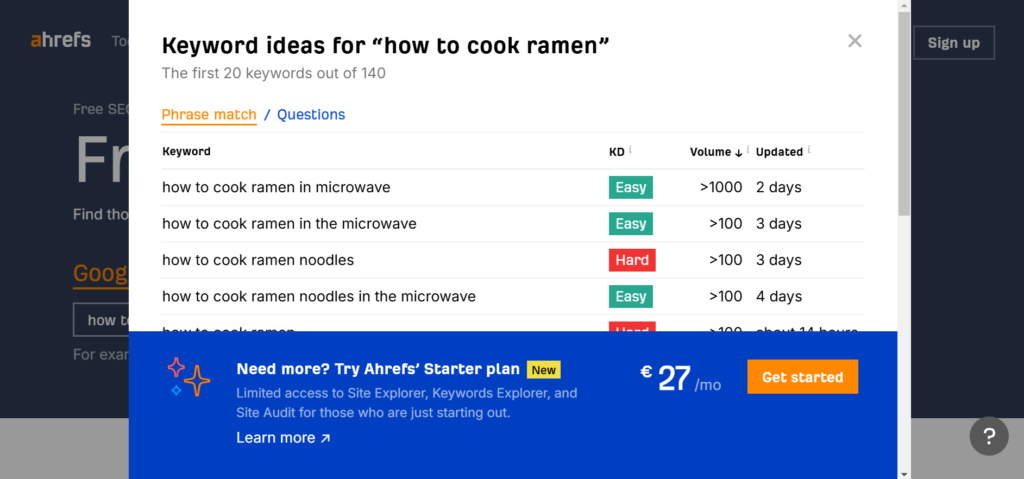
The rule remains the same – target the Easy ones. If you have to choose between multiple easy keywords, choose the one with a higher search volume.
Repeat the process to list the keywords you will turn into blog posts, then start planning your writing schedule.
Create an editorial calendar
I love writing blog posts, but some days I just don’t feel like it – and that’s normal. Deadlines keep me going on those days.
Creating a writing schedule helps you stay on track. Breaking the process into smaller tasks like drafting, editing, and publishing can also prevent you from feeling overwhelmed.
A good rule of thumb for publishing blog posts is at least once per week. However, don’t be too hard on yourself if you can’t do it – what really matters is creating a routine that you can stick to.
Don’t ever sacrifice your content quality. It’s better to publish fewer pieces that genuinely provide value than to churn out posts that lack substance.
Keeping your blog updated signals to search engines that it’s active and relevant. Seeing the latest blog posts from the past few weeks leaves a better impression than stumbling upon something that was last updated years ago, right?
To block time for writing, choose a method that’s simple and accessible for you. Overcomplicating the process can make procrastination worse.
I recommend these three easy ways to arrange a content calendar:
- The easiest one is to use Google Calendar (or any calendar app you love) and set notifications to start writing, editing, or publishing your blog post.
Expert Tip
Try to post in the mornings within your time zone or where your target audience resides, as it tends to do better. So, if I’m targeting people in Europe, I would do it in the mornings, around maybe 8 AM in the UK. That way, you can get higher traffic and have more social share possibilities.
- Make use of any mainstream tool you’re most familiar with. For example, our team uses Google Sheets a lot, so we created a content calendar with it. Feel free to make a copy of our content calendar template and modify it as you see fit.

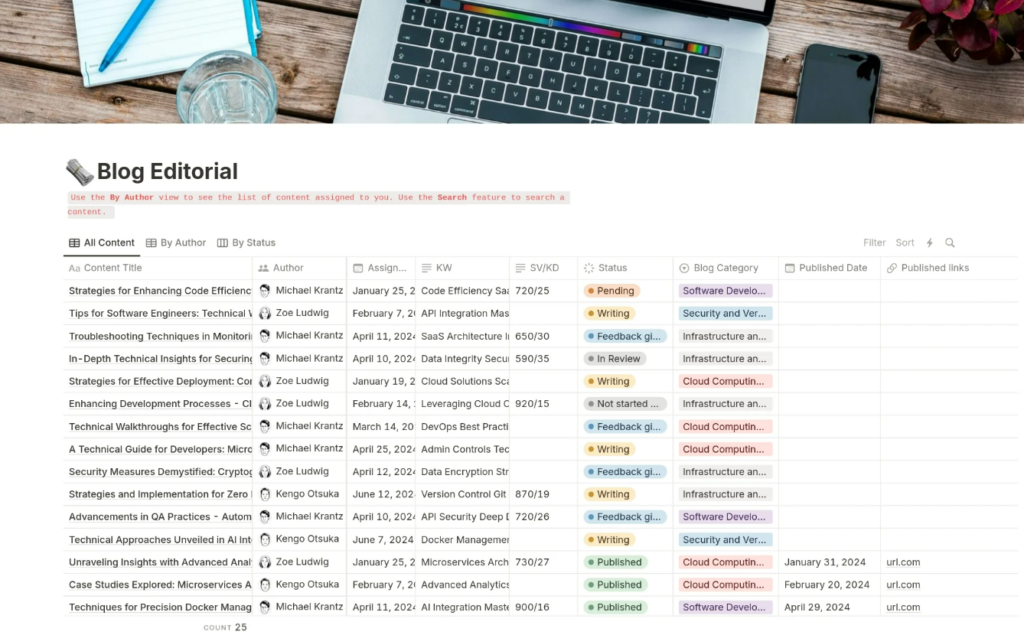
- Productivity tools like Asana, monday.com, ClickUp, Trello, or Notion provide many helpful workflow templates to organize your blog writing schedule. Here’s an example of a cool blog editorial template I found on Notion:
Write and optimize the blog posts
Google’s helpful content system encourages blogs to create genuinely useful content. Simply put, focus on writing for people, not search engines.
Answering your reader’s search intent is the key. As I explained before, really understand what value you can offer readers before you start writing. These blog post templates can help you answer different user search intents:
Checking the ranking articles on search engines can also help you find a unique angle or information gap you can fill. Make sure you don’t just repeat what has been said over the search engines. Otherwise, they may read your posts as AI-written.
Speaking of using AI for blog post writing, you don’t have to avoid it at all costs. It can be helpful for creating a rough first draft or brainstorming topic ideas. Just be sure to sprinkle in your unique touch afterward! Adding your personality and perspective sets your writing apart from bland, cookie-cutter content so that it can be more relatable and engaging.
Write your sentences in smaller chunks, as readers often skim through content quickly. Avoid bulky paragraphs, which can harm your blog’s readability.
Additionally, using clear headings and arranging the tags in numerical order will help search engines understand your content.
When writing the headings, include the focus keyword wherever it naturally makes sense to signal its importance to search engines. Keeping the headings around 50-70 characters also makes them easier to read and fit better in search engine result pages.
For example, this is the hierarchy of this article:
- H1: How to start a blog and make money from it
- H2: How to start a blog in 7 steps
- H3: Pick a niche for your blog
- H3: Choose a platform for your blog
- H3: Get hosting and a domain name
- H3: Build your blog on WordPress
- H3: Start writing and publishing blog posts
- H3: Increase your blog traffic
- H3: Monetize your blog
- H2: Conclusion
You can also use question-based headings to boost your chances of appearing in Google’s Featured snippets and People also ask sections.
In case you aren’t familiar with both, Featured snippets highlight search results that provide quick answers to user queries, often displayed at the top of the search page. Meanwhile, People also ask displays related questions that users commonly search for.
Tools like AlsoAsked help identify question sentences people commonly type in search engines, which you can answer in your article.
Publish your blog posts on WordPress
To create your first blog post on WordPress, navigate to Posts → Add New Post. You will be taken to the WordPress post editor, where you can write and format your article. Like editing pages, here, you can use blocks to add text, images, videos, and various widgets.
Once your article is written, make sure the post settings are configured the way you want. Access the Settings panel on the right side of the post editor. Here, you can choose whether to allow comments, add tags, set the post’s categories, or upload a featured image.
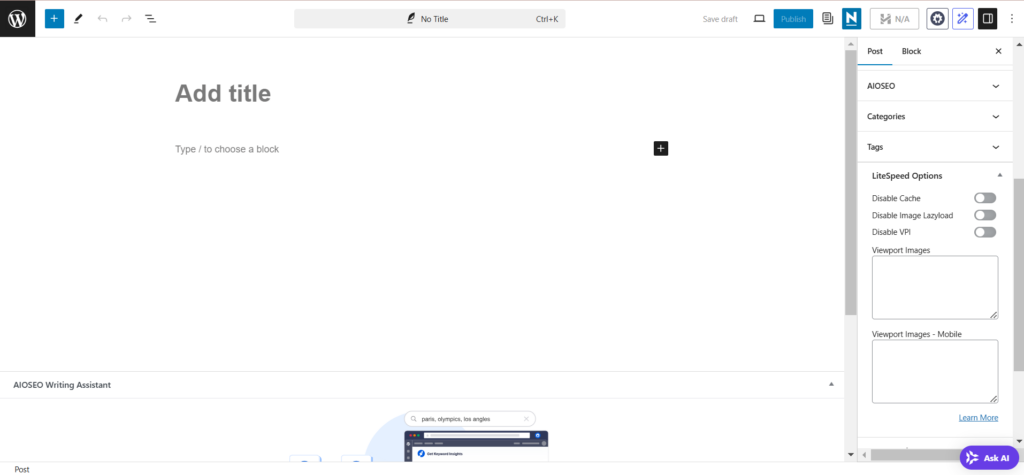
If you install an SEO plugin, you may also see additional SEO settings integrated within the post editor. Complete them to help make your blog post recognizable for search engines.
Most importantly, make sure to add a meta title and a meta description and edit the WordPress slug. This lets you customize the appearance of your article in the search results, making it more enticing to read and user-friendly.

Lastly, Preview the blog post to make sure everything’s in order. For example, check that the title isn’t too long and that all paragraphs and images look as intended.
Once you’re happy with it, click Publish. Congratulations on launching your very first blog post!
6. Increase your blog traffic
The key to driving traffic to your blog is consistently creating content that resonates. Think of the last blog that inspired you. You probably passed it along to other people who’d enjoy it, right? Over time, this word-of-mouth can build a steady stream of visitors.
That said, it may not be enough. You may have to put in extra effort to draw in readers, much like opening a café and inviting people to stop by and try it. Since you’ve poured your heart into your content, be the first to spread the word!
Here are some ways to promote your blog:
Optimize your blog for search engines
WordPress SEO involves making your blog content easily understandable for both users and search engines. This increases your visibility in search results, which can drive more organic traffic.
First thing first, submit your blog to search engines to get indexed faster. You just need to prepare your blog’s sitemap, which can be automatically created using an SEO plugin. Don’t forget to submit every published blog post and update your sitemap.
Note that successful SEO requires consistency. Even after getting your blog at the top of search pages, staying there will require continuous optimization due to algorithm changes.
Promote your blog on social media
Being active on social media puts your posts in front of a larger, more diverse audience. Plus, social media algorithms prioritize engaging content, which means a well-crafted post can gain significant reach.
Think about how often someone scrolls through TikTok looking for quick recommendations – they could discover your content next!
Just remember to focus on platforms where your target audience is most active. For example, if you’re targeting business owners and professionals, it’s better to focus on LinkedIn.
Fill your social media with content by repurposing your blog posts to fit your chosen platform. It’s okay to start on one social media platform – you can always expand to others later.
Note that gaining traction on social media also requires consistency. If you want to pursue this path, make sure to balance your blog-writing schedule with the time to be active on social media.
Add more time slots in your content calendar to arrange your social media activity, such as repurposing your blog post content and interacting with your audience. This way, you can maintain a steady flow of content and retain audience interest across platforms.
You can also participate in discussions on online communities like Reddit or Quora by positioning yourself as a knowledgeable, go-to source in your niche. Don’t forget to add your profile picture, title, and bio to add credibility to your answer.

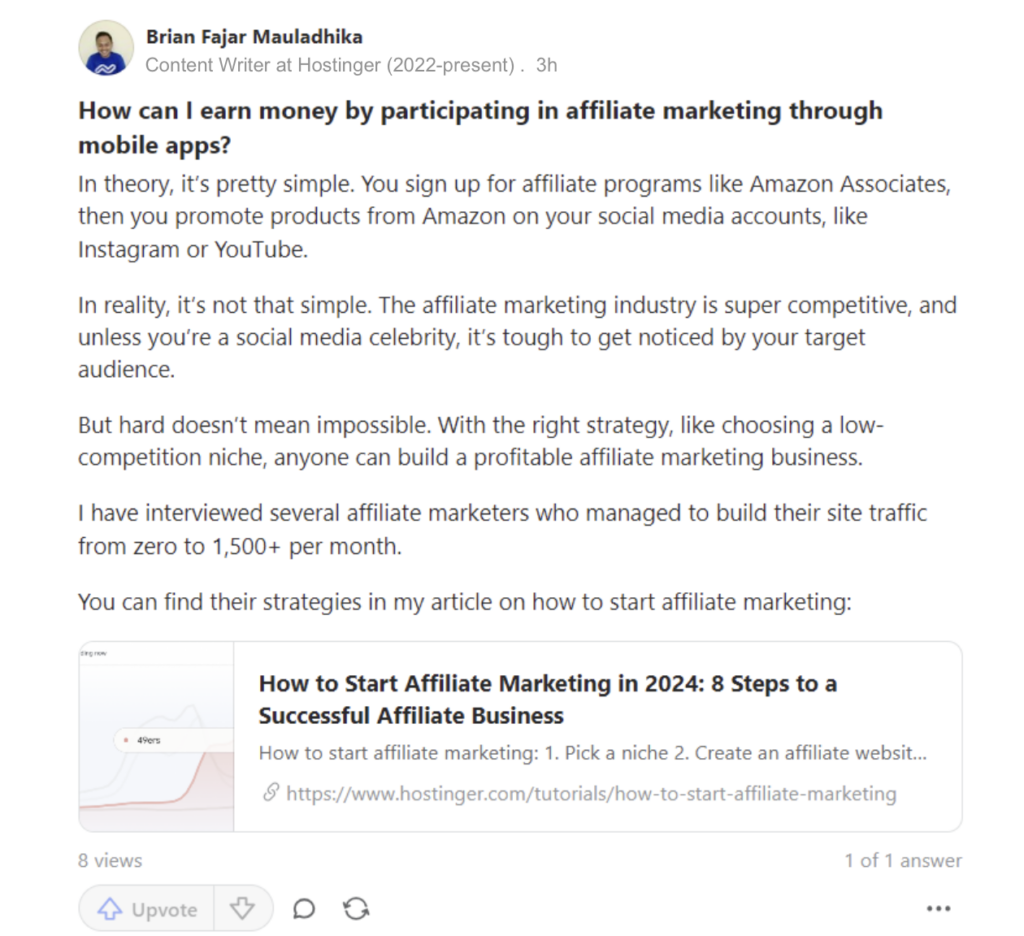
Then, look for questions related to your blog’s topic and provide thoughtful, valuable responses. If any of your blog posts add more value to your answer, add a link to it.
For example, Brian answered a question about how to start an affiliate marketing business on Quara and added a link to his article.
That said, focus on being helpful and avoid being overly promotional. In time, community members may recognize you as an expert and naturally want to learn more about your blog.
Email marketing
Email marketing involves sending email blasts to invite people to read your blog. Even in the age of social media, it remains an effective way to reach an audience.
If you want to implement this strategy, create a custom email address that matches your domain (like name @ yourblogdomain.com) to establish trust and credibility with your audience. This small detail can impact how your audience views your emails, making them more likely to engage.
Lucky for you, custom emails are included in every Managed WordPress hosting plan we offer. Follow this guide to set up your Hostinger email accounts.
Once you get the email account sorted, here are the steps for creating an email newsletter in a nutshell:
- Choose an email marketing tool. An email marketing tool simplifies your campaign, from collecting leads to email customization. If you’re using WordPress, simply activate a newsletter plugin.
- Build an email list. Encourage new readers to sign up for your email newsletter on your homepage and other pages and posts. Offer clear benefits to convince them to subscribe, like free eBooks, templates, cheat sheets, or toolkits.
- Send high-quality emails. The more value you can offer readers, the more likely you are to brand your blog as a trusted source in your field. Top the content off with engaging subject lines and call-to-action buttons linking to your blog post.
Guest blogging
Guest blogging, or guest posting, is writing content for other blogs. The main goal is to gain exposure for your blog by getting published on bigger, more established websites. This also lets you build high-quality backlinks, encouraging search engines to recognize your blog’s authority.
To start doing this, you need to find the sites that are receiving guest posts, contact them to discuss the terms and conditions, and send the article as agreed in the deal. That’s it!
Note that different sites have different rules for guest posting. Some require a fee, while others may ask for content exchanges, which involve promoting each other’s blog content without payment. Make sure you thoroughly understand the terms and conditions.
Also, when contacting other blogs, prepare a few topic ideas that align with their audience’s interests and your expertise. This will increase the chance of attracting the right audience to your blog.
Even when writing for someone else’s blog, focus on providing value to readers. If your articles perform well, you could build long-term partnerships with these websites, leading to more backlinks and exposure.
7. Monetize your blog
Once you’ve got some traffic coming in and a solid collection of posts, the next step is figuring out how to make money from your blog. Bloggers can make up to $5,450 per month on average after around five to ten years, according to Productive Blogging’s survey.
Additionally, the survey shows that older blogs with more posts generate higher income. So, don’t be discouraged if you’re just starting out. As long as you can offer valuable blog posts, there’s always a chance to make money from blogging and build passive income.
Try out different blog monetization methods to find what works best for your niche:
- Displaying advertisements. The simplest way to start earning money from blogging is by displaying ads on high-visibility spots on your website, such as the header, sidebar, or posts. To do this, simply sign up and add Google AdSense to your WordPress blog.
- Affiliate marketing. Starting an affiliate marketing business lets you make money by sharing links to products or services on your blog. Whenever someone clicks your link and makes a purchase, you’ll earn a commission – usually between 5-30% of the product’s price. The exact rate depends on the program and what’s being sold.
- Selling digital and physical products. Digital items like eBooks, courses, or templates (think financial trackers or wedding planners) are great since there’s no inventory or shipping involved. Prefer physical products? That works, too, if it suits your audience. To get started, add eCommerce functionality with WooCommerce to your blog.
- Freelancing. Blogging showcases your skills in writing, communication, and often other specialized topics, making it a perfect gateway to freelancing opportunities. If you’re passionate about the niche you’re blogging about, consider offering services like writing, graphic design, social media management, or web development, to name a few. Check out the best freelancing websites to find your first clients.
- Offering consulting or coaching services. Once you’ve positioned yourself as an expert in your niche, offering consulting or coaching services can be a great income stream. Create packages, like hourly consultations or long-term coaching plans, to cater to different needs. Simplify bookings and payments with tools like Calendly, or use a WordPress calendar plugin to keep things organized.
- Creating exclusive content. Setting up a members-only area with exclusive content lets you earn recurring income and build stronger connections with loyal readers. Offer perks like early access to posts, exclusive newsletters, webinars, or a private community – whichever your audience values most! Plugins like MemberPress or Paid Membership Subscriptions make it easy to add membership functionality to your blog.
- Brand partnerships. As your blog grows, start collaborating with brands through sponsored posts, product reviews, or mentions. Create a media kit highlighting your blog’s performance, audience demographics, and rates to attract potential partnerships. Alternatively, make the pitch through platforms like Aspire or Intellifluence, where brands look for collaborators.
Conclusion
Starting a blog offers many personal and professional development advantages, from strengthening your branding to earning extra money. The good news is it’s now easier than ever to begin your blogging journey.
In this article, I’ve provided the seven simple steps on how to start a blog, including picking the right niche, choosing a platform, writing and publishing content, and monetizing your blog.
Every successful blogger started where you are now with an idea and a willingness to try. Only by taking that first step will you know where your blog could take you!
If you have any questions or need more guidance, feel free to leave a comment below. I’ll be more than happy to help.
How to start a blog FAQ
Is blogging profitable?
Yes! As long as you offer something valuable on your blog, it can be profitable. However, remember not to expect high earnings in your first month of blogging – building a profitable blog takes effort and consistency.
How much can I earn from blogging?
According to Ryan Robinson, bloggers can make an average of $45,000/year. However, the number will vary significantly depending on factors such as the overall topic, the blogger’s experience, and their reputation in the industry.
Should blogging be a full-time job or a side hustle?
The answer to this really depends on your personal goals and overall situation. A good rule of thumb is to start blogging as a side hustle and only make it a full-time endeavor once it begins to outgrow the income or demands of your main job.
Can beginner bloggers make money?
Absolutely! Anyone can make money blogging once they have a steady traffic stream. Common monetization methods include joining an affiliate marketing program, displaying ads, and partnering with brands. You can also offer coaching services or freelance writing for other sites.
Can I start a blog for free?
Yes, many blogging platforms are free. However, they come with trade-offs, such as limited customization, ownership, and monetization options. Still, launching your blog on a free platform could be a useful starting point until you’re ready to scale up.


Comments
August 23 2018
The toughest thing was to create a good name for our blog :D
August 23 2018
Indeed! Picking a suitable blog name is a tricky part for many people :D
August 24 2018
Wow, great read! I was looking up how to start a blog on Google and came across your article by chance. I will make sure to apply your given tips to my new technology blog that I plan to launch. Now I am very fired up. Thank you Hostinger!
August 24 2018
That's awesome, Rahjit! I hope success will guide you every step of the way ;)
August 24 2018
I used to run my blog with Joomla, but it worked really slow. Then I migrated it to WordPress and I've never been happier! Never tried Drupal, it seems pretty cool. But I don't know much coding though :(
August 24 2018
Thank you for sharing your experience, Lee! And if you feel like learning something new, we've got a great guide on how to learn coding for free! ;)
February 05 2020
Thanks for the info, I will be looking forward to more info from you guys. I haven't done that before but a journey of a thousand miles begins with a step.. Thanks once again
April 02 2020
what theme are you using for your blog
April 03 2020
Hey Victor, we are using a custom WordPress theme.
August 20 2020
Very soon this website will be famous among all blog viewers, due to it's nice articles or reviews
August 29 2020
A lot of thanks for shared this post on public .
September 07 2020
Hey, Awesome post! Thanks for sharing great information about "how to start a blog" Follow the given steps to be aware of selecting a web hosting company for your blog. Step #1: Select a best niche for your blog. Step #2: Choose a running a blog platform. Step #3: Pick a domain name. Step #4: Get a internet internet hosting account. Step #5: Starting a weblog on WordPress. Step #6: Select a theme and graph your blog. Step #7: Write content material and promote your blog. Best regards!!
November 11 2020
Great tips! Thank you.
November 23 2020
Excellent article. Among so many things, the niche of your blog and web hosting plays a crucial role. And keyword research is also a fundamental part.
May 15 2021
Wow nice ...very soon this blog will be the best
May 19 2021
Hiya Huldah, Thank you! :)
June 04 2021
This article is really useful to know Hostinger hosting better and to use it to maximize our chance to rank in Google.
February 17 2022
thank you
February 22 2022
Thanks for sharing an amazing articles. I would like you to take a look at another amazing Business theme named Oliev
March 02 2022
Thank you so much for sharing this wonderful post with us.
March 23 2022
great post
May 14 2022
Thank you, have a nice day
May 31 2022
Very nice blog. Much Appreciated
October 26 2023
hi Matleena/ Domanatas please tell me, how to create a blogger website for Google adsense.
November 07 2023
Hi Malik! To earn money from a blog, I recommend using WordPress. WordPress is an excellent choice for beginners. e even have easy-to-follow tutorials that will guide you through the process of adding AdSense to WordPress site. I hope you like it ?
November 11 2023
Nicely written post. I honestly like the topic covered here. I'll come back from time to time for more postings like this one.
November 14 2023
Thank you for your kind words! I'm delighted to hear that you enjoyed the post. Feel free to drop by anytime for more content on similar topics. Your feedback is always appreciated! ?
December 15 2023
Truly enjoyed your unique viewpoint.
December 19 2023
Thank you so much! If you have any further thoughts or if there's anything else you'd like to explore, feel free to let us know. We're here to assist and provide information ?
January 23 2024
Thanks for the article! Was helpful learning how to start a blog.
January 25 2024
You're welcome! If you have any more questions or need further assistance, feel free to reach out. Best of luck with your blogging journey ?
February 29 2024
Great post! The author has taken efforts to explain the steps of how to start a blog. Loved reading it.
March 05 2024
Thank you for the kind words! If you require further assistance or have any inquiries, please don't hesitate to get in touch ?