Samsung Email Setup: A Step-by-Step Guide
Around 85% of online users can confirm – setting up email accounts on a mobile device helps to access and manage emails on the go. Fortunately for those using Samsung, setting up an email account on their device is simple with the Samsung Email app.
No matter the email provider, this app will help to set up your email. However, for custom email addresses, there are configuration settings that require an additional step. Thus, this article will go over the steps to add and remove a custom email account on a Samsung device.
In addition, as Gmail dominates the email platform market with 1.8 billion users worldwide, we will share the Samsung email setup guide to add a Gmail account, including additional privacy settings that can be changed manually.

1. Find Your Email Details
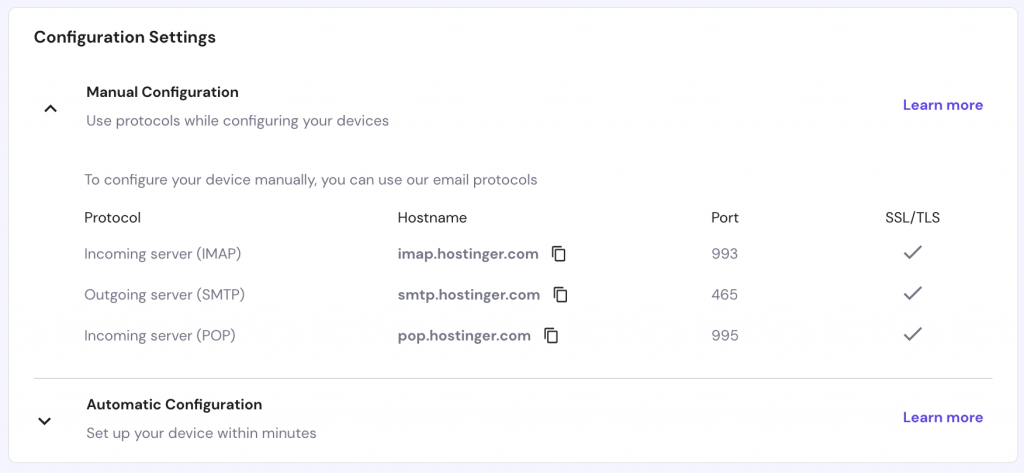
For custom emails, it is essential to find the email details first from the email server host. They include the incoming server (IMAP) and outgoing server (SMTP) settings. Take note of the hostname, security type, and SSL port for the manual setup.
Hostinger’s email hosting users should follow the steps below:
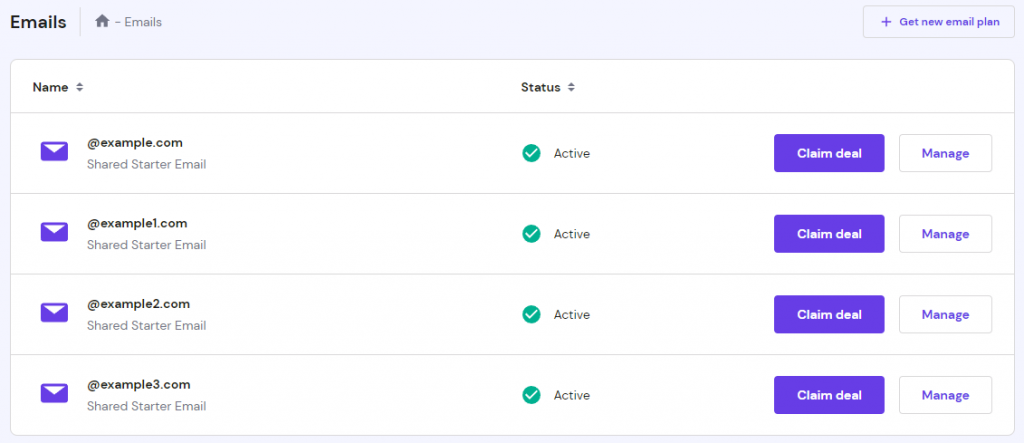
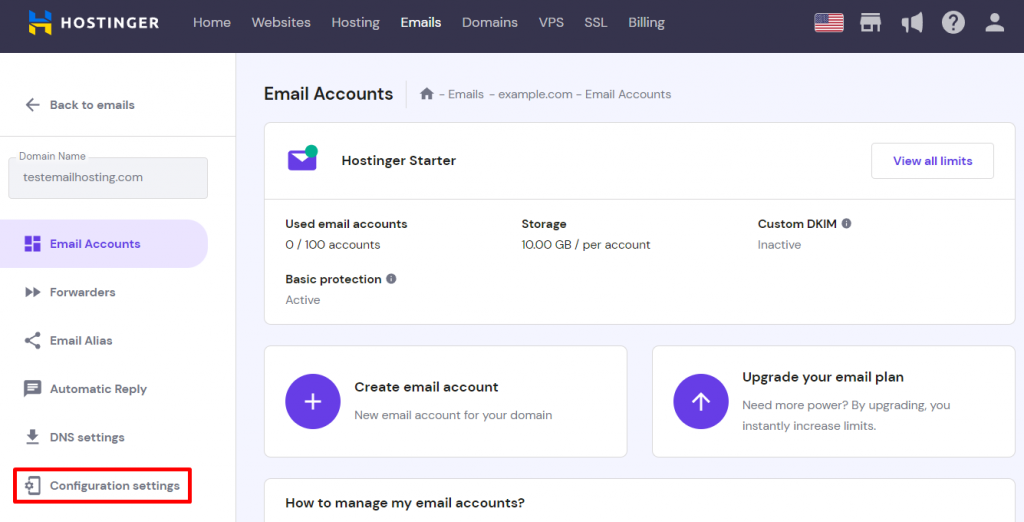
- Log into your Hostinger account and head to the hPanel dashboard to check your mail account details. Go to the Emails section and select your domain.

- From there, click on the domain and select Configuration Settings under the Domain Name to find the configuration settings.

- Select Manual Configuration under Configuration Settings. Keep the following details for use later:
- The hostname of the IMAP server and SMTP server.
- The SSL port of each server.

2. Add an Email Account to Samsung Email
The Samsung Email app is a native email client on Samsung mobile devices. The app can be used to set up any account type manually or automatically.
The automatic setup usually works with popular email solutions, such as Google Workspace’s (formerly G Suite), Gmail, Yahoo, Hotmail, Outlook, Microsoft Exchange Server, and Office 365. If the app cannot automatically find your email or if you do not use any of the mentioned providers, opt for the manual method.
We’ll show you how to add a custom email manually using Samsung Galaxy S20, a device running Android 11. Keep in mind that the process for other Samsung devices might be slightly different.
Here are the general setup instructions to add a mail account manually on Samsung Email:
- From the home screen, open the Samsung Email app. When the Set up Email screen appears, select Other.
- Fill in your Email address and Password. Then, tap Manual setup or Sign in, as both buttons will lead to the same page.
- A popup window will appear with three account types to choose from: POP3 account, IMAP account, and Microsoft Exchange ActiveSync. Tap the IMAP account to be able to access mail content on multiple devices.
- The server will automatically insert your full email address, password, the details of the server, security type, and port. Match the information to the configuration details from the previous section. Don’t forget to:
- Leave IMAP path prefix blank.
- Leave Require authentication to send emails ticked.
Samsung Email will then start synchronizing the mail account.
If you come across a password error, double-check the password and IMAP and SMTP server information. If this error occurs, we recommend inputting the server, security type, and port again.
Pro Tip
Sometimes, even when your password is correct, resetting it will solve the password error.
Try using these alternative ports if there are still problems:
- Non-SSL IMAP: 143 port
- Non-SSL SMTP: 587 port
However, if the problem persists, try contacting the email provider or Samsung customer support.
3. Remove an Email Account From Your Device
In case you want to remove an account, open the Samsung Email app again. Then, follow these steps:
- Sign in and tap the three lines menu icon on the top left of the Inbox.
- Select the gear icon above the email address.
- Choose the account name under the Accounts section to remove.
- Click on the Remove button at the top right corner to finalize the steps.
Adding Your Gmail to Samsung
You can log into your Gmail account on the Samsung Email app without having to install the Gmail app. Instead of Others, select Gmail G Suite and enter your email address and password.
To log into Gmail for a custom domain email, use the details from the server settings:
- Head to the Settings app and tap Accounts and backup.
- Select Manage accounts and tap Add account.
- Tap on the Personal (IMAP) option under Add account.
- Fill in your Username, Password, and Server for both Incoming and Outgoing server settings to sign in.
What Does ‘Samsung Email Was Granted Access to Your Google Account’ Mean?
To use Gmail in the Email app, Samsung needs to register the user’s information to get authentication. For this process, users will get an auto-generated notification from Google: Samsung Email was granted access to your Google account.
If you do grant access to Samsung Email, there is no need to do anything else. If you choose to revoke access, you can no longer receive and send emails using the app. To revoke access, remove Samsung Email from Apps with access to your account.

Conclusion
We have shared the setup guide on adding and removing email accounts on the Samsung Email app. With popular solutions, such as Yahoo, Hotmail, or Outlook, it is possible to do an automatic setup right away. However, for a manual setup, get the email details from the email provider first.
If you are experiencing problems with the setup, verify all the entered information, reset the password, or contact customer support.
We have also gone over how to add a Gmail account using the Email app and the device’s settings. If you receive a notification about granting access to your Google account, it means that Samsung can sync your email account. However, its access can be revoked at any time.
If you have any questions regarding setting up an email account on a Samsung android device, leave a comment below.
Check Out These Email Tutorials
How to Setup Outlook
How to Add Email Account on iPhone
How to Add Emails on Thunderbird


Comments
September 30 2020
Hi, I get an error message that says it cannot verify my account. I don't know hoe to verify it. I have follow each step exactly, I just cant get it to work. Thank You
November 18 2020
Hey there Stephanie. Drop a message to our Customer Success team and we will help you out.