How to Run a Dedicated Server on ARK Using Hostinger Game Panel and Manual Set-Up
ARK: Survival Evolved is an ever-popular open-world game that challenges players to survive in a harsh enviroment filled with dinosaurs and other prehistoric creatures.
Its successor, ARK: Survival Ascended, offers enhanced graphics and improved performance, making the gameplay even more enjoyable.
Setting up your own dedicated server for ARK provides numerous benefits over playing on public servers, such as customizable game difficulty levels, player slots, and mods. You can also build a private community with friends and control server wipes and resets, preventing unexpected data loss.
In this article, you’ll learn how to set up, configure, and manage a dedicated ARK server. Whether you’re playing Survival Evolved or Survival Ascended, our comprehensive guide will help you get started with your game server.
Prerequisites
Here are the hardware specifications to run an ARK dedicated server, which are applicable to both versions. Please note that these requirements are based on resources used after installing one server.
- Operating system. 64-bit major Linux distributions.
- CPU. At least a dual-core Intel or AMD-based processor.
- RAM. A minimum of 12 GB of RAM.
- Storage. At least 20 GB of free hard disk space.
For a smooth ARK server installation, use a stable internet connection, whether broadband or Wi-Fi.
If you want to host the game on a Linux VPS, we recommend having a basic understanding of Secure Shell (SSH) and Linux commands. These skills are essential for ARK server setup and management through the command line interface (CLI).
How to Set up a Dedicated ARK Server Using Hostinger Game Panel
Using Hostinger’s Game Panel is the easiest way to set up a dedicated ARK server. Available on all our game hosting plans, including ARK server hosting, this graphical user interface (GUI) tool helps you install and manage your game server with minimal effort.
This approach is suitable for beginners or players who want to quickly enjoy the game on their server rather than dealing with a complex manual setup process.
Here are the steps to get your own ARK server up and running on Hostinger’s Game Panel:
- Choose a game server plan that meets your needs. Based on the requirements in the previous section, we highly recommend Game Panel 4 with a quad-core AMD processor, 16 GB RAM, and 200 GB NVMe storage.
- After purchasing, follow the on-screen onboarding instructions to pick a server location near your player base and create a secure password for your Game Panel profile.
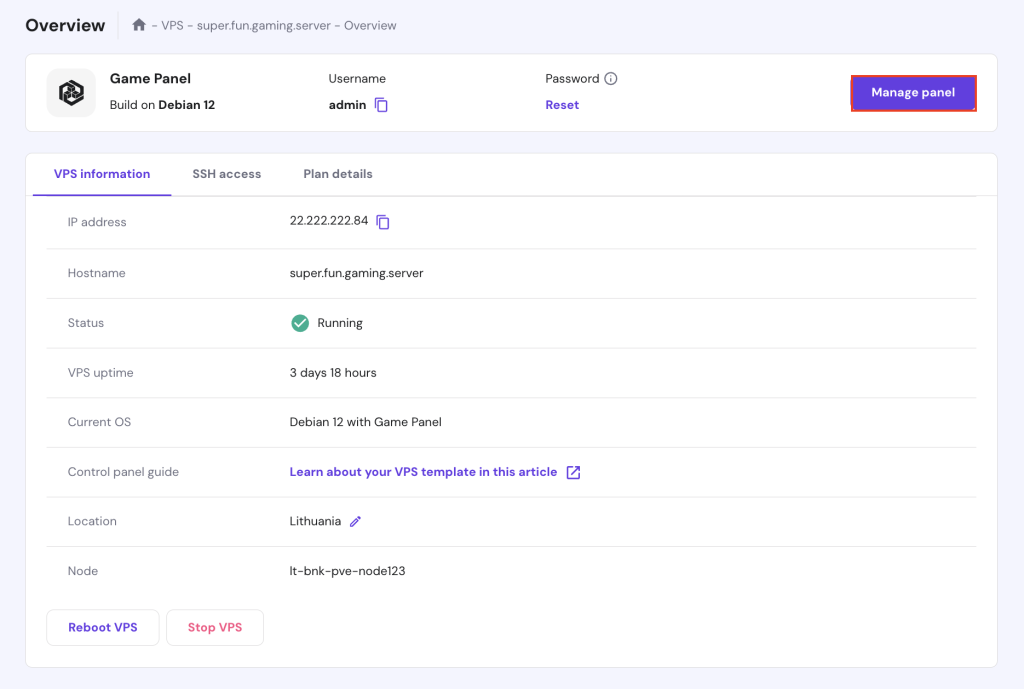
- Access the VPS dashboard and click Manage panel to open Game Panel.
- Enter your username and password on the login page.
- After logging in, click Create Instance and choose either ARK: Survival Ascended or ARK: Survival Evolved from the dropdown menu.
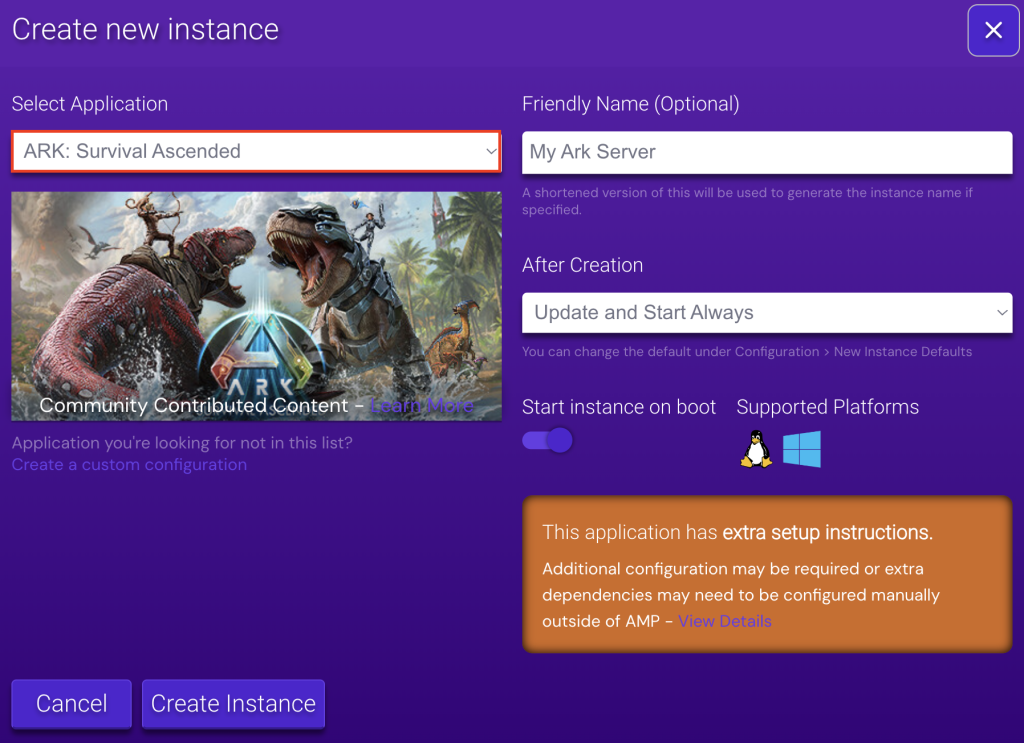
- Assign a unique server name and click Create Instance.
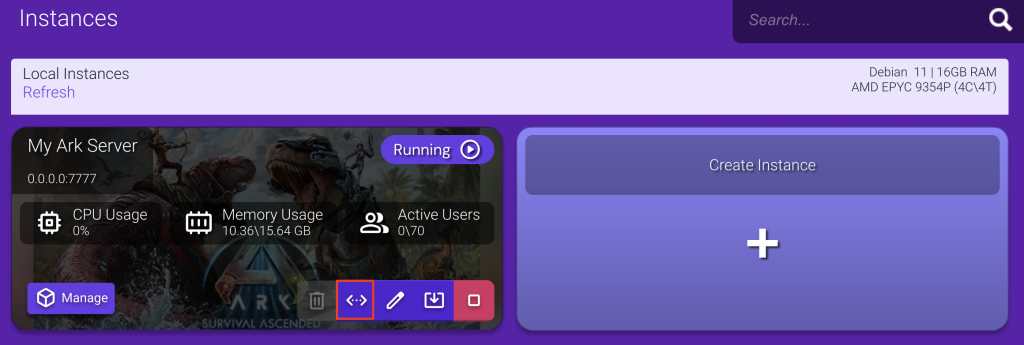
- Wait for the installation to complete within 10-15 minutes. Once done, click Manage to explore your newly created ARK server.
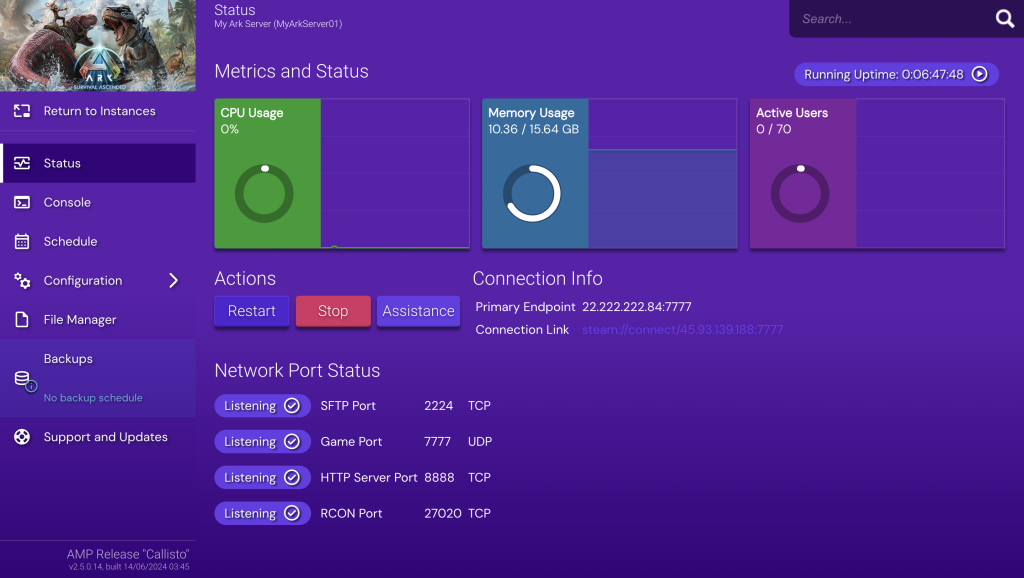
- In the Status menu, you can see your instance’s running indicator, resource usage, and action buttons to start, restart, and stop the server. There’s also information about the server IP and port for players to join your server.
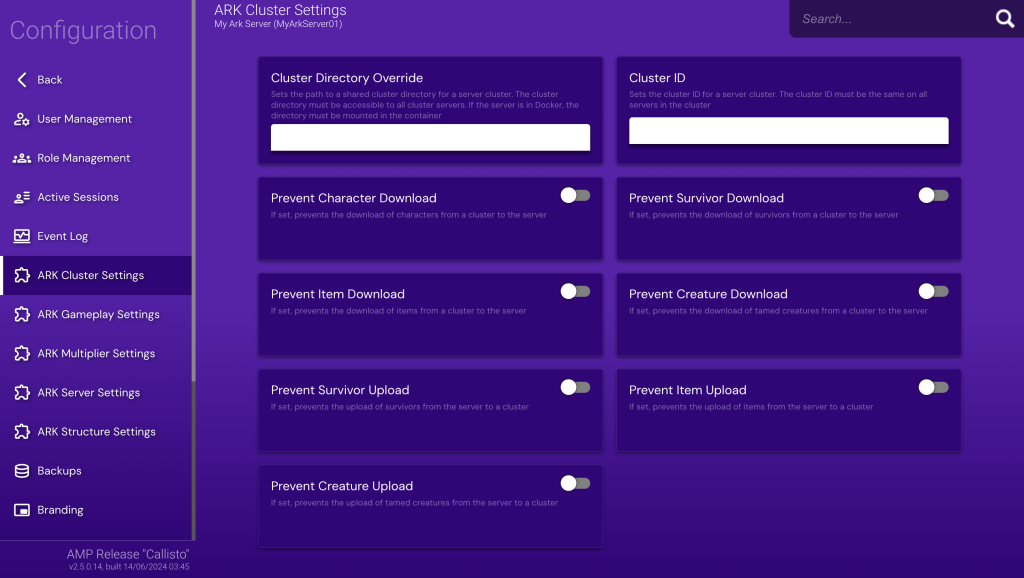
- Access Configuration to explore advanced ARK server options, including tweaking Cluster, Gameplay, Multiplier, and Structure settings.
- Use the Backup feature to create and restore backups of your game server data. Meanwhile, Support and Updates is handy for updating your game instance when a new version is available and getting assistance if needed.
Congratulations on successfully setting up your ARK dedicated server. You’re now ready to embark on epic adventures, tame dinosaurs, and build bases with your friends.

How to Run a Dedicated ARK Server Manually
In this section, we’ll demonstrate how to manually create an ARK: SA server on a Debian 12 VPS. Players choosing ARK: SE might need to use slightly different commands.
1. Get a Gaming VPS
To run a dedicated ARK server, the first step is to get a reliable gaming VPS service. Here are key considerations when choosing a gaming provider:
- Performance. Make sure the VPS offers sufficient CPU and RAM to handle the demands of hosting an ARK server.
- Storage. Look for ARK VPS hosting plans with ample storage, preferably NVMe SSD, to ensure fast read/write speeds and adequate space for game files.
- Server locations. Choose a provider with multiple server locations around the globe to minimize latency when playing the game.
- Access and control. Ensure full administrative access to the server so you can completely control your server software.
- Scalability. Opt for a VPS service that allows easy upgrades to higher plans as your server’s needs grow, ensuring you can scale resources without downtime.
As one of the best game server hosting providers, Hostinger excels in all these areas, making it an ideal solution for hosting ARK dedicated servers. Our game hosting plans offer up to 8-core AMD CPUs, 32 GB of RAM, and 400 GB of NVMe storage to ensure top performance.
To provide the best gameplay experience for players worldwide, you can choose server locations available in Asia, Europe, North America, and South America.
Built on VPS, Hostinger grants you full root access to the server, allowing you to customize your games to your liking, including installing custom mods.
Last but not least, Hostinger’s game hosting service is easily scalable, meaning that you can grow your server as needed. This is particularly beneficial when your player base expands or you want to set up multiple dedicated servers under one account.
Suggested Reading
Interested in hosting multiple games on a server? Check out our curated list of the best games to install on a dedicated server, including the latest gaming surprise Palworld or classics like Minecraft and Counter-Strike.
2. Set up Your VPS
After selecting a reliable gaming VPS, it’s time to set up your server. Follow these steps to get started:
- Open a remote console server access tool like PuTTY or terminal to log in to your VPS via SSH. Run the following command, replacing username and your_server_ip with your actual credentials:
ssh username@your_server_ip
- Update and upgrade your server’s package lists and installed packages to ensure you have the latest versions:
sudo apt update

sudo apt upgrade
- Install the software-properties-common package to your Debian system. This package allows you to add additional architectures and repositories to the package manager:
sudo apt install software-properties-common
- Add the i386 architecture to your system, as we need it to access 32-bit software like SteamCMD in the subsequent step:
sudo dpkg --add-architecture i386
- Update your server’s available repositories and package managers:
sudo apt-add-repository non-free

sudo apt update
3. Download ARK Server Files
Next, install SteamCMD, configure a new user, and download the ARK dedicated server files. Here’s how to do so:
- Use this command to install SteamCMD, the command-line version of the Steam client, to download and update game servers:
sudo apt install steamcmd
- For security reasons, it’s best to run the ARK server under a dedicated user. Create a new user with a home directory. Here, we name it arkuser:
sudo useradd -m arkuser
- Switch to arkuser and navigate to its home directory by executing these commands:
sudo -u arkuser -s

cd ~
- Use SteamCMD to download the ARK: Survival Ascended server files:
/usr/games/steamcmd +@sSteamCmdForcePlatformType linux +force_install_dir /home/arkuser/arkserver +login anonymous +app_update 376030 validate +quit
- For ARK: Survival Evolved, run the following command instead, replacing 376030 with 346110:
/usr/games/steamcmd +@sSteamCmdForcePlatformType linux +force_install_dir /home/arkuser/arkserver +login anonymous +app_update 346110 validate +quit
- Wait around 10 to 15 minutes for the download to finish. Once completed, switch back to the root user with:
exit
4. Configure Your ARK Server
Now, you need to create a service to run the ARK server. While you can also initiate it with the server executable file, using a service lets you start, stop, and manage the game server as a background process. Here are the steps:
- Create the service file and open the nano editor by running the following:
sudo nano /etc/systemd/system/arkserver.service
- Add the following content to this file to define the ARK server service:
[Unit]

Description=ARK Dedicated Server

Wants=network-online.target

After=network-online.target

[Service]

LimitNOFILE=1000000

Environment=SteamAppId=376030

Environment=LD_LIBRARY_PATH=/home/arkuser/arkserver/linux64:$LD_LIBRARY_PATH

Type=simple

Restart=on-failure

RestartSec=10

KillSignal=SIGINT

User=arkuser

Group=ark

WorkingDirectory=/home/arkuser/arkserver

ExecStartPre=/usr/games/steamcmd +login anonymous +force_install_dir /home/arkuser/arkserver +app_update 376030 validate +exit

ExecStart=/home/arkuser/arkserver/ShooterGame/Binaries/Linux/ShooterGameServer <MAPNAME>?listen?SessionName=<SERVERNAME>?ServerPassword=<SERVERPASSWORD>?ServerAdminPassword=<ADMINPASSWORD> -server -log -crossplay

[Install]

WantedBy=multi-user.target
- Customize the <MAPNAME>, <SERVERNAME>, <SERVERPASSWORD>, and <ADMINPASSWORD> values in arkserver.service. For the map, you can use the default TheIsland or other valid map names like TheCenter, ScorchedEarth_P, and Ragnarok.
- If you’re configuring an ARK: SE server, remember to replace the Environment=SteamAppId value with 346110.
- After editing the file, save your changes and exit nano by pressing Ctrl + X → Y → Enter.
5. Start the ARK Server
Once you’re done with the ARK server configuration, you can start managing your dedicated server. Follow the instructions to launch ARK:
- Ensure your server starts automatically at boot by enabling the service:
sudo systemctl enable arkserver
- Start the ARK server service using the command:
sudo systemctl start arkserver
- Verify that the ARK server is running correctly by checking its status:
sudo systemctl status arkserver
- You should see the following output, indicating that the server is indeed active:
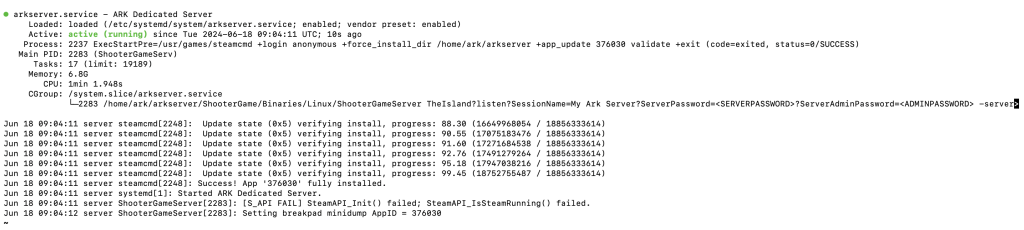
- To exit from the server status screen without terminating the server, press Ctrl + C.
- If you need to stop the server for any reason, execute the command below:
sudo systemctl stop arkserver
- To reboot the server, for example, after applying changes to the configuration file, run:
sudo systemctl restart arkserver
You’ve successfully created your own ARK server using a manual method. Now, invite your friends or fellow survivors to join and enjoy the thrilling adventure together.
Maintaining Your Dedicated ARK Server
It’s important to ensure the smooth operation and longevity of your ARK dedicated server. Here are some server maintenance tips you can implement.
Server Updates and Optimization
Regular updates and server optimization are crucial to maintaining a high-performing and stable ARK server, which will improve the experience for all players.
Schedule Server Updates
Regularly update your server files to benefit from the latest features, bug fixes, and security patches. For players installing the dedicated ARK server through Hostinger’s Game Panel, here’s how to schedule server updates:
- Open your game’s instance and go to Schedule → Add New Trigger.
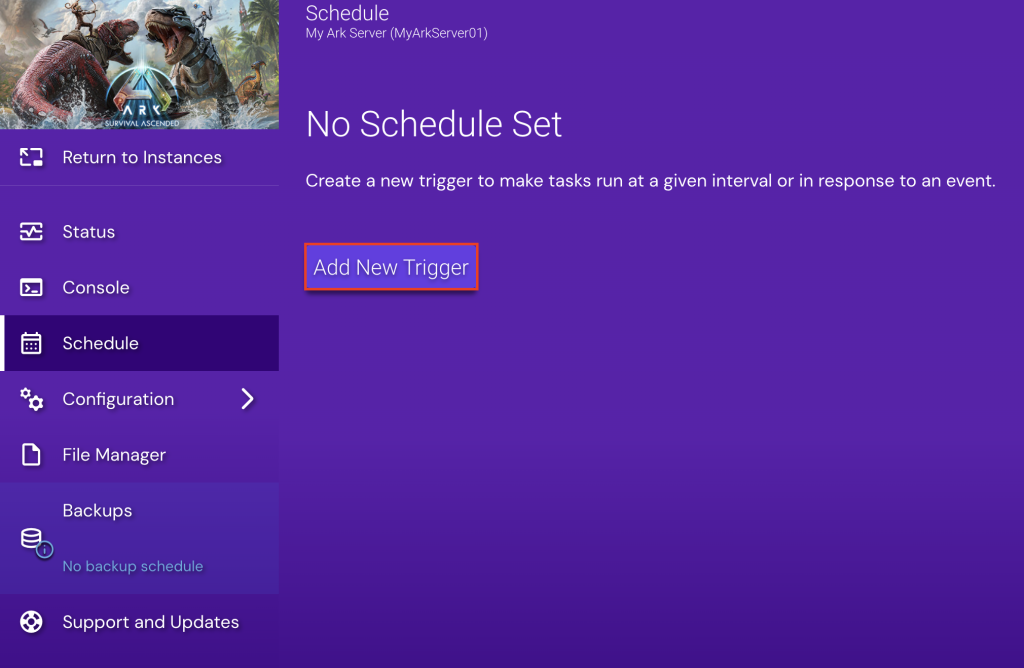
- Select Event Trigger → An update is available via SteamCMD → Add Trigger.

- Click Add New Task → Update the application and restart if it was previously running → Add Task.

You can also use a cron job to automate the server updates. For example, to update your server daily at midnight, add the following to your crontab:
0 0 * * * /usr/games/steamcmd +login anonymous +force_install_dir /home/arkuser/arkserver +app_update 376030 validate +quit
Automatically Save World Data
Configure your server to save world data at regular intervals automatically. This ensures that you don’t lose progress due to unexpected server crashes or restarts.
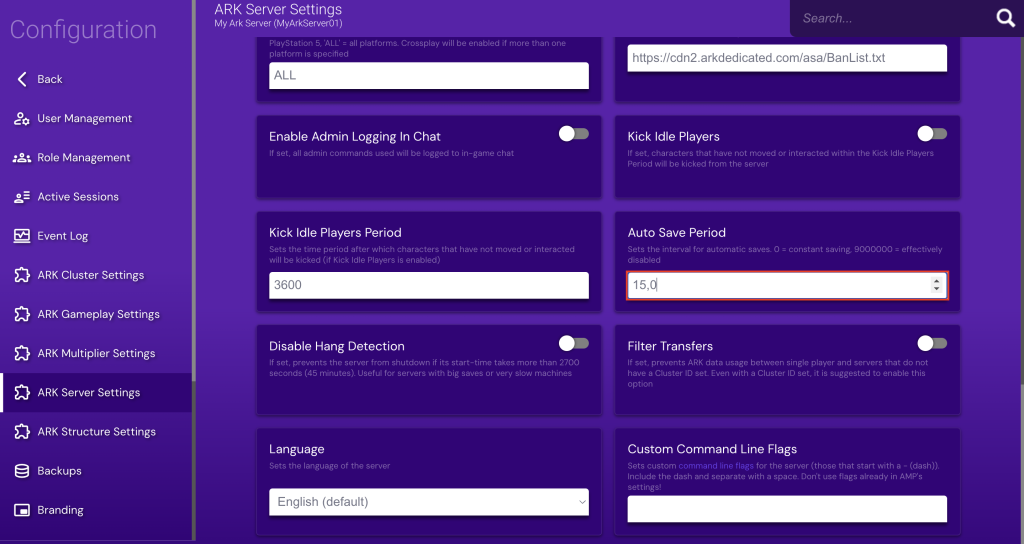
To do so, access Configuration → ARK Server Settings via Game Panel. Scroll down to the Auto Save Period field and set the interval in minutes according to your needs.
Alternatively, run the following command to open the server configuration file named GameUserSettings.ini:
nano /home/arkuser/arkserver/ShooterGame/Saved/Config/LinuxServer/GameUserSettings.ini
Then, add the following line under the [ServerSettings] section, replacing 15 with your desired interval:
AutoSavePeriodMinutes=15
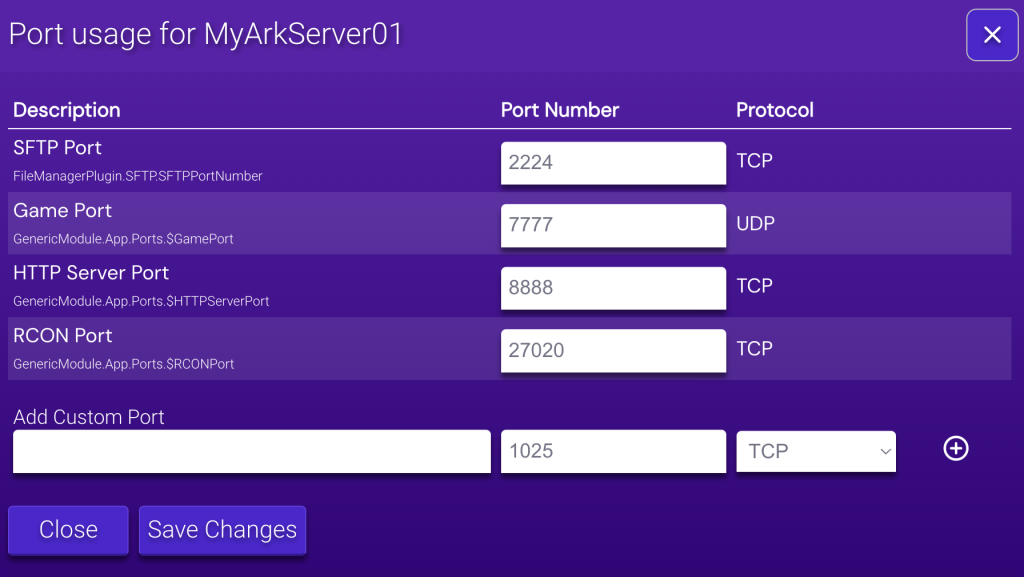
Port Forwarding and Network Configuration
If you use Uncomplicated Firewall (UFW) on your VPS, you need to open specific ARK ports to allow traffic to your server.
Open Firewall Ports
ARK servers typically require the following ports to be open:
- Game Port (UDP). 7777
- Query Port (UDP). 27015
- Socket Port (UDP). 7778
- RCON Port (TCP). 27020
In Game Panel, go to your instance’s Main Menu and click the Network Settings icon.
Then, set up the correct port settings for your ARK server according to the numbers listed above.
If you’re more comfortable using the command prompt, run these commands in your terminal:
sudo ufw allow 7777/udp

sudo ufw allow 27015/udp

sudo ufw allow 7778/udp

sudo ufw allow 27020/tcp

sudo ufw reload
Configure Router Port Forwarding
To ensure players can connect to your server from outside your local network, you need to configure port forwarding on your router. Follow these instructions:
- Access your router’s settings page by entering its IP address into your web browser.
- Find the port forwarding section, which is often under the Advanced or Network settings.
- Set the internal IP address to your VPS IP.
- Forward the Game Port (7777 UDP), Query Port (27015 UDP), Socket Port (7778 UDP), and RCON Port (27020 TCP).
Managing Server Settings and Player Slots
Ensure a smooth gaming experience for all players by adjusting player slots and other server settings that affect all players equally.
Adjust Server Settings via Game Panel
On Game Panel, go to Configuration → ARK Server Settings. Here, you can find options to set the maximum number of players, select the default map, list allowed ARK server mods, grant specific players based on their IPs, and kick idle gamers.
Configure Server Options by Editing the Configuration File:
You can also edit the GameUserSettings.ini file to customize parameters such as player limits, server passwords, and basic game mechanics:
[ServerSettings]

MaxPlayers=70

DifficultyOffset=1.0

ServerAdminPassword=YourAdminPassword
Customizing Gameplay Parameters
Game parameters are configurations that affect the player experience, such as how fast they gain experience, how quickly they tame creatures, or how many resources they gather.
Customize Gameplay via Game Panel
For Hostinger customers setting up the server on Game Panel, navigate to Configuration → ARK Gameplay Settings. There are plenty of options you can customize to enhance the gameplay, from enabling a third-person view to preventing spawn animation.

Edit Gameplay via GameUserSettings.ini and Game.ini
You can also find these settings in the GameUserSettings.ini file under the [ServerSettings] section:
- Modify the experience gain rate to make leveling up faster or slower:
XPMultiplier=2.0
- Speed up or slow down the taming process:
TamingSpeedMultiplier=3.0
- Increase or decrease the amount of resources gathered by players:
HarvestAmountMultiplier=2.5
- Customize the length of day and night cycles to suit your server’s gameplay style:
DayCycleSpeedScale=0.5

NightTimeSpeedScale=2.0
Specifically, to adjust the amount of stat points players receive per level, edit the Game.ini file by running:
sudo nano /home/arkuser/arkserver/ShooterGame/Saved/Config/LinuxServer/Game.ini
Then, modify the following lines:
[/script/shootergame.shootergamemode]

PerLevelStatsMultiplier_Player[0]=2.0

PerLevelStatsMultiplier_Player[8]=1.5
Troubleshooting Common Issues
Even with a well-configured server, you may encounter some common issues. Here are some tips to identify and resolve these problems effectively.
Server Crashes or Fails to Start
- Check the server logs located in the ShooterGame/Saved/Logs directory to identify any errors or issues. Use this command to view the logs:
cat /home/arkuser/arkserver/ShooterGame/Saved/Logs/YourServerName.log
- Ensure your configuration files, GameUserSettings.ini and Game.ini, are correctly set up. Check for any syntax errors or incorrect values.
- Make sure all necessary dependencies are installed on your server. Reinstall any missing packages.
Server Loses Characters or Progress
- Ensure your server is configured to save world data automatically. Check the GameUserSettings.ini file for the auto-save interval:
AutoSavePeriodMinutes=15
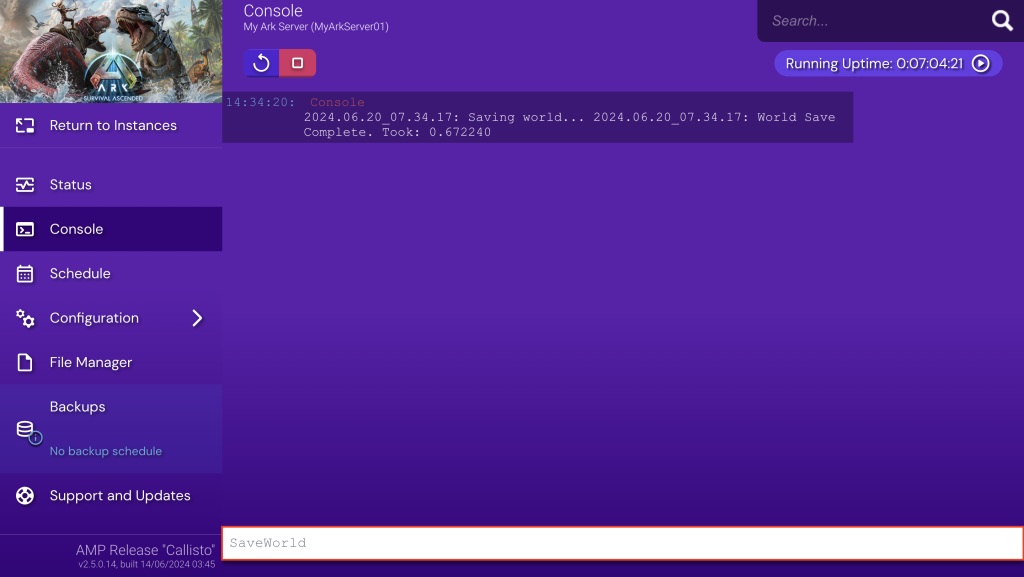
- Consider performing manual saves regularly. Type this command in Game Panel’s Console menu or ARK’s in-game console to save the game manually:
SaveWorld
Players Unable to Connect
- Check your router settings and firewall rules to make sure the necessary ports are open.
- For VPS using a dynamic IP, ensure the server’s IP address is correctly updated in the server settings.
- Confirm that the server is running and accessible by executing the following command:
sudo systemctl status arkserver
Conclusion
In this guide, you’ve learned how to create a dedicated server for ARK using Game Panel’s simple user interface and manually through the command line.
Both options offer unique advantages, whether you prefer an easy setup or more control over server customization.
For a smooth and enjoyable experience when playing with friends, consider fine-tuning server settings, customizing gameplay parameters, and updating your game instance regularly.
Have fun taming formidable dinosaurs and building impressive bases with fellow survivors!
How to Run a Dedicated Server on ARK FAQ
This section answers the most common questions on running dedicated ARK servers.
What Are the Differences Between ARK: Survival Ascended and ARK: Survival Evolved?
ARK: Survival Ascended is an upgraded version of ARK: Survival Evolved, featuring enhanced graphics, improved performance, and new content. It uses Unreal Engine 5 for better visuals and includes quality-of-life improvements and additional gameplay features.
Why Run a Dedicated ARK Server?
Running a dedicated ARK server offers better control over game settings, enhanced performance, and a more intimate gaming experience with friends. With a game server, you can build a private community, customize game parameters, and ensure reliable uptime and stability.
What Ports Do I Need to Open for My ARK Server?
You need to open the following ports for your ARK server – Game Port (UDP 7777), Query Port (UDP 27015), Socket Port (UDP 7778), and RCON Port (TCP 27020). These ports ensure proper connectivity and functionality.
Can I Install Mods on My ARK Server?
Yes, you can install mods on your ARK server. Use the Steam Workshop to subscribe to mods and add their Mod IDs to the GameUserSettings.ini file. After that, restart your server for the added mods to take effect.

Ariffud is a Technical Content Writer with an educational background in Informatics. He has extensive expertise in Linux and VPS, authoring over 200 articles on server management and web development. Follow him on LinkedIn.