How to play Workshop maps in CS2 + popular map suggestions
Counter-Strike 2 Workshop maps are custom-made areas where you can play other game modes beyond the default Deathmatch, Wingman, and Casual. These modes can make your gameplay more challenging and fun to play alongside your friends.
Popular Workshop maps in CS2 include surf maps like Utopia and Kitsune, where you must navigate obstacle courses and cross the finish line as quickly as possible. Meanwhile, competitive players usually set up aim training grounds like Aim Botz.
In this article, we will explain how to play Workshop maps in CS2 on a dedicated server. You will also learn about several popular maps so you can set up on your own.
Prerequisites for setting up Workshop maps in CS2
Before setting up CS2 community maps, ensure you have a virtual private server (VPS) to host the game. The system must meet the minimum requirements and use newer Linux distributions like Debian 11 since the steps to set up the maps will differ otherwise.
Hostinger Game Panel hosting is an excellent option, featuring powerful hardware and extensive software support. Moreover, our Game Panel lets you easily set up a private CS2 server without commands. We’ll cover the steps in the next section.
Our plans also have features that help simplify the game server setup and management. For example, our VPS AI assistant Kodee lets you generate commands and guides with simple prompts.

How to play custom maps in CS2
After purchasing a Game Panel hosting plan, follow these steps to set up the game server and install a custom CS2 map.
1. Set up a dedicated server for Counter-Strike 2
Running a CS2 dedicated server requires the Game Server Login Token (GSLT) to comply with Steam’s service-level agreements. To generate it, follow these steps:
- Log in to your Steam account and navigate to the Game Server Account Management page.
- Scroll down to the Create a new game server account section.
- Enter the App ID for Counter-Strike 2, which is 730.
- Add a Memo or name for your server.
- Click Create.

After obtaining the key, proceed with the game server setup. Here’s how to do so in the Hostinger Game Panel:
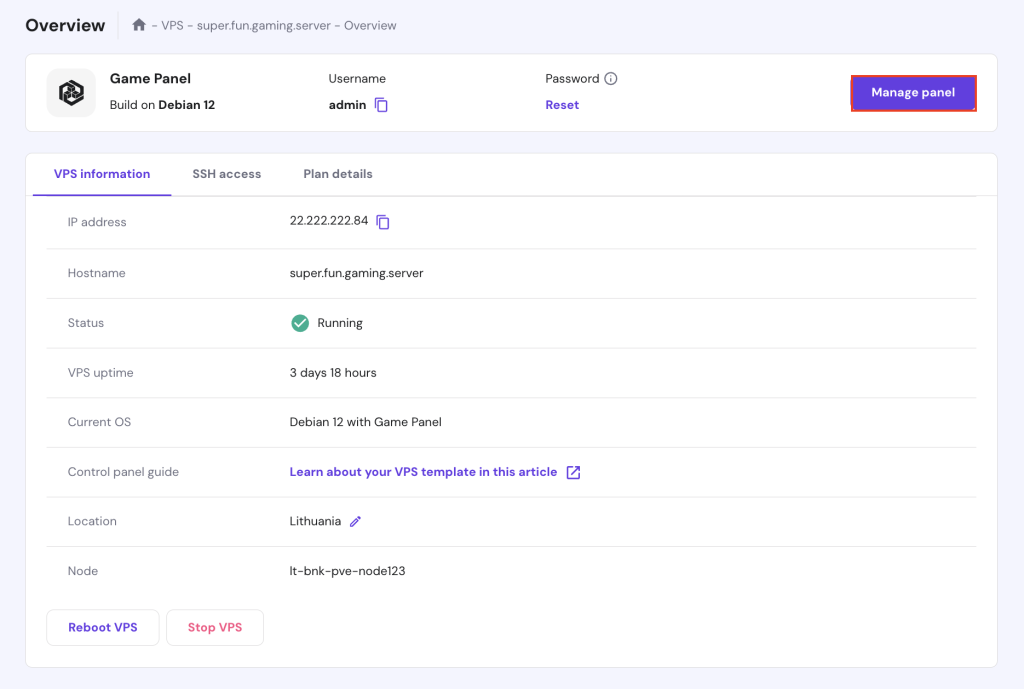
- Log in to hPanel and select VPS → Manage on your game hosting plan.
- In the VPS Overview menu, click the Manage panel button. This will lead you to a new tab.
- Enter your Game Panel admin credentials and click Login.
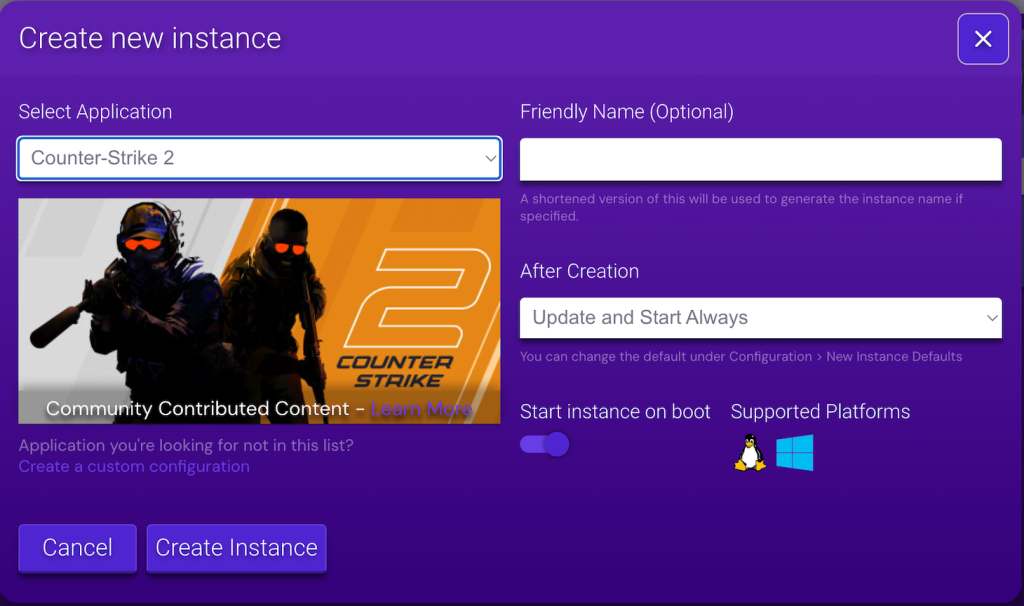
- Hit Create Instance and choose Counter-Strike 2 from the Select Application list. Hit Create.
- Double-click the instance and click Manage.
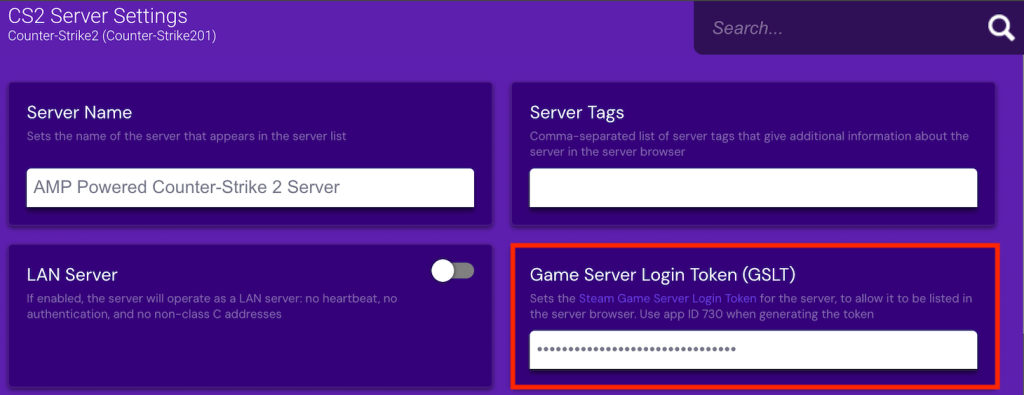
- Navigate to Configuration → CS2 Server Settings. Paste your GSLT.
- Return the CS2 instance page and click Start to run your server.
If you are not using Hostinger Game Panel, you can set up the game server manually using commands. To learn more about the steps, check out our tutorial on creating a Counter-Strike 2 server.
2. Find the Workshop maps
Once the server is set, let’s compile the Workshop maps you want to add to your server. To do so, log in to the Steam library and follow these steps:
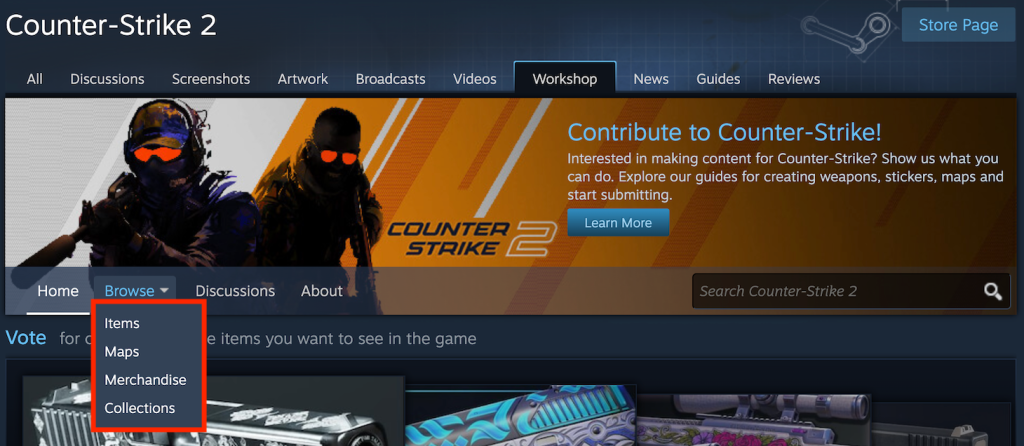
- From the top menu, navigate to Community → Workshop.
- Using the search bar, enter Counter-Strike 2.
- Under the game banner, go to Browser → Maps.
- Search for maps you want to install on your server. You can sort them by Popularity and Game Mode.
- Click on the map you want to add. Hit Subscribe to add it to your account.
- Check the page URL, copy the ID number, and store it in a safe location. Repeat the steps if you want to add multiple maps.

After obtaining the Workshop ID, you can add the map to your server. However, we recommend creating a Collection if you want to set up multiple maps.
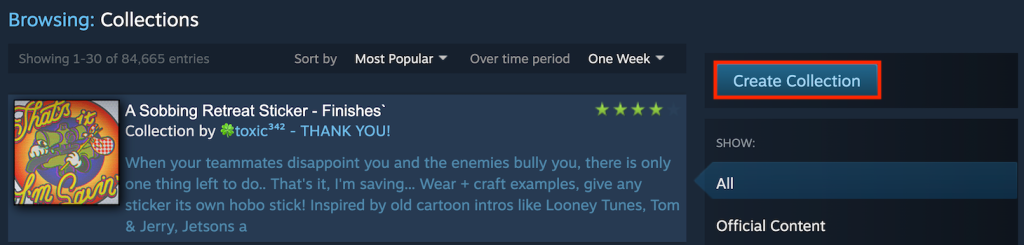
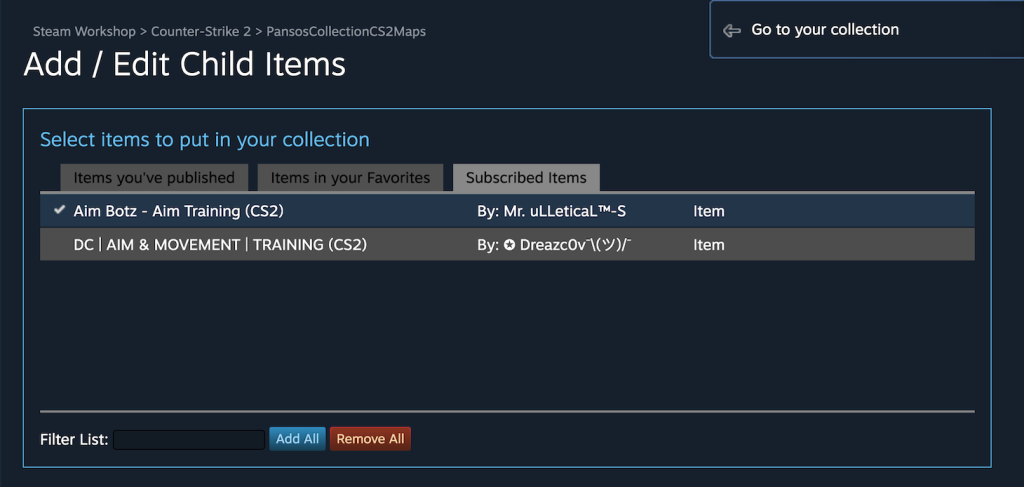
3. Create a collection
Steam Collection is a custom category that lets you easily store and manage Workshop content for your game, including CS2 maps. While you can load them on your server individually using commands, that can be inconvenient.
After opening the Counter-Strike 2 Steam Workshop page, follow these steps to create a new Collection:
- Under the game banner, go to Browser → Collections.
- Select Create Collection from the sidebar.
- Enter the required information based on the instructions. Click Save and Continue.
- Click on the Subscribed items tab and select the maps you want to add to your Collection. Hit Save and Continue to confirm.
- Check your Steam account’s email and click the confirmation link. If you didn’t receive the message, click Resend.
Wait until Steam confirms your Collection, which can take up to an hour or two. Once finished, open your profile page and click Workshop Items on the sidebar. Click the Collections tab.
Select your new Collection and obtain the ID from the URL. You will add this information to the Game Panel or your server command to load the saved content.
You can also add existing Collections to your server using their IDs. Note that since some might contain other content, like custom skins, inspect them before installing.
4. Configure the server to run Workshop maps
After obtaining a Workshop map or Collection ID, add it to your server. There are two ways to do so – using the Hostinger Game Panel or manually using commands.
We recommend the Game Panel method since it is a whole lot simpler. Here is how:
- Log in to the Game Panel and double-click your Counter-Strike 2 instance.
- Navigate to the sidebar and click Configuration.
- Add your Workshop Collection ID to the Map Group field.
- Scroll down and fill out the Workshop Collection ID form.
If you only want to set up a Workshop map, enter the Workshop Map ID, change the Initial Map setting to Custom, and enter the map name in the Custom Initial Map field. Leave the Map Group and Workshop Collection ID fields empty.
Once finished, return to the instance management screen and click Update. Then, Restart your server to apply the changes.

If you set up the CS2 server manually using commands, specify the IDs in the host startup command. To load a single map, use the host_workshop_map id parameter like so:
./cs2 -dedicated +map de_dust2 +host_workshop_map 12345678
Ignore the +map de_dust parameter since the Workshop content will automatically replace it. Meanwhile, use +host_workshop_collection followed by the ID to upload a Workshop Collection to your server:
./cs2 -dedicated +map de_dust2 +host_workshop_collection 12345678
When rebooting, the server will download the map file. Depending on the number of items in your Collection and your internet speed, this process might take up to an hour.
That’s it! Now, open the CS2 game client, head to the server browser, and look for your VPS from the list. Alternatively, open the console by pressing the ~ (tilde) key and enter the following. Replace your_server_IP with the actual value:
connect your_server_IP:27015
If you wish to enable password protection on your game server, enter the following instead and replace yourpassword with your chosen value:
connect your_server_IP:27015; password yourpassword
Once connected to your custom lobby, enter the console again and enter ds_workshop_listmaps to check all the available maps on the server. To change the current map, enter ds_workshop_changelevel.
Important! Due to a particular bug, some Workshop maps might be unable to load in-game. To resolve the issue, try recreating a Collection by adding chosen maps once more.
Popular CS2 custom maps
After learning how to set up a custom map in CS2, let’s check out the most popular ones in the Workshop.
Aim Botz
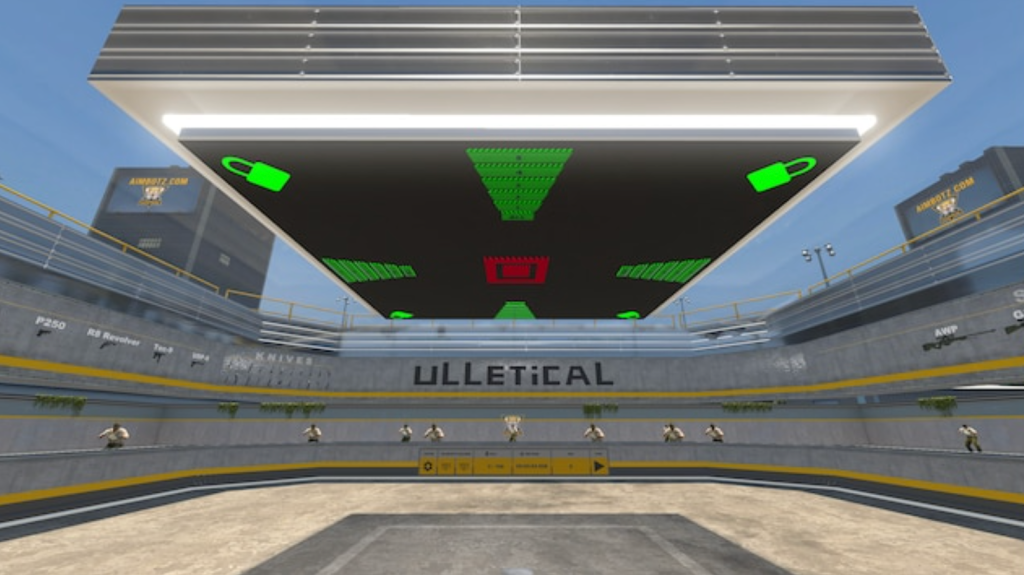
Aim Botz is the most downloaded Counter-Strike Workshop map. In this arena, you can try various weapons and hone your skills against bots.
You can select different challenges and modify the settings to make the aim training more difficult. For example, you can toggle armor to increase the bots’ health, make them move, or put a cover to practice “wallbang”.
While Aim Botz is single-player only, it is a popular warm-up arena for competitive players preparing for a ranked match.
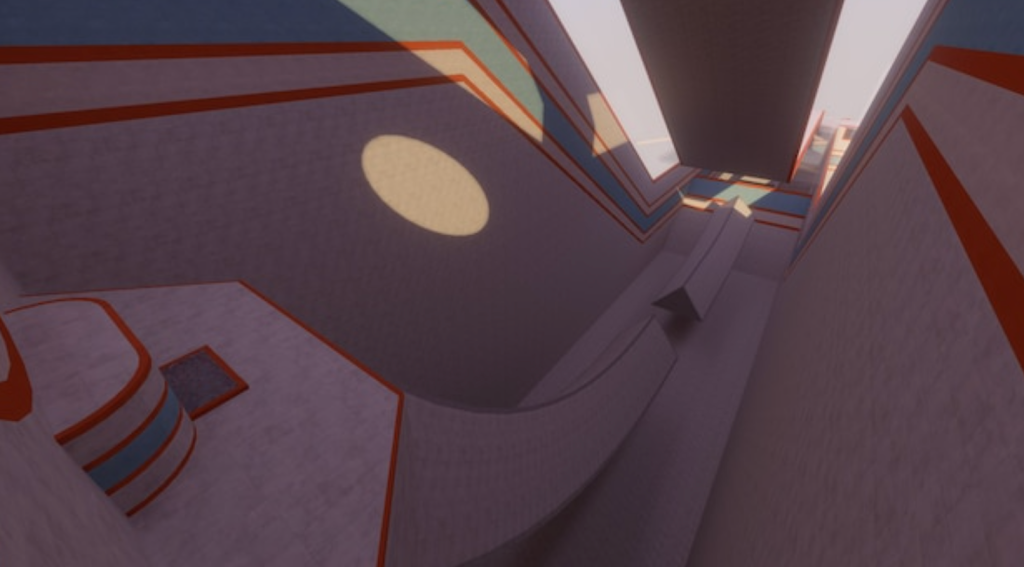
Only Up!

The CS2 Only Up! community map is based on another game with the same name. In this custom arena, players must climb through obstacles and reach the summit as quickly as possible.
While this map is built purely for fun, many players use the course to practice movements like “counter-strafing” and “bunny hopping”. You can also bring a friend to the arena to join the race.
Surf Utopia
In Counter-Strike surfing game mode, the player glides and jumps across the course to reach the finish line. There are plenty of Workshop maps for it, but Surf Utopia is one of the most popular ones.
Simply keep in mind that surfing arenas and mechanics are not applicable to other game modes. You can invite friends to this lobby for a race or play solo to score the quickest time.
Conclusion
Counter-Strike 2 Workshop maps let players set up a custom mode or arena to make the game a bit more exciting. In this article, we covered how to add them to your private gaming server via Hostinger’s Game Panel and commands.
Here is a quick recap:
- Set up the CS2 server by creating an instance using Game Panel or making use of commands.
- Open the Steam Workshop and subscribe to the maps you want to play.
- On the Workshop page, create a new Collection and add the custom maps.
- Add map and Collection IDs to the Game Panel or the server startup commands.
There are thousands of Workshop maps in CS2, so why not give a few of them a try?
How to play workshop maps in CS2 FAQ
In this section, we will answer several common questions about how to play Workshop maps in a CS2 dedicated server.
Where can I download CS2 custom maps?
You can download CS2 custom maps via the Steam Workshop library. Obtain their IDs and add them to the Hostinger Game Panel or your server startup command. Once you start the host, it will download the map files automatically.
Are there any popular CS2 custom map packs available?
Yes, many players curate Workshop maps into Collections. To check them, navigate to the Steam Workshop Library → Browser→ Collections. Remember to review the content since some of them might include custom skins or other items.
Can I create my own custom maps for Counter-Strike 2?
Yes, if you have a Counter-Strike 2 Prime account, you can enable the map Workshop tools via the setting. Go to your Steam Library, start CS2, and choose Workshop tools. To learn more about the application, check the Valve Hammer Editor documentation.

Aris is a Content Writer specializing in Linux and WordPress development. He has a passion for networking, front-end web development, and server administration. By combining his IT and writing experience, Aris creates content that helps people easily understand complex technical topics to start their online journey. Follow him on LinkedIn.