How to Connect to Notepad++ FTP and How to Edit Server Files Using It
If you’re a web developer or planning to be one, Notepad++ is an indispensable tool for your workflow. It provides a quicker way to modify code on your server than using an FTP client. As such, in this article, we’ll be showing you how to establish a Notepad++ FTP connection and get remote access to your server.

Getting to Know Notepad++
Notepad++ is an open-source text editing software available for Microsoft Windows users. It has been a top choice for many developers due to its extensive features, including syntax highlighting and folding, text search and replace features, and multi-document view.
Various plugins are available to enhance the software’s functionality, and one of them is NppFTP. The tool allows you to use Notepad++ to connect to your server files via an FTP connection, so you can edit the web files and make changes to your website.
Establishing a Notepad++ FTP Connection
Perform the following steps to enable the FTP function in Notepad++:
Step 1. Getting FTP Details
- Download and install Notepad++ on your computer.
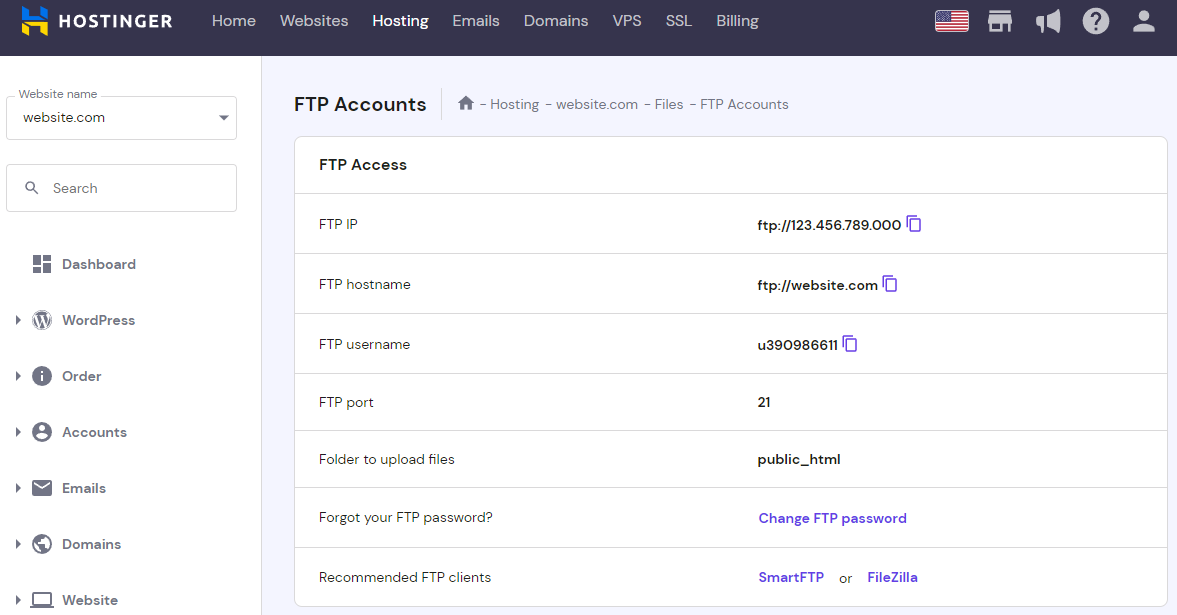
- Get your FTP details by logging in to your hPanel. Then, scroll down to the Files section and select the FTP Account menu. You’ll see the details under the FTP Access section.
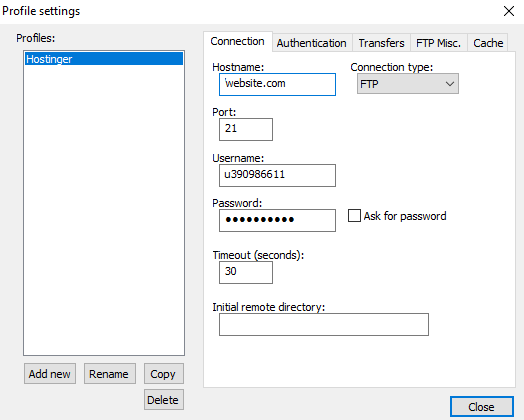
The hostname, port, username, and password will be used to connect your server to Notepad++.
Step 2. Connecting to Notepad++ via FTP
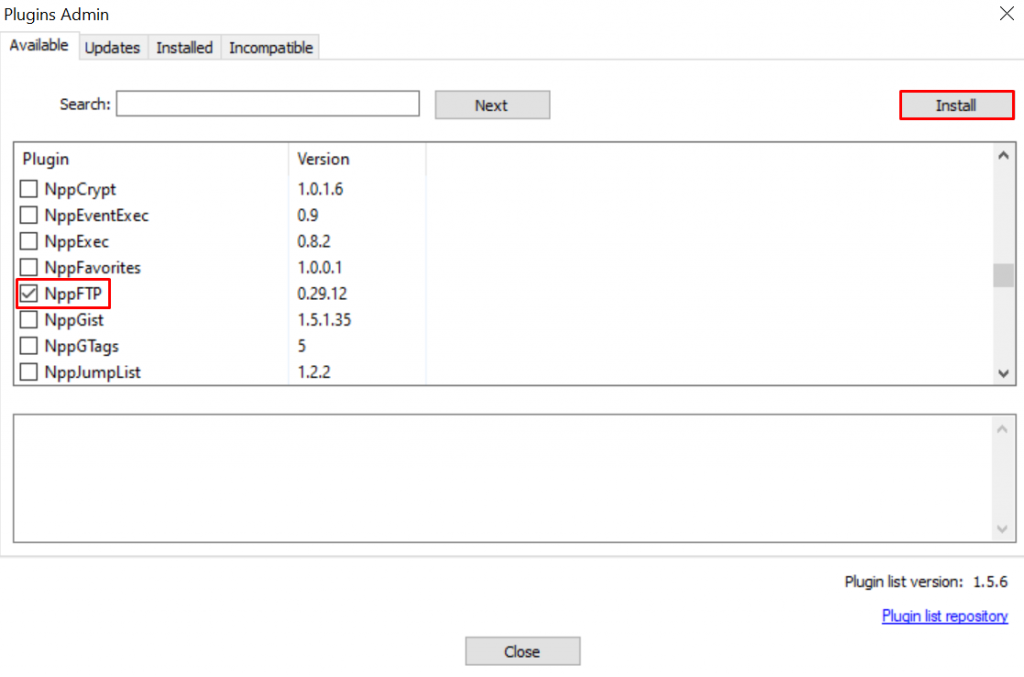
- Open Notepad++ and navigate to Plugins → Plugins Admin…
- Once a dialog box has popped up, tick the NppFTP box that is under the Available tab. Press Install, and the application will restart.
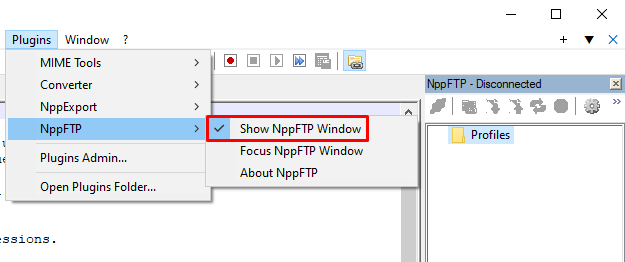
- Head over to Plugins → NppFTP → Show NppFTP Window. A configuration window will appear on the right side of the app.
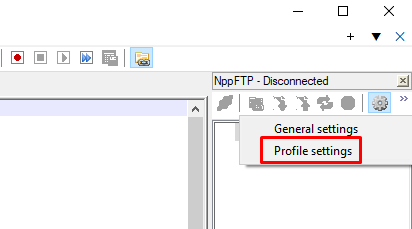
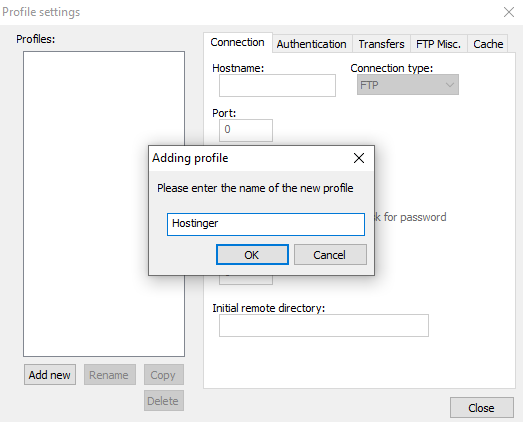
- Create a new profile to start using the plugin. To do so, click the gear icon in the NppFTP menu bar and select Profile settings.
- Select the Add New button, enter the profile name, and press OK.
- After that, input the FTP details into the Connection tab.
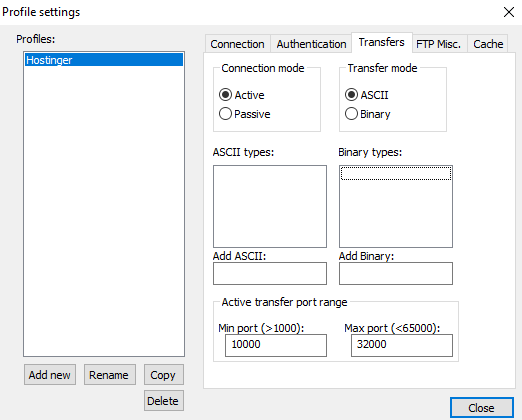
- Navigate to the Transfers tab. Then, set the Connection mode as Active and the Transfer mode as ASCII.
- Click on the Close button to save your configuration.
Pro Tip
The above settings will ensure that your permissions remain the same after making any changes. Using a different setup may potentially affect your website.
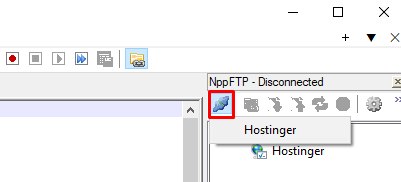
- To establish a connection, press the (Dis)connect button (the first one in the NppFTP menu bar), and choose your newly created FTP profile.
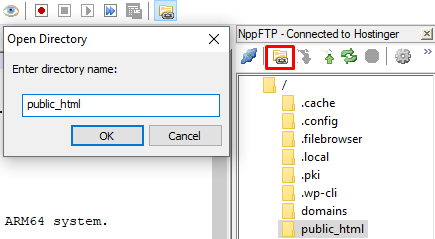
- Finally, you will see a folder icon beside the (Dis)connect button. To access a directory, select the Open Directory button, type the Directory Name, and press OK. In the example below, we’re going to open the public_html folder.
Editing Server Files through Notepad++
After establishing an FTP connection in Notepad++, it’s time to edit the files within your directory. All you need to do is:
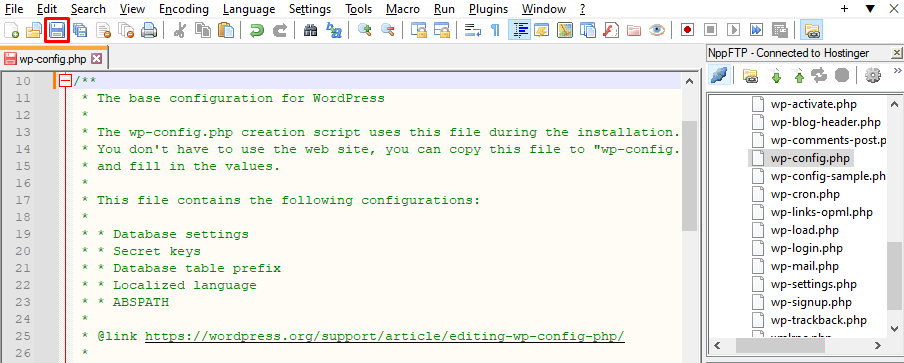
- Double click on any files that you want to edit.
- Once you are done, press the Save button to apply the changes.
Pro Tip
It’s recommended to create a backup before making any changes to prevent any errors like data loss or corrupted files.
Conclusion
Notepad++ can replace the traditional FTP client. Simply establish a Notepad++ FTP connection, then you can start modifying your server files. Here’s how you can do it:
- Download and install Notepad++ on your computer. Then, get your FTP details from your hPanel.
- Install the NppFTP plugin and create a new profile.
- Connect to your server and access the desired directory.
- Select the file you want to edit and save the changes.
Congratulations! You have successfully learned to access and manage your web files via Notepad++.


Comments
May 01 2019
This is great documentation.
December 28 2019
Thanks so much. I plan to use this instead of pspad. Notepad++ is now my text editor as well as my ftp editor.
January 11 2021
Vagally had a notion that an FTP plugin existed for Notepad++, one search found it: another, and your most competent tutorial popup up on Google. I'm retired, so free is a must, but I always donate where possible. I've been tempted by the likes of Sublime (far to expensive), and also Visual Studio Code (far to complex), Notepad++ has been my choice of simplified text editor for years, and now it has an FTP bold on running as well, well its now a subline piece of visual coding all built into a neat studio package. (grin!) Again: thankyou for taking the time out to create this extremely factual, and extremely simply to follow tutorial. Rgds - Terry - UK
April 17 2023
need some helps: I followed all steps above except step 10, because in my nppftp window I can double click a folder and it would open its contents, so I am assuming it is the same as step 10. I can open, edit and save (i.e upload) files located at the home directory (i.e the default directory when the connection icon was pressed), but if I open a file from any subdirectory, it seems unable to save back to remote server and a message "upload of file xxxx failed" shows in the log window. Any idea why and how to fix it? Thanks in advance. Regards
April 21 2023
Hello there! I've just tested the steps on a Windows machine, seems like all of them are working (including the Step 10), are you sure you are using correct hostname, alternatively, you can input your hosting IP there. Also make sure that you've set the Connection mode as Active and the Transfer mode as ASCII.