upload_max_filesize Error: How to Fix the File Size Limit in WordPress
Most hosting providers set limits to the PHP memory designated for running applications and scripts. The uploaded file exceeds the upload_max_filesize directive in php.ini is an error that occurs on your WordPress site when you upload a file that exceeds the limitations set by your webserver.
As scary as this error may seem, the solutions are pretty straight-forward. In this tutorial, you will learn how to debug this WordPress error by increasing the default limit of upload_max_filesize through a few methods.
Download all in one WordPress cheat sheet
How to Fix the upload_max_filesize Error
The solution, as you might have guessed, involves increasing the default limit of upload_max_filesize. Let’s dive into it and see what steps we can take to fix this WordPress error.
Method 1. Editing the .htaccess File
The quickest fix for the uploaded file exceeds the upload_max_filesize directive in php.ini error is increasing your PHP resource limits by tweaking the .htaccess file. Here’s how to do it:
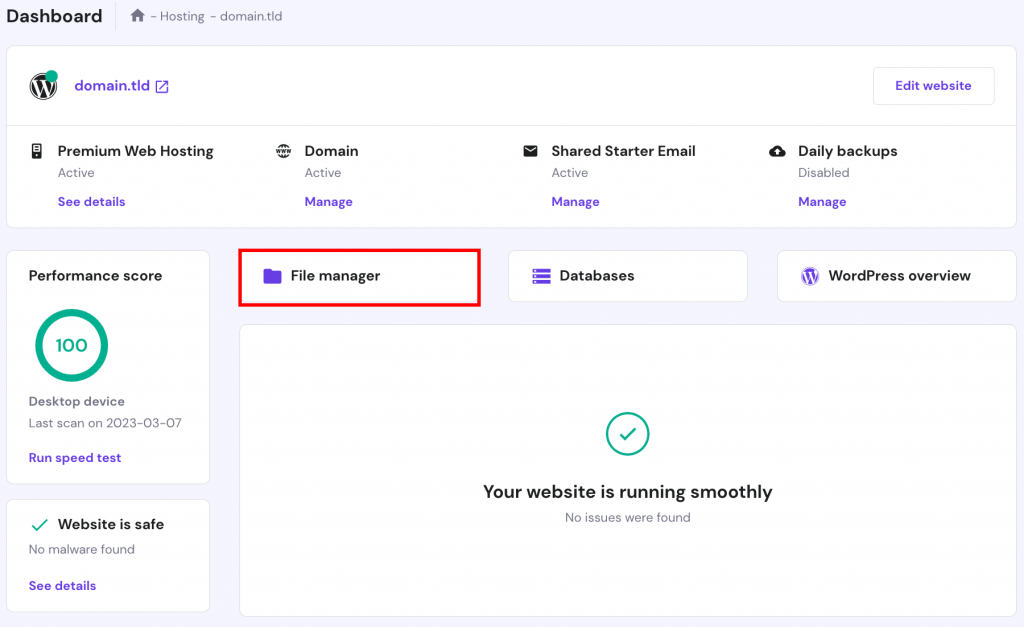
- Login to hPanel and navigate to File Manager in the Dashboard section.

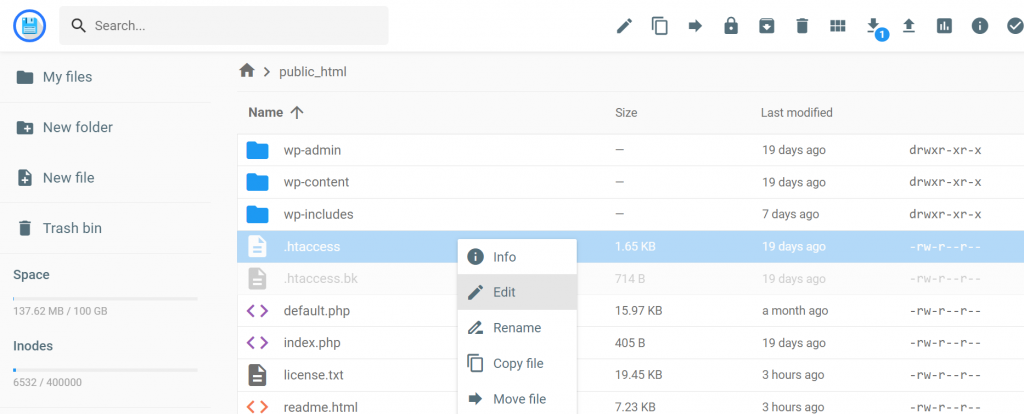
2. Locate the .htaccess file inside the public_html directory and right-click to Edit.

3. Add the following line at the bottom of the file:
php_value upload_max_filesize 256M
Then Save the changes.
That’s it! Increasing the upload_max_filesize value should automatically fix the error.
Pro Tip
Adjust the PHP limits to any desired values as long as your web hosting providers support it. You can also locate the maximum available limits by checking the PHP info of your website.
Method 2. Editing the wp-config.php File
Another way to get rid of the uploaded file exceeding the upload_max_filesize directive in php.ini error is by tweaking the wp-config.php file located in your root directory.
All you need to do is log in to the hPanel and access public_html to edit the wp_config.php file. Add the following line before the “That’s all, stop editing! Happy publishing” line:
@ini_set('upload_max_size' , '256M' );
Now Save the file, refresh your web browser, and try uploading again!
Method 3. Updating php.ini to Fix the upload_max_filesize Error
If you look closer at the uploaded file exceeds the upload_max_filesize directive in php.ini error message, we can safely assume that it has something to do with php.ini, a file that holds all of the PHP related variables.
If you’re using shared web hosting by Hostinger, including WordPress site hosting, all limits are already at the maximum value for user convenience. As a result, it’s not possible to alter php.ini.
However, you can always modify your PHP settings through the PHP Configuration tool on hPanel if you wish.
If you’re using VPS or a different platform, you can try updating php.ini to fix the error. Here’s what you need to do:
- Navigate to your php.ini file and edit it. If you can’t find it, ask for assistance from your hosting providers.
- Locate the upload_max_filesize and increase it by changing its number. You can also boost a few other limitations, as shown below:
upload_max_filesize = 256M
post_max_size = 256M
memory_limit = 512M
max_execution_time = 180 - Save the file, and that’s it. The error should no longer occur.
Method 4. Making Changes to PHP Configurations on hPanel
For Hostinger clients, modifying PHP configurations can’t get any easier. Hostinger offers a custom-built tool to edit and adjust the PHP settings of your hosting account.
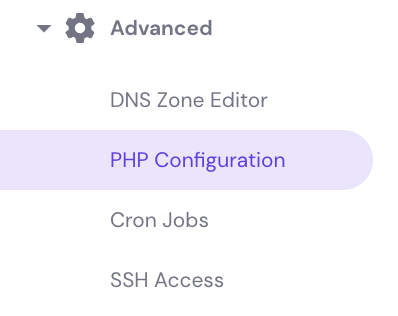
Log in to hPanel and head to PHP Configuration under Advanced.
Then, switch to the PHP Options menu and scroll down to find uploadMaxFilesize row and make changes as needed.

Method 5. Contacting Customer Support to Fix the upload_max_filesize Error
If none of the options above fixed the error, try contacting your web hosting support team.
Explain the situation and let them know what steps you took to fix the WordPress error, and hopefully, they’ll resolve the problem for you.
If you’re a Hostinger client, our customer success agents are ready to help you out 24/7 through our live chat feature. Log in to the hPanel and access the chat feature at the bottom right of your dashboard.

Conclusion
In this tutorial, you have learned five different ways to fix the uploaded file exceeds the upload_max_filesize directive in php.ini error in WordPress. Here’s a quick recap:
- Increasing upload_max_filesize and other PHP values through the .htaccess file
- Setting higher upload_max_filesize through the wp-config.php file
- Editing php.ini file to increase upload_max_filesize
- Editing and adjusting PHP configurations through the PHP Configuration feature on hPanel
- Contacting your hosting providers for assistance
Easy, right? If you have any questions or suggestions, don’t hesitate to comment down below!
Learn How to Solve Other WordPress Errors
How to Fix “Briefly Unavailable for Scheduled Maintenance” Error
How to Fix Missed Schedule Error in WordPress
How to Fix Mixed Content on WordPress
How to Fix Broken Links on WordPress
How to Solve 404 WordPress Error
How to Solve WordPress Not Sending Emails


Comments
March 01 2018
The uploaded file exceeds the upload_max_filesize directive in php.ini. - that's such a freakishly long error haha! I never thought the fixes were so simple. Thank you for this article, the first solution worked like a charm!
March 01 2018
Hello, Jason. I'm glad to hear that you found this WordPress tutorial useful!
March 19 2018
please i want to host a website and it contain a heavy folder of pdf. because it's an e_library. so can i send the folder and you host it for me. am having difficult uploading it due to max upload file size.
March 23 2018
Hey Abdullahi, How big is your pdf? Have you tried to optimise it or upload it with FTP client?
May 22 2018
Hi. I am still facing the issue even after trying all these methods. So far, I have tried: 1.Increasing upload_max_filesize and other PHP values through .htaccess; 2. Setting higher upload_max_filesize through wp-config.php file; 3. Editing php.ini file to increase upload_max_filesize; However, my media upload size is still 10mb. Please tell me how to fix it. Thanks in advance!
May 23 2018
Hello, Himashu I'm sorry to hear that the error still persists on your website. It is possible that the limitations set by your current hosting provider do not allow uploading larger files than 10MB. If the server configuration does not let you exceed this limit, it is no surprise that the above solutions did not work. You can confirm this by checking PHP info. I would also suggest getting it touch with your web hosting provider and asking them personally if the limit can be increased. Alternatively, you may give your WordPress website a test drive on Hostinger. The error will be a thing of the past, and you can start with a 14-day free trial! ;)
August 06 2018
Remember to restart your Apache to apply changes (if you're using VPS)!
November 07 2018
That's a great point!
September 09 2018
Thanks! Option 1: Editing the .htaccess file worked for me :)
October 09 2018
You sir, are a life saver. Have a nice day !
October 12 2018
Thanks, brother. It helped me
November 06 2018
You're welcome! Glad to hear the article was useful ;)
October 24 2018
This helped, Thanks!
November 05 2018
Awesome article, very helpful. Thanks for sharing!
December 18 2018
Changing .htaccess worked for me. Thanks!
January 06 2019
Thank you for helping. I really enjoy this website!
January 13 2019
Thanks a ton...had the same problem but could resolve it, thanks to you
January 17 2019
Editing .htaccess in the root (WordPress) directory worked for me. Thank for the tip!
January 23 2019
Thanks a lot fam... ".htaccess" worked for me!
February 07 2019
Option #1 worked for me. Thanks a lot for the tip!
April 03 2019
wow ....after spending a lot of times i found the solution in this website form the first solution ..I am very grateful to you for your helpful suggestion.
April 11 2019
option 01 : is working in my case 100% perfect , thanks mate
July 03 2019
Hello Gediminas! There is a typo in your code snippet. It says: upload_max_filesize = 256MB and should say upload_max_filesize = 256M Cheers!
September 24 2019
Hey domagoj, Thanks for letting us know! Fixed.
August 06 2019
Thanks for this help
August 09 2019
Thanks bud
August 15 2019
thank you. this solved my problem.
September 26 2019
Thank you very Much sir. you'r Great sir.
November 29 2019
Thank you very much sir, It's helpful for me.
December 25 2019
Thank you, Domantas. I succeeded after updating to 256M at php.ini, wp-config.php and .htaccess. Huynh Nguyen
March 15 2020
Thanks a lot .It solved my problem too
April 30 2020
thank you, work it!
May 20 2020
Very usefull
August 22 2020
I have tried all three methods but it still shows up in my Site Health problems. Is there anything else I'm missing>
November 11 2020
Hey Angelica! :) I am not sure which methods you've followed as you are replying to an article about uploading max file size, which shouldn't give Site Health problems. I don't have enough information to check your issue, but don't worry, just message our Customer Success team and they will guide you through and check your case.
September 17 2020
Thank you.Method 1 works good
November 11 2020
Hey Hamed. Happy to hear that.
November 04 2020
Very useful its work 100%, Thanks Hostinger :)
February 02 2021
Happy you enjoyed it!
December 20 2020
1 method worked for me thank you.
December 22 2020
Thank you so much! Struggled to a point where I wanted to scream.... and then I found your article!
February 09 2021
Happy it helped :)
April 14 2021
Thank you for this amazing tutorial!
April 30 2021
Thank you very much. It worked
October 02 2023
My website is broken after adding line in htaccess file. Please help me I have added this line: php_value upload_max_filesize 256M
October 30 2023
Hello there! Adding "php_value upload_max_filesize 256M" to the .htaccess file is intended to increase the maximum file size for uploads. If it's causing issues, try removing or commenting out the line "php_value upload_max_filesize 256M" in your .htaccess file. If the problem persists, please contact our Customer Success team and we will help you out ?