WordPress Multisite complete guide: What is a multisite and how to set it up
WordPress Multisite lets you manage multiple websites from a single dashboard, removing the hassle of managing separate installations. It’s especially popular among businesses and institutions, allowing users to create a network of subdomains or subdirectories with shared branding.
This article will cover everything you need to know about WordPress Multisite ‒ how it works, when to use it, how to set it up, and how to manage it. We’ll also share troubleshooting tips to help keep your network running smoothly.
What is WordPress Multisite?
WordPress Multisite is a feature for managing multiple websites from a single WordPress installation on your hosting server. With it, you can run a whole network of sites from one dashboard.
How does WordPress Multisite work?
To understand how WordPress Multisite works, let’s break down its key elements.
Administrator
WordPress Multisite uses the same user roles as single-site installations, with one addition ‒ the super admin.
The super admin has full control over the entire network, including adding sites and users, managing themes and plugins, and editing network-wide settings. Simply put, they oversee everything within the network.
On the other hand, admins manage individual subsites. They handle content, users, and settings for their specific site but can’t access network-wide features. This separation allows site managers to work independently without affecting the rest of the multisite network.
Core files and database structure
WordPress Multisite shares the same core files and database for all sites in the network, saving server resources.
However, each site gets its own database tables for posts, users, and other data. By keeping data isolated, changes on one site won’t affect others ‒ making troubleshooting and backups easier.
The same goes for media uploads, where each site has its own wp-content/uploads directory. This organization keeps files tidy and prevents media from different sites from getting mixed up.
Subsites and domain mapping
You can create subsites in a multisite network in two ways:
- Subdomains. They look like standalone sites, ideal for unrelated entities within a network. For example: men.myboutique.com and women.myboutique.com.
- Subdirectories. They’re organized as folders under the main site’s URL, making them great for blogs, categories, or sections of the same website. For example, pawcare.com/services and pawcare.com/contact.
With domain mapping, you can assign custom domains to subsites. You can either use the same domain with subdomains, subdirectories, or give each subsite its own unique domain.
Using the same domain makes management easier and improves domain authority, which helps with SEO. On the other hand, unique domains are better for giving each subsite a more independent branding.
Theme and plugin installation
Super admins have the ability to install or update themes and plugins across the network. They can also choose to network activate them, which makes the theme or plugin available on all subsites ‒ overriding the site admins.
Remember that each subsite has its own database, so plugin or theme settings and customizations apply only to that site, not the entire network.
We’ll cover this in greater detail later in the Multisite management section.
Pros and cons of WordPress Multisite
Now that you’ve learned more about how WordPress Multisite works, let’s look at the pros and cons.
Here are the pros of setting up a multisite network in WordPress:
- Efficient management. As the network admin, you can handle updates, backups, and security or performance plugins from one WordPress dashboard.
- Easier delegation. WordPress Multisite lets you assign lower-level admins to different sites in your network, making it easier to share management tasks.
- Greater control. If you run multiple sites, Multisite gives you control over plugins and themes on each site. This helps reduce the risk of security or performance issues affecting the entire network.
- Centralized user management. You can manage users across all sites from a single dashboard and give them access to multiple sites without creating separate accounts for each.
- Streamlined updates and maintenance. Since all sites share the same core files, themes, and plugins, you only need to update them once for the entire network, saving time on maintenance.
Consider the cons of using Multisite before implementing it:
- More limitations. Since all subsites share the same database, you can only do backups and updates across the entire network, not on a per-site basis.
- Higher risk. If the network goes down, all sites are affected. Similarly, a security issue on one site can compromise the rest.
- Interdependent performance. Each website’s performance depends on the traffic across the whole network. If one site gets a spike in traffic, it can slow down the others.
- Limited plugins and themes. Not every plugin or theme works with Multisite, so your options may be more limited.
- Limited hosting options. Not all web hosts support WordPress Multisite.
When to use WordPress Multisite
WordPress Multisite is a great solution for managing multiple similar websites, especially when they share the same themes, plugins, and WordPress core files.
For example, Harvard Blogs lets students and faculty create blogs under the harvard.edu domain. Similarly, BBC America creates subsites for each show, using child themes to give them unique branding.
That said, a multisite network isn’t a one-size-fits-all solution. If your websites aren’t related or have very different needs, you might find it limiting since most features must be shared and managed by a network admin.
Suppose you’re a web developer with multiple clients, each needing a unique website. Since every site has different plugins, themes, and custom settings, putting them all in a multisite network could cause compatibility issues. Managing them separately with their own WordPress installation and settings would be much easier.
Here’s a table comparing different use cases to help you decide:
| WordPress Multisite | WordPress Single Site |
| You run websites with similar content and functionality | You run websites with vastly different content and features |
| Manage multiple sites with the same server configurations | Each website requires specific server configurations |
| For businesses or organizations needing separate websites for each department or project | For businesses or organizations that only need a single website |
| Suitable for multilingual websites | Ideal for single-language sites |
| Cost-effective to start, though spending can increase as the network grows | The budget is more predictable since each site has dedicated resources |
How to set up WordPress Multisite
If you’ve decided that WordPress Multisite is the way to go, it’s time to set it up. Follow these five easy steps to create a WordPress Multisite network on a fresh installation.
Prerequisites
To install WordPress Multisite, you’ll need:
- Web hosting. Choose a web hosting plan that supports multiple sites or domains.
- WordPress installation. You can either set up a new WordPress installation or use an existing site. If you go with the latter, deactivate all plugins and back up your WordPress site first.
- Admin access. You should be able to access and modify your WordPress configuration files.
Multisite support is available in all of Hostinger’s Managed WordPress hosting plans. We recommend the Business plan (starting at ₱169.00/month) or higher for easier setup with the AI website builder for WordPress and Kodee AI Assistant. Buying an annual plan gives you a free domain for the first year.
1. Enable WordPress Multisite via the wp-config.php file
The wp-config.php file contains your website’s configuration, including database settings, hostnames, username, and password. You can access this file in your website’s root directory (public_html) using hPanel’s File Manager. Alternatively, use an FTP client like FileZilla.
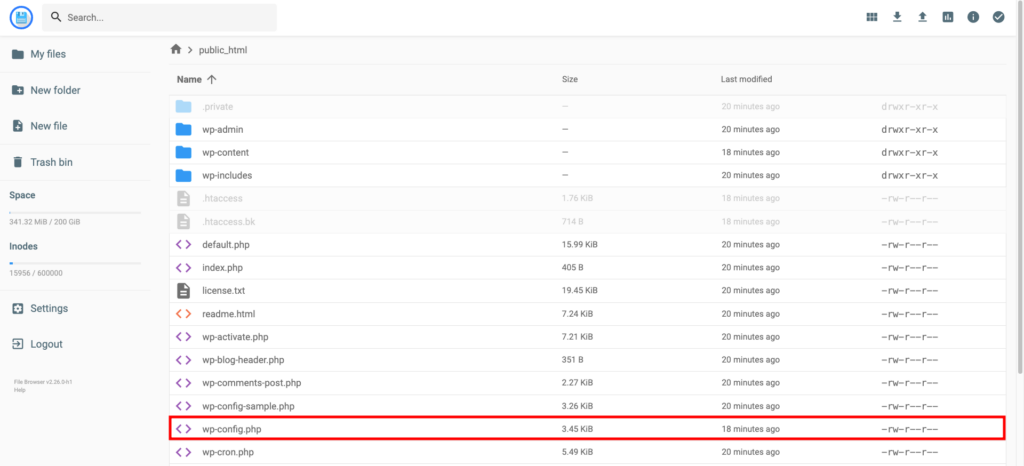
Once you’ve located the configuration file, open it and scroll down to the bottom until you see the line that reads /* That’s all, stop editing! Happy blogging. */. Sometimes the line might be /* That’s all, stop editing! Happy publishing. */ instead.
Add the following code snippet above that line:
/* Multisite */
define( 'WP_ALLOW_MULTISITE', true );

Save the changes and continue to the next step.
2. Set up the WordPress Multisite network
Now that Multisite is enabled on your WordPress installation, you can start configuring the network functionality.
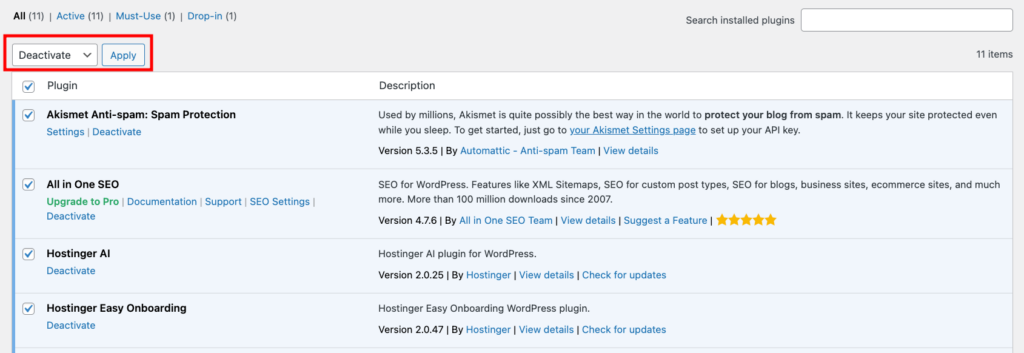
First, go to Plugins → Installed Plugins in the WordPress dashboard and deactivate all plugins using the bulk action feature. Since not all plugins support Multisite, doing so helps prevent potential conflicts.
Next, go to Tools → Network Setup to create your WordPress Multisite network.
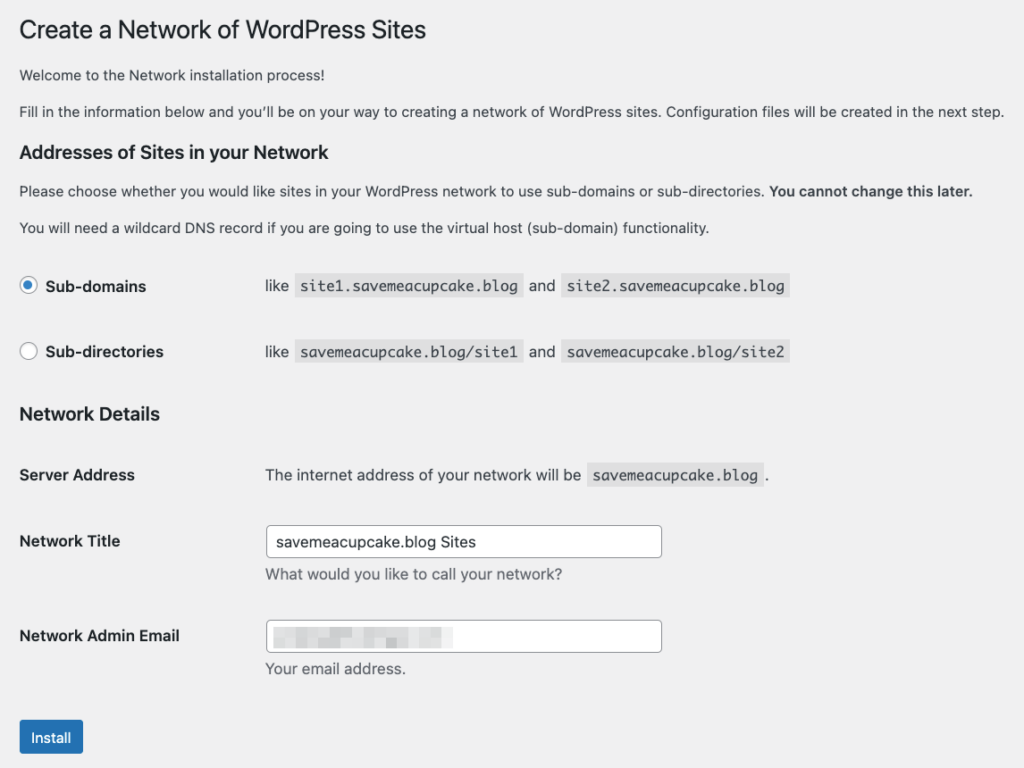
Under the Addresses of Sites in your Network section, decide whether you want to use subdomains or subdirectories.
If these options aren’t available, WordPress will default to using subdirectories. This security measure applies to sites older than 30 days to avoid URL conflicts. We recommend setting up a new WordPress installation to use subdomains.
In the Network Details section, enter the network name in the Network Title field and the super admin’s email in the Network Admin Email field.
Double-check all the information, then hit Install.
Important! If you choose subdirectories, skip to Step 4. Otherwise, don’t worry about the Warning! Wildcard DNS may not be configured correctly! error ‒ just continue to the next step to prepare your subdomains and fix it.
3. Set up a wildcard subdomain
A wildcard subdomain is a placeholder that handles all subdomains under your main domain, making this step crucial for subdomain-based networks. For example, if your main domain is example.com, a wildcard subdomain can route traffic for site1.example.com, blog.example.com, or any other subdomain you create.
You can set it up by adding a wildcard DNS record (*) in your domain’s DNS settings and pointing it to your server’s IP address.
Here’s how to create the wildcard DNS record on Hostinger:
- Go to Advanced → DNS Zone Editor in the hPanel dashboard.
- Under Manage DNS records, enter * in the Name field and the hosting account’s IP address in the Points to field. You can find your host IP address by going to Hosting Plan → Plan Details. Hit Add Record.
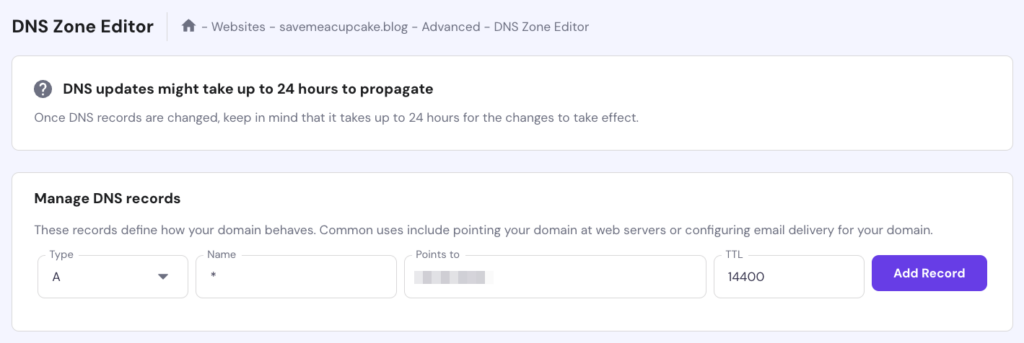
- Head to Domains → Subdomains and enter the subdomain you want to create. Check the Custom folder for subdomain and Use public_html directory boxes, then click Create.

That’s it ‒ the new subdomain will appear under the List of Current Subdomains.

Keep in mind that the wildcard subdomain can take between 24-48 hours to propagate. You can use a DNS checker to see whether the propagation process is finished.
4. Update the wp-config.php and .htaccess files
Go back to Tools → Network Setup in the WordPress dashboard to find code snippets for your wp-config.php and .htaccess files.
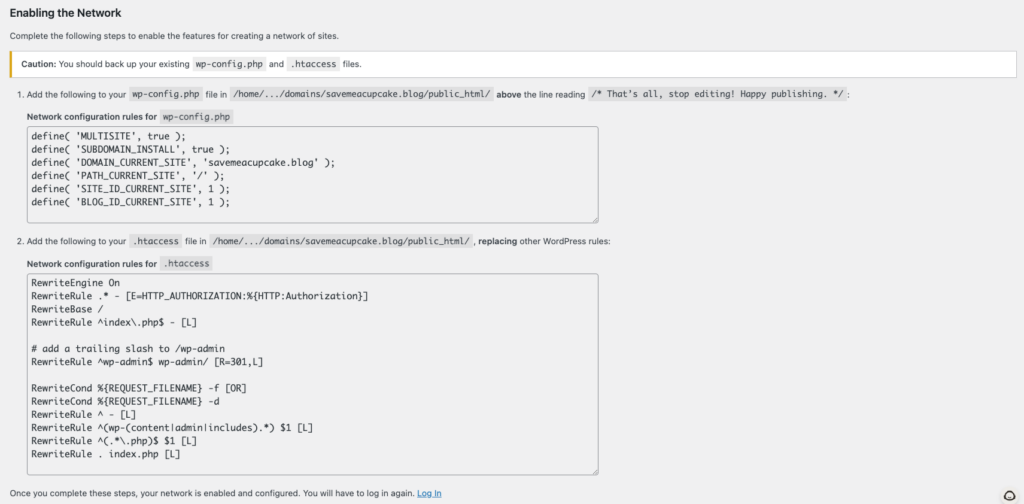
Before making any changes to your configuration files, it’s a good idea to back them up. This way, you can easily restore them if something goes wrong. If you’re a Hostinger user, you can use the Download feature in File Manager to save copies of both files.
Just like in Step 1, access your wp-config.php file with File Manager or an FTP client and add this code snippet above the line /* That’s all, stop editing! Happy publishing. */:
define( 'MULTISITE', true );
define( 'SUBDOMAIN_INSTALL', true );
define( 'DOMAIN_CURRENT_SITE', 'yourdomain.tld' );
define( 'PATH_CURRENT_SITE', '/' );
define( 'SITE_ID_CURRENT_SITE', 1 );
define( 'BLOG_ID_CURRENT_SITE', 1 );
Don’t forget to replace yourdomain.tld with your actual domain name.
You can find the .htaccess file in the same public_html directory as wp-config.php. If it’s missing, check our WordPress .htaccess guide to create one yourself.
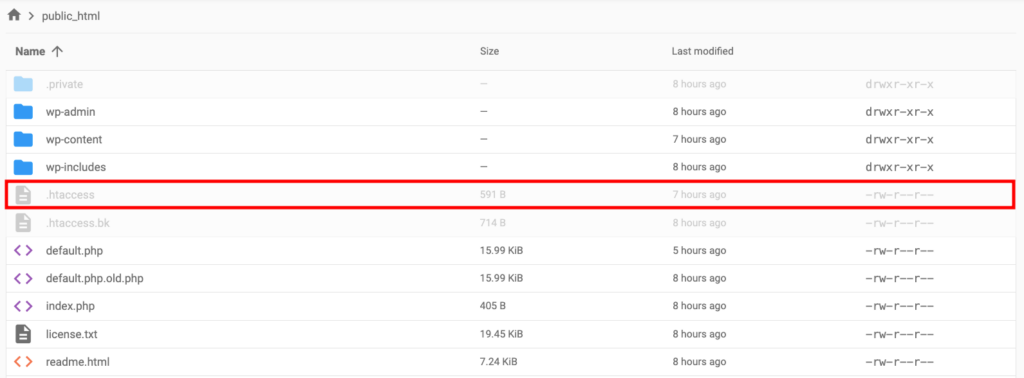
Open the .htaccess file and insert this code snippet inside the IfModule tags:
RewriteEngine On
RewriteRule .* - [E=HTTP_AUTHORIZATION:%{HTTP:Authorization}]
RewriteBase /
RewriteRule ^index\.php$ - [L]

# add a trailing slash to /wp-admin
RewriteRule ^wp-admin$ wp-admin/ [R=301,L]

RewriteCond %{REQUEST_FILENAME} -f [OR]
RewriteCond %{REQUEST_FILENAME} -d
RewriteRule ^ - [L]
RewriteRule ^(wp-(content|admin|includes).*) $1 [L]
RewriteRule ^(.*\.php)$ $1 [L]
RewriteRule . index.php [L]
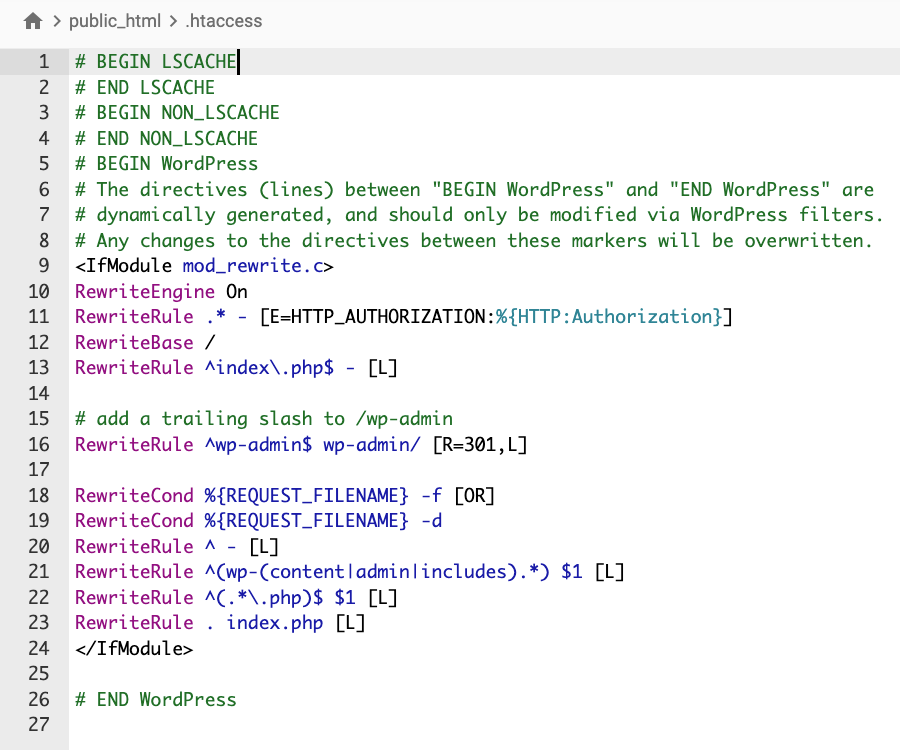
Make sure to save changes to both files.
5. Configure the network settings
At this point, your WordPress Multisite network is technically active. You’ll see the Network Admin dashboard under the new My Sites drop-down menu after logging back in. However, it’s not fully configured yet.
Follow these steps to complete the network setup:
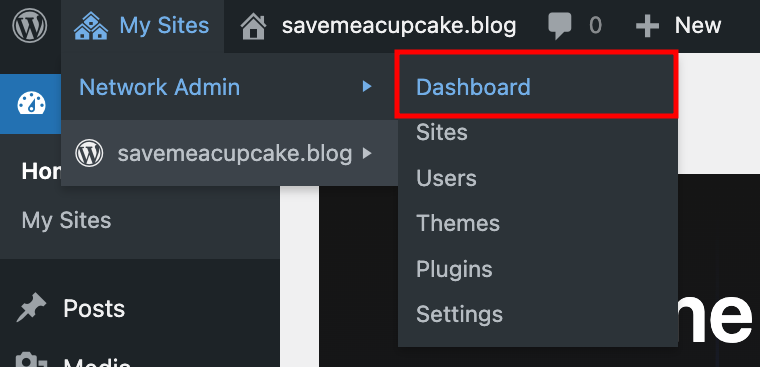
- Head to My Sites → Network Admin → Dashboard. This is where super admins can manage all the sites in the network.
- Go to Settings → Network Settings from your network admin dashboard.
- Under the Operational Settings section, update the network’s name and the admin email address to receive network-wide notifications if needed.

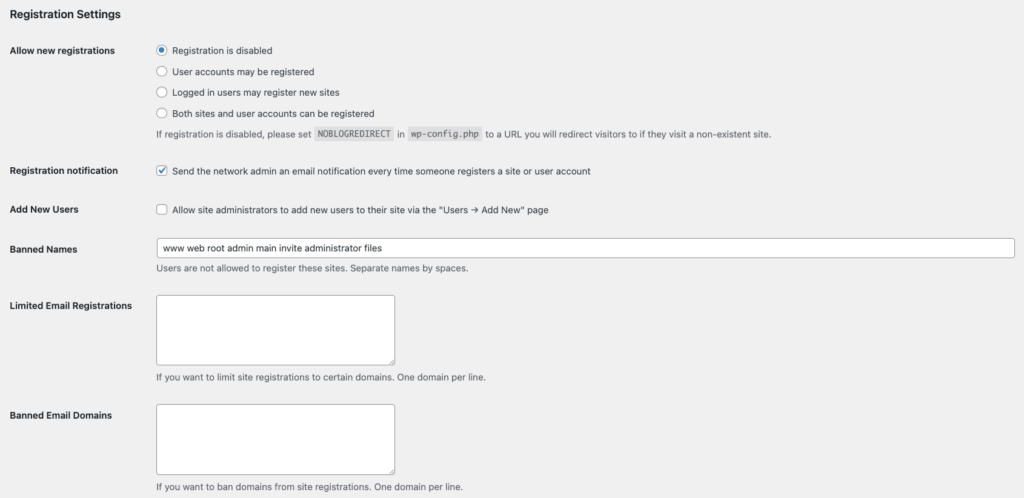
- The Registration Settings section allows you to manage all options related to user and site registration.
- Allow new registrations. Controls whether user or site registration is open, restricted, or disabled across the network.
- Registration notification. Sends email notifications to the network admin whenever a new user or site registers.
- Add New Users. Lets site admins add new users directly to their subsites.
- Banned Names. Blocks specific site names during registration.
- Limited Email Registrations. Restricts registrations to specific email domains for better control and security.
- Banned Email Domains. Prevents users from registering with email addresses from specified domains.
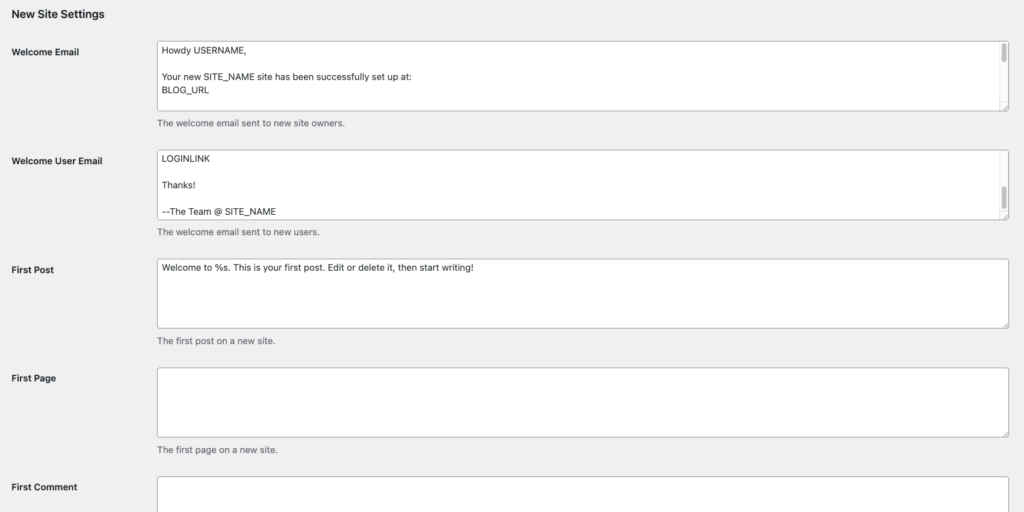
- As the name suggests, the New Site Settings section lets you customize how you welcome new sites and communicate with their admins. You can also personalize the initial content, including posts, pages, and comment authors.
- Check the Upload Settings section if you need to adjust the types of files users can upload to the network. If you increase the total upload space, make sure it stays within the storage limit provided by your hosting plan.

- Finally, check the Plugins option under Menu Settings to enable plugin menus for site admins.
- Hit Save Changes once you’re done.
Congratulations! Your WordPress Multisite network is now up and running, ready to host multiple websites.
How to manage WordPress Multisite network
Now that you’ve set up the network, let’s go through some key features for managing it.
How to add a new website to the network
Once you’ve set up Multisite, you’ll notice your network starts with just one website.
To create a subsite, go to Sites → Add New Site in your Network Admin dashboard and enter the site’s address, title, language, and admin email. Hit Add Site once you’re done.
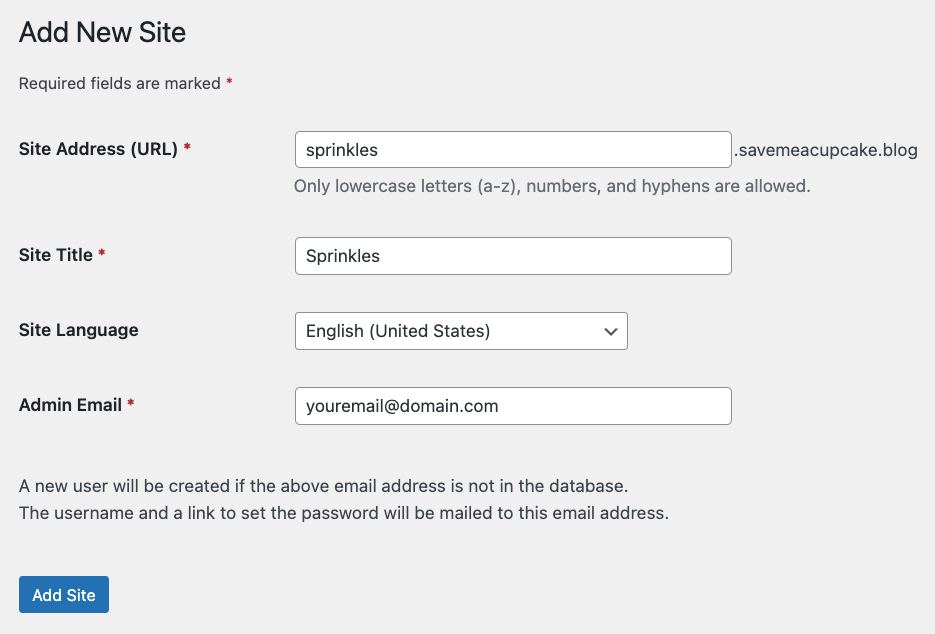
You can manage all subsites in Sites → All Sites, including editing, deactivating, and deleting them. As long as your web hosting plan’s resources support it, you can create as many individual sites as you need.
If you want to assign a custom domain to a WordPress Multisite subsite, follow these steps:
- Buy a domain name from your chosen domain registrar. If you host your Multisite network on Hostinger, getting a domain from us can centralize and simplify all your website-related management. Browse our list of domains for available options ‒ prices start at just $0.99 for the first year.
If you got the domain from the same web host as your WordPress Multisite, skip to Step 3.
- Point the domain to your web host’s nameserver. Remember that DNS propagation can take up to 48 hours to complete.
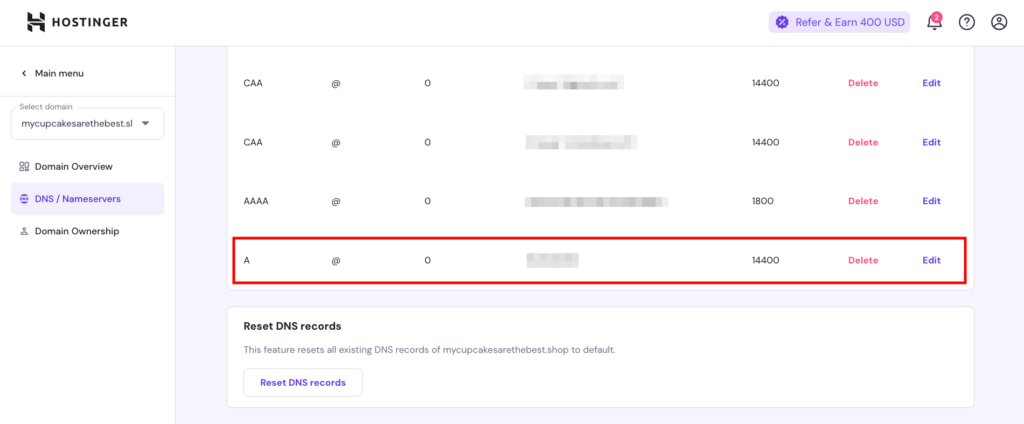
- Update the domain’s A record to point to the IP address of your WordPress Multisite server. If you use Hostinger, add the domain as a parked domain in your hosting account, then update its A record in DNS/Nameservers.
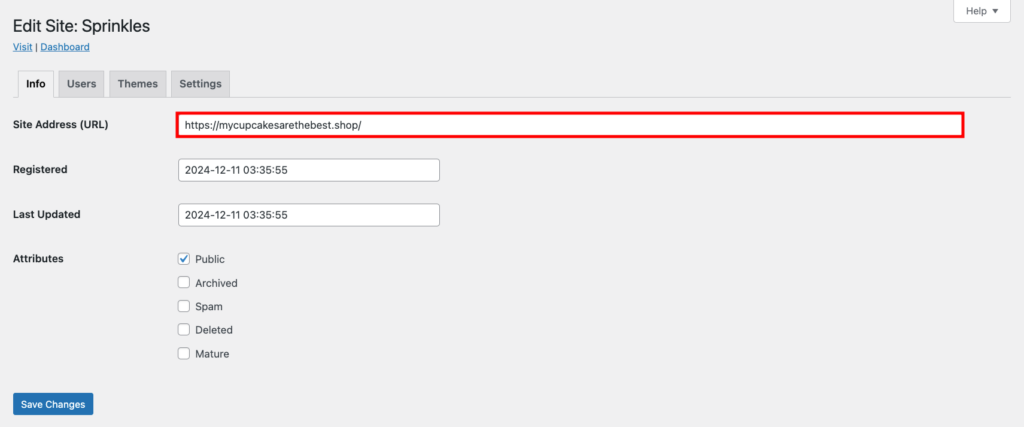
- Map the custom domain to your subsite. Head to Sites → Editor for the subsite you want to customize, then update the Site Address (URL) field with your custom domain. Hit Save Changes once you’re done.
Domain Name Checker
Instantly check domain name availability.
How to add new users to the network
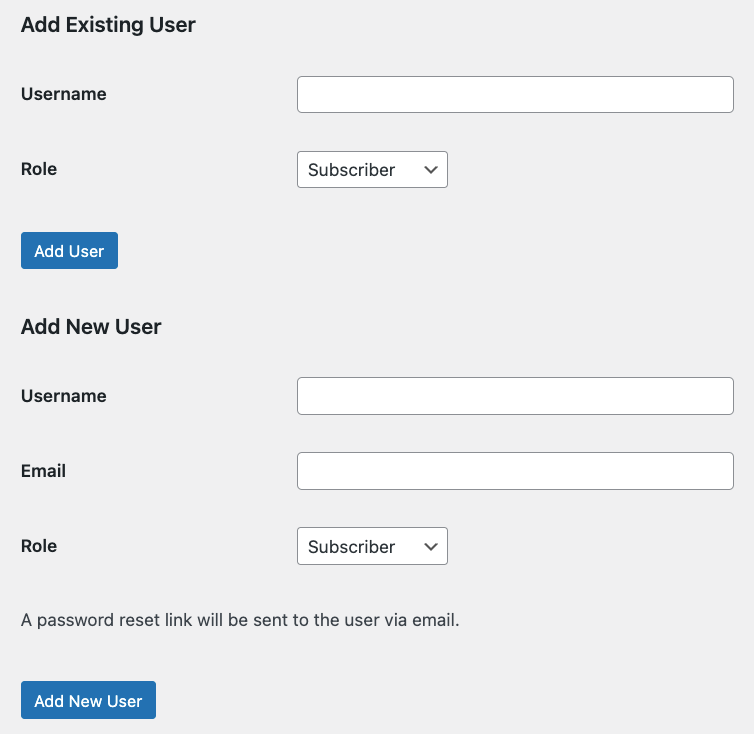
As a super admin, you can add new users as network and site admins. Just go to Users → Add User and fill in their username and email address. After clicking Add User, they will receive an email inviting them to set a password.

To grant super admin privileges, edit the user you just added and check the Super Admin option. Be careful when giving users super admin status, though, as they’ll have full control over your multisite network. It’s usually best to limit this to one person.
You can also create new users and assign roles for a specific subsite. Head to Sites → All Sites and select the number under Users next to the chosen subsite. In the User tab, add existing or new users under the appropriate section.
How to manage themes and plugins in Multisite
The steps to installing themes and plugins are similar to those of a standard WordPress site. The key difference is that the themes and plugins installed by super admins are available across the entire network.
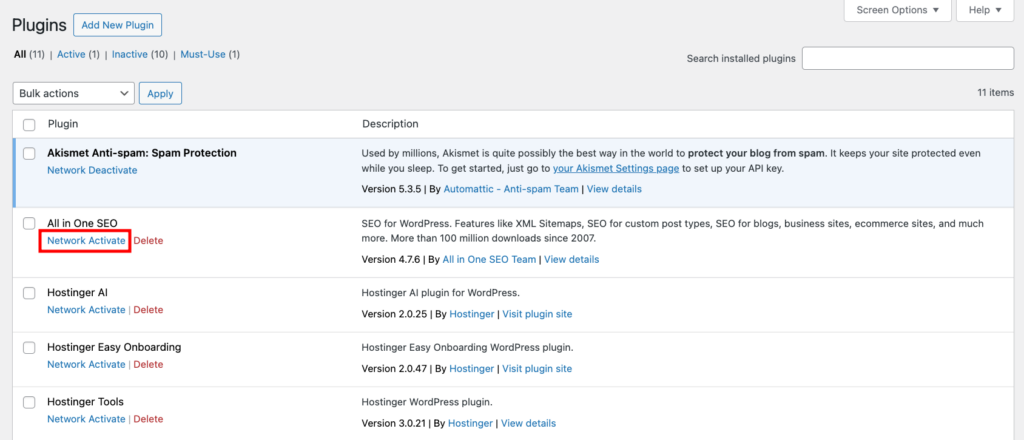
To make a plugin run on all subsites, click Network Activate on the Plugins page. If you don’t, site admins can choose to activate it on their own sites.
With themes, super admins can set them to Network Enable to make them available on all subsites. Each site’s admin can then activate them from their dashboard as needed.
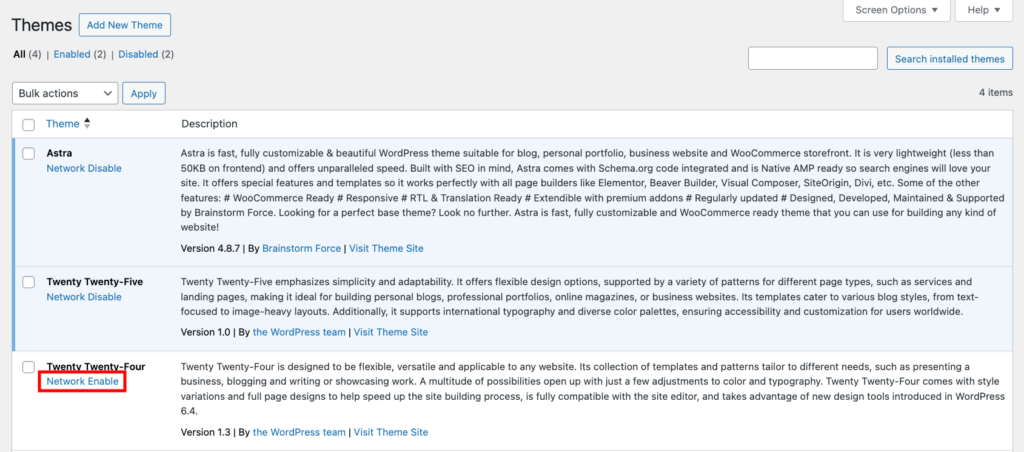
Remember, super admins are responsible for handling plugin and theme updates and removing inactive ones to keep all sites running smoothly.
How to manage media files on WordPress Multisite
All uploaded files (like images, PDFs, or videos) are stored in the installation folder under /wp-content/uploads/sites/. Each subsite gets its own subfolder within this directory, identified by the site’s ID.
For example, the main site uses /wp-content/uploads/, while Subsite 2’s files are in /wp-content/uploads/sites/2/. Each new subsite gets a folder with the next available ID number, keeping everything neatly separated and easy to find.
To find a specific subsite’s folder, go to /wp-content/uploads/sites/ using File Manager or an FTP client.
If you’re not sure of the subsite’s ID number, head to the Sites section in your WordPress Network dashboard. Hover over the Edit button for the subsite, and you’ll see the ID number in the URL. For example, a URL like site-info.php?id=2 means the site ID is 2.
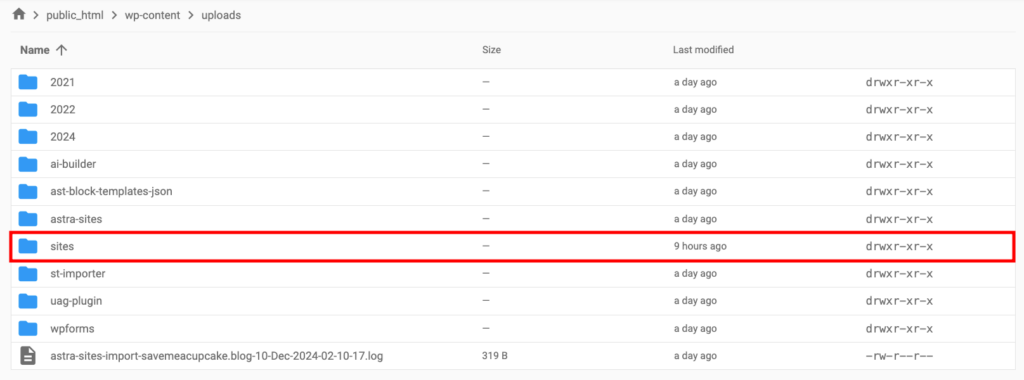
If you need to upload large files or batches that are hard to manage through the WordPress dashboard, upload them directly to the subsite’s folder. You can also delete unused files or download the entire media folder as a backup the same way.
How to manage WordPress Multisite database
WordPress uses a single database to store all the network’s data. It organizes content for each site into separate tables, so every subsite has its own space in the WordPress database while sharing the following core tables:
- wp_users. Stores user information for all users on the network.
- wp_usermeta. Stores additional metadata about users, like roles and capabilities.
- wp_site. Contains information about the network itself, including the network name and domain.
- wp_sitemeta. Stores metadata for network-wide settings.
- wp_blogs. Lists all sites within the network, along with their domains, paths, and statuses.
- wp_blog_versions. Keeps track of the WordPress version each site is running.
- wp_signups. Logs user or site signups if you enable registrations.
- wp_registration_log. Records user registration details for management and tracking.
When a new site is created on a WordPress Multisite network, WordPress generates 11 new database tables for that site, using the site’s ID in the table name. For example, if the site ID is 2, the new database tables are:
- wp_44_posts. Stores all posts, pages, and custom post types.
- wp_44_postmeta. Contains metadata for posts, such as custom fields.
- wp_44_comments. Stores comments made on posts and pages.
- wp_44_commentmeta. Contains metadata for comments.
- wp_44_users. This table isn’t created for individual sites. User data is shared across the network in wp_users.
- wp_44_usermeta. Like the previous table, it contains user meta shared in wp_usermeta.
- wp_44_links. Stores blogroll links if used.
- wp_44_term_relationships. Tracks relationships between content and taxonomy terms.
- wp_44_term_taxonomy. Defines taxonomy types for terms.
- wp_44_terms. Stores tags, categories, and custom terms.
- wp_44_options. Contains the site’s settings and configurations.
Use a database management tool like phpMyAdmin to locate the database table for a specific subsite and its content. See our guide on how to access phpMyAdmin in Hostinger.
Troubleshooting common WordPress Multisite problems
To make sure your WordPress Multisite network runs smoothly, familiarize yourself with these common issues and how to resolve them.
Incorrect domain mapping
This issue often comes from DNS misconfigurations. Start by checking if the A record points to the correct server IP that hosts your Multisite. If you’ve recently made changes, remember that DNS updates can take up to 48 hours to propagate globally.
Next, review your WordPress settings. Go to Sites in the Network Admin dashboard, find the problematic subsite, and edit its settings. Double-check the Site Address (URL) field to make sure it has the correct mapped domain.
Remember to validate the domain’s SSL certificate. Issues with SSL can lead to HTTP/HTTPS mismatches, which you can fix by enforcing HTTPS connections. Check out this guide on forcing HTTPS with .htaccess if you need help.
Outdated caching can also cause trouble. Cached DNS records, server-side caching, or even plugin-based caching might interfere with domain resolution. To resolve this, flush the DNS cache, along with any server and plugin caches.
Lastly, if you’re using a domain mapping plugin, make sure it’s updated and correctly configured.
Incorrect file or directory permissions
File or directory permissions control how the server interacts with your WordPress files. Incorrect permissions can prevent the server from reading, writing, or executing essential files, causing issues in your Multisite network.
To fix this, check current permissions using File Manager or an FTP client. The recommended settings are:
- Files ‒ 644 (the owner can read and write, while others can only read).
- Directories ‒ 755 (the owner can read, write, and execute, but others can only read and execute).
If you’re using Hostinger, fixing permissions is really easy. Just go to Advanced → Fix File Ownership in hPanel, tick the box, and click Execute.
Check out our guide on setting access rights for files and folders to learn how this mechanic works. We also have a dedicated tutorial on changing file permissions in Linux.
Login issue on subdirectory installation
If you can’t log in to subsites after adding or modifying wp-config.php and .htaccess files, it’s likely due to incorrect subdirectory configuration.
To fix this, locate the following line in your wp-config.php file:
define('SUBDOMAIN_INSTALL', true);
Change true to false so it reads:
define('SUBDOMAIN_INSTALL', false);
This change configures WordPress to use a subdirectory-based Multisite setup instead of subdomains.
Users not getting activation emails
If new users aren’t receiving the activation email to access subsites, you might have issues with email configuration or server settings.
To improve email deliverability, set up WordPress SMTP to send emails through a reliable third-party provider instead of relying on your host server’s default PHP mail() function.
SMTP ensures a more secure and reliable email delivery process, reducing the chances of emails being marked as spam or failing altogether.
Conclusion
Setting up a WordPress Multisite network makes managing multiple websites easier. It speeds up repetitive tasks (like updates) and keeps shared data and design consistent while still giving each site the freedom to have its own content and settings. That’s why it’s such a popular choice for organizations, schools, and businesses with multiple sites.
We’ve covered everything from setting up your Multisite network to managing it and troubleshooting common issues. If you’re still unsure, weigh the pros and cons and explore common use cases to decide if it’s the right fit for you.
Did you find this article helpful? Leave your questions in the comments below. Good luck!
WordPress Multisite FAQ
Can I set up a multisite on an existing WordPress site?
Absolutely! By default, Multisite will use subdomains for new sites. You can switch to subdirectories, but it requires changing several settings and core files ‒ so it’s not the most beginner-friendly process.
Does multisite affect SEO?
Multisite doesn’t directly impact SEO, but its setup can. Subdomains might spread SEO value across sites, while subdirectories can benefit from shared domain authority. In the end, focusing on good SEO practices, like unique content and avoiding duplicates, is what really matters.
What is the limit for WordPress multisite?
There’s technically no limit to how many sites you can have in a WordPress Multisite network. As your network grows with more sites, users, and traffic, performance may slow unless your hosting resources can keep up.


Comments
October 14 2017
Hello, why isn't my 'Network Setup' option in the 'Tools' tab not showing up? I have done all the proper procedures and step by steps you mentioned. thank you in advance for the reply :)
January 17 2018
Some really interesting information. Well written and broadly speaking - user friendly!
August 11 2020
I've tried a lot to set up wordpress multisite using the sub-domains option but it's not working. When I tried the sub-directories, it worked properly. I need your help to set it up for sub-domains.
November 11 2020
Hey there Ali. You can only set multisite with sub-directories on all plans except a VPS :)
January 11 2022
I appreciate, cause I found exactly what I was taking a look for. You have ended my 4 day long hunt! God Bless you man. Have a nice day. Bye
January 11 2022
Happy to know we helped!
February 23 2022
Hi there we have recently moved to Hostinger and have a few MultiSites we are wanting to create, can you please do a walk through on how to create other domains on the multisite NOT subdomains or subdirectories: e.g. MainSite.com = Site ID 01 - NewSite1.com = Site ID 02 - NewSite2.com = Site ID 03 ... I have been able to do this on other hosting providers but on Hostinger it is not working... Please provide a step by step process to make this scenario work. Thanks
March 01 2022
Hi there, Hostinger uses a custom hPanel (not commonly used cPanel), so the file structure for your addon websites is quite different. In this case, you'll simply need to add the new sites as addon domains and then follow this guide to see how to use Hostinger's file manager. If you're having any trouble, feel free to contact our 24/7 Customer Success team!
January 29 2025
Can someone tell me if Multisite WordPress with subdomain could work on a business plan?
February 05 2025
Yes, Multisite support is available on all of Hostinger’s Managed WordPress hosting plans. The Business plan is a great choice for this :) You can follow this guide to activate WordPress Multisite for detailed steps.